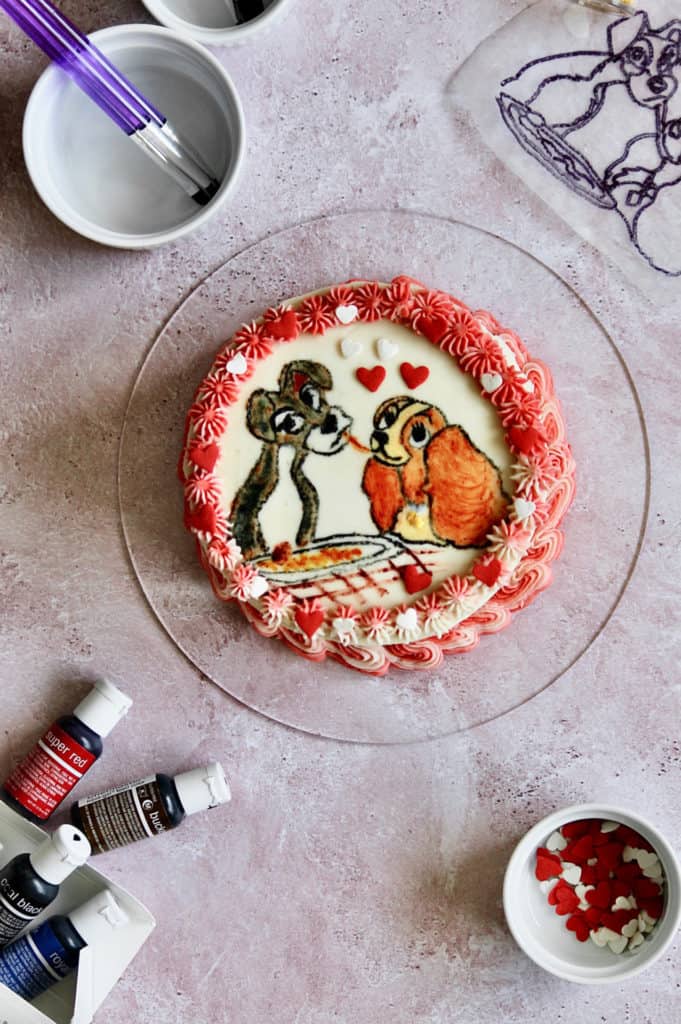
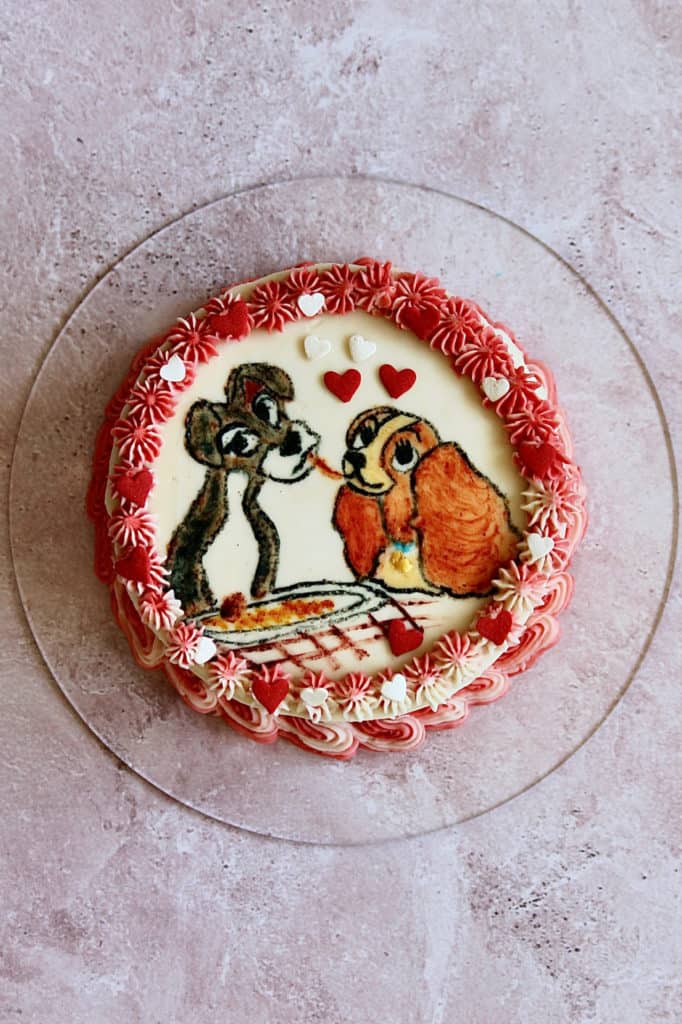
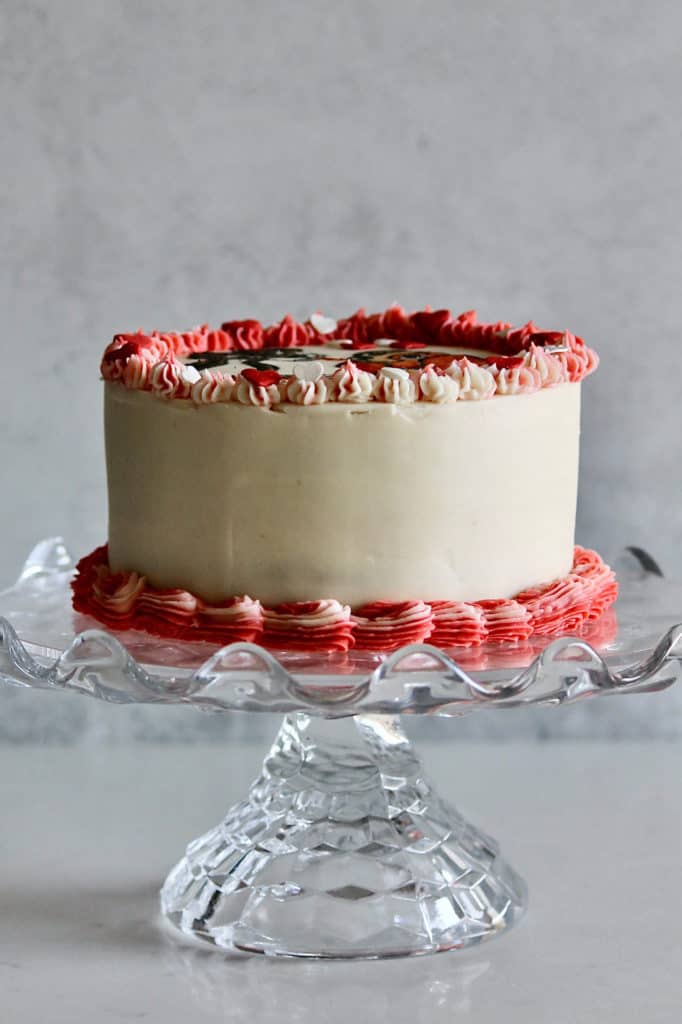
There are few movie moments more iconic than the famous dinner scene from Lady and the Tramp. You know the one, where romance blossoms over a plate of spaghetti and meatballs. While not the most realistic love story, I figured a Lady and the Tramp cake *would* be pretty cute nonetheless. So here with a cake decorating tutorial in time for Valentine's Day, I'm sharing tips on making this Lady and the Tramp cake! While it's certainly detailed, it actually took under an hour to create that design on top. I'll show you how you can recreate this cake, too!
Preparing to Make Your Own Lady and the Tramp Cake
While this cake design may appear intricate, if you've done much cake decorating before, you probably already have all the equipment you need. Below I've listed out the tools that helped me with this cake. They are also tools I return to with many of my cakes, and some of them, like toothpicks, are basic household items.
- Set of small food-safe brushes for cake decorating like this one from Wilton
- Offset spatula
- Toothpicks for your food gels
- Containers like shot glasses, mugs, or ramekins for mixing your food gels
- Thumbtacks, T-pins, sewing needles, or another object with a very fine point to trace the details of the Lady and the Tramp scene
- Wax paper and pen or permanent marker for tracing the movie scene onto your cake
Below are some items I'd call optional (though still very helpful). That said, I highly recommend purchasing and investing in tools like these if you want to get serious about upping your cake decorating game!

- A cake turntable as well as disposable or reusable cake circles
- A set of piping bags and tips - if you want to recreate the border here, fit one piping bag with a Wilton 32 tip or similar open star tip
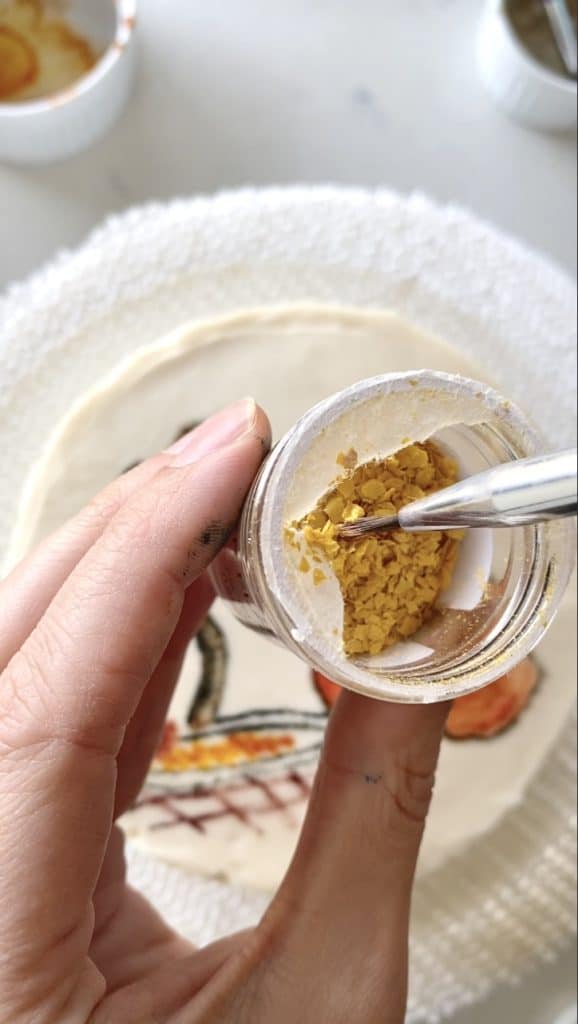
- Gold flakes or paint for the tag on Lady’s collar.
- Heart-shaped sprinkles for more love in the air
Purchasing the more "Extraneous" Cake Supplies
You don't lots of fancy equipment and products to make a cake. But I do think there's something to be said for buying a product here or there that you'll continue to use repeatedly.
I've amassed a pretty solid sprinkle collection from a few places. Sweetapolita and Sprinkle Pop have lots of options with glitz, glam, and flair. I also love the sprinkles and cake supplies from Layer Cake Shop. My edible gold flakes for Lady's collar as well as the heart sprinkles both came from there.

Also, high-quality food gel is worth ordering. You can buy some decent options from the grocery store; my local Harris Teeter sells nice (but small) sets of Wilton gel. I like Wilton food gel, though here I used Chef Master. I’ve heard great things about Americolor, too. Any of these (or another brand of food gel) should work fine.
And edible glitter is so fun! I get mine from Bakell. While I didn't use that here, you definitely could. Who doesn't love a little sparkle?! I now regret not adding more to this cake...
Steps for Making this Lady and the Tramp Cake
To make this design, you'll of course need a cake. When I'm more focused on decorating a cake, I'll buy a cake box mix and use that as my base. If you're looking for a homemade white frosting to coat this one, my vanilla buttercream would be great here!
Coat your cake in a thick, smooth layer of white-colored frosting, and let it chill in the refrigerator until firm to the touch (at least 15 minutes).
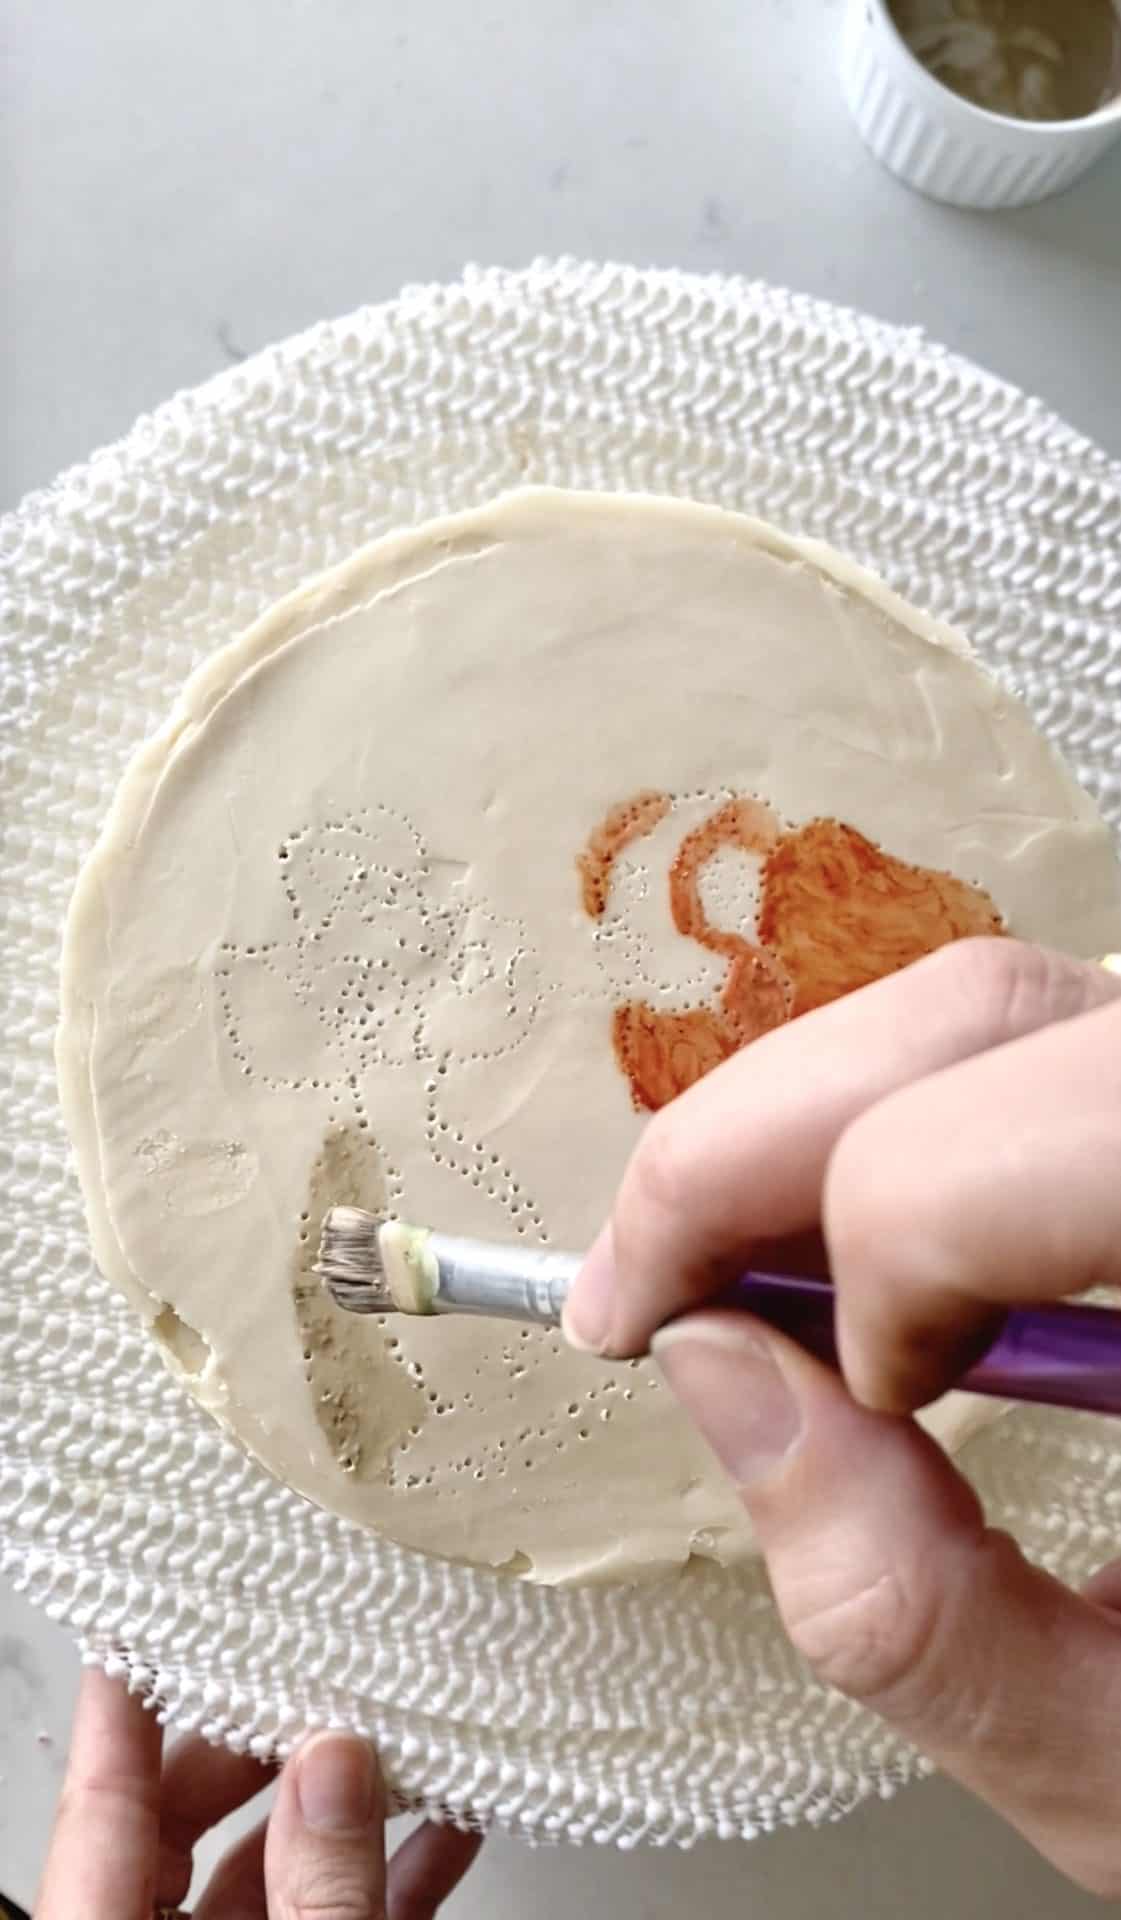
As your cake chills and buttercream hardens, size and print the meatball scene from Lady & the Tramp to cover the middle third of your cake. It helps to print an image with a stronger contrast (or boost it yourself on Canva or even Microsoft Word) so you can more easily see the lines when you go to trace them.
On your piece of wax paper, use a permanent marker to trace the outline of Lady and Tramp, as well as their plate of spaghetti and meatballs.
Chilling your cake is important here so that in your next step, your buttercream isn't a smudged mess.
Bring your cake out of the refrigerator and once buttercream has hardened, attach wax paper to the cake using thumbtacks or T-pins. Punch tiny holes through the wax paper to create a faint outline of all the details.


Remove the wax paper to begin painting!
Setting Up Colors for Painting this Cake
Pour a drop of your red, yellow, brown, and black food gels into your four respective small containers. You’ll ultimately need yellow and an orange-y red color for Lady’s fur as well as the meatballs. You’ll be creating a brownish color for Tramp’s fur and using a touch of red for the color of his inner ear.
Add ¼ teaspoon of powdered sugar and ½ teaspoon of clear extract to each of these bowls. Combine all ingredients together in your respective containers with the food safe paintbrush you plan to use for each of the colors. Add more powdered sugar or extract to each bowl as needed to achieve a paste-like consistency. Compare your food gel colors to your original printed image and lighten or darken as needed. Your design will not be large (even if you're decorating a cake bigger than my 6" one), so you don’t need a ton of paint here. A little goes a long way.
For my colors, I took tiny amounts of brown and added that to my red to darken it. Once I painted the yellow of Lady’s fur, I also added that to the red to create a more burnt-orange color for lady’s fur.
Tips for Painting your Lady and the Tramp Cake
Set your frosted cake on a cake stand or turntable, ideally with a cardboard or reusable cake circle underneath it.
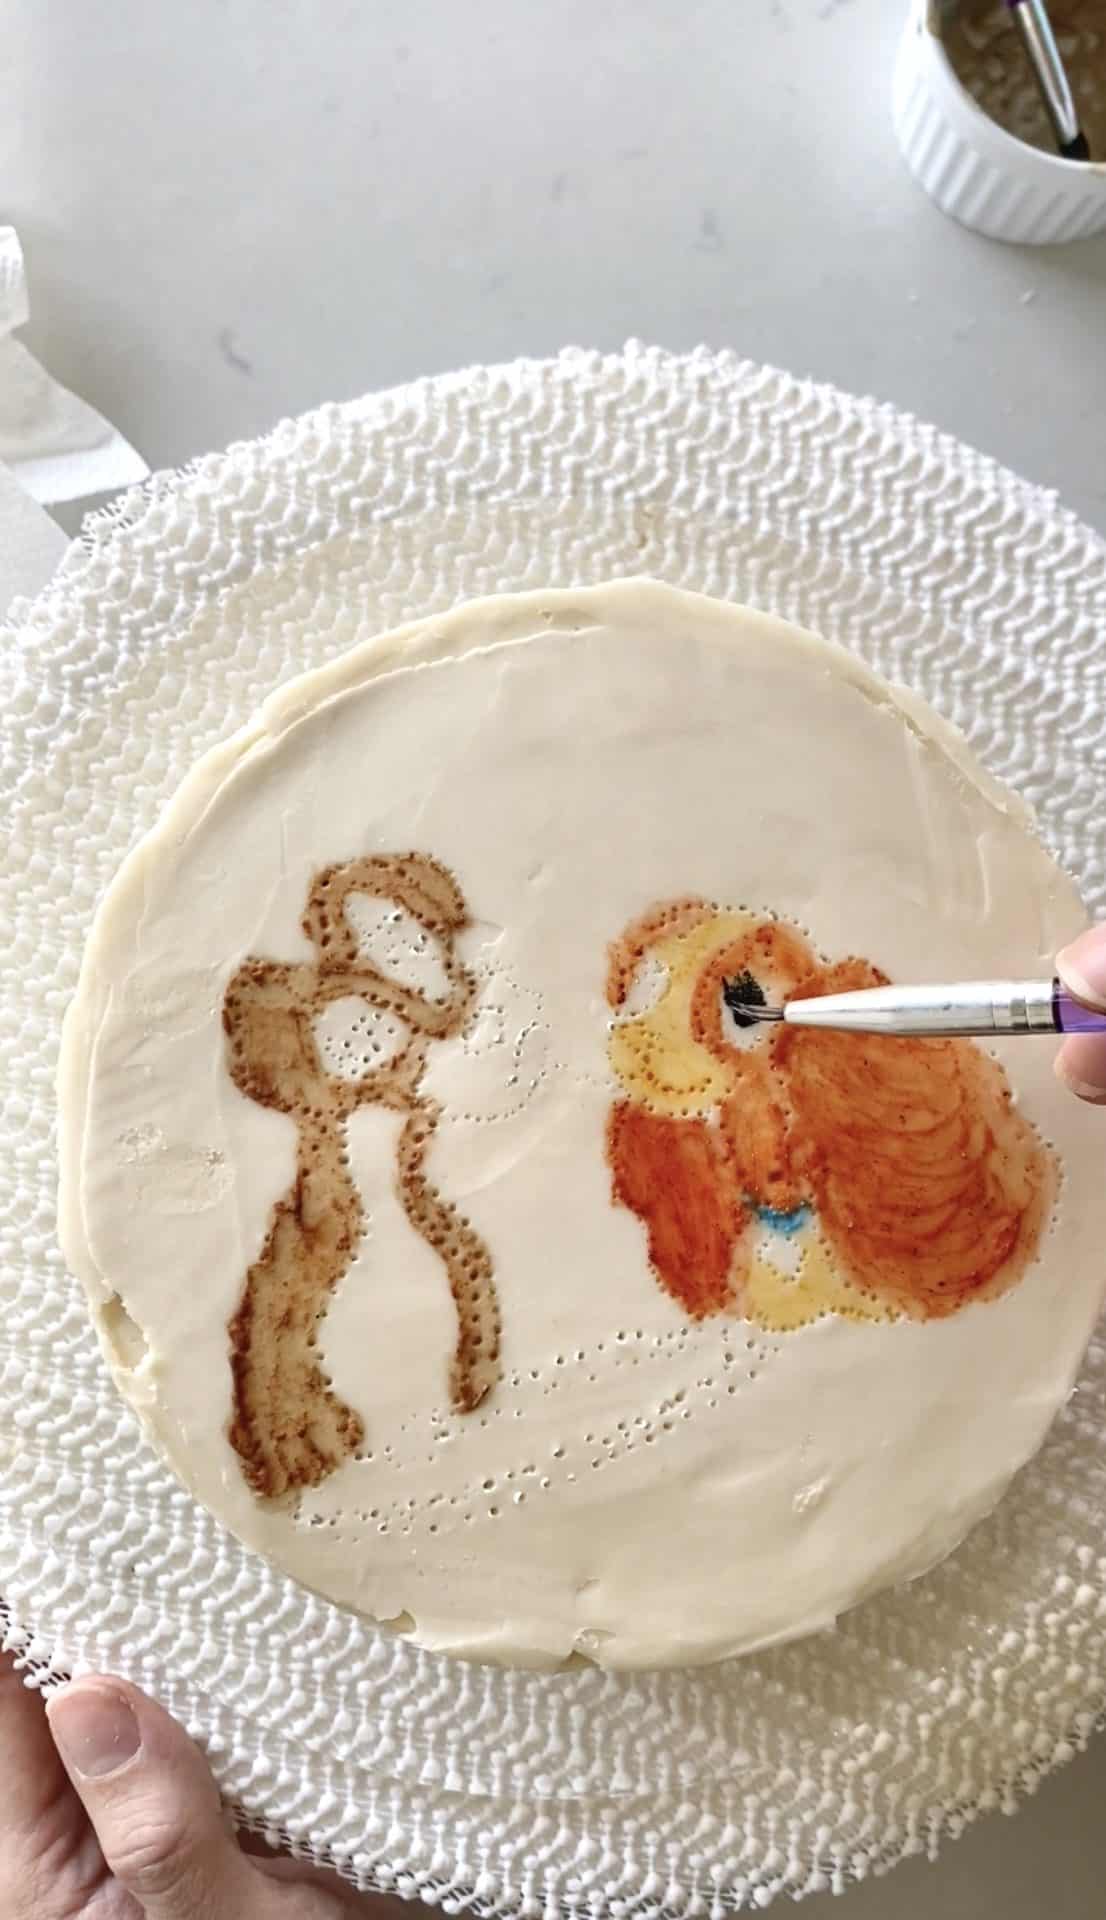
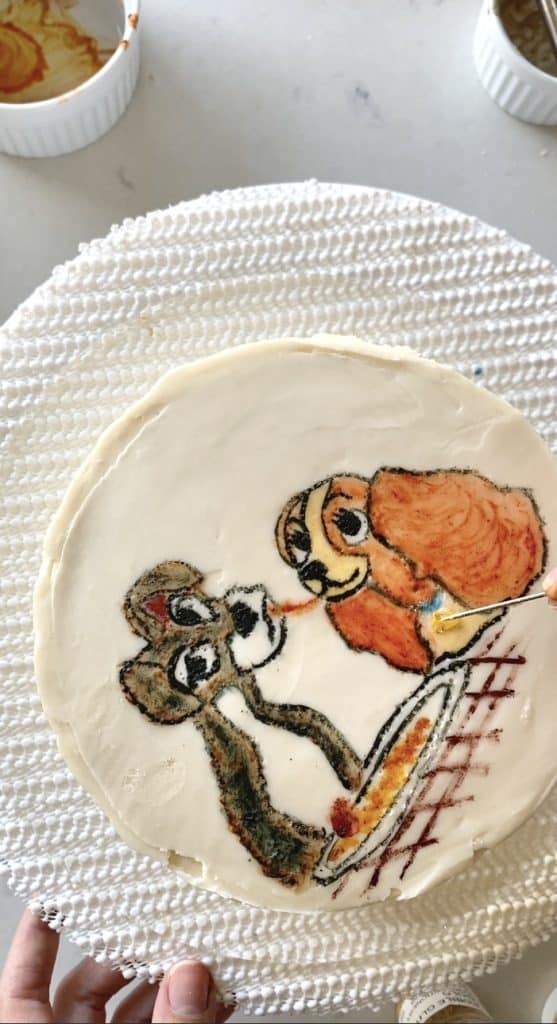
Fill in the colors of the scene, starting with the lightest colors. This entire step took me about 30 minutes.


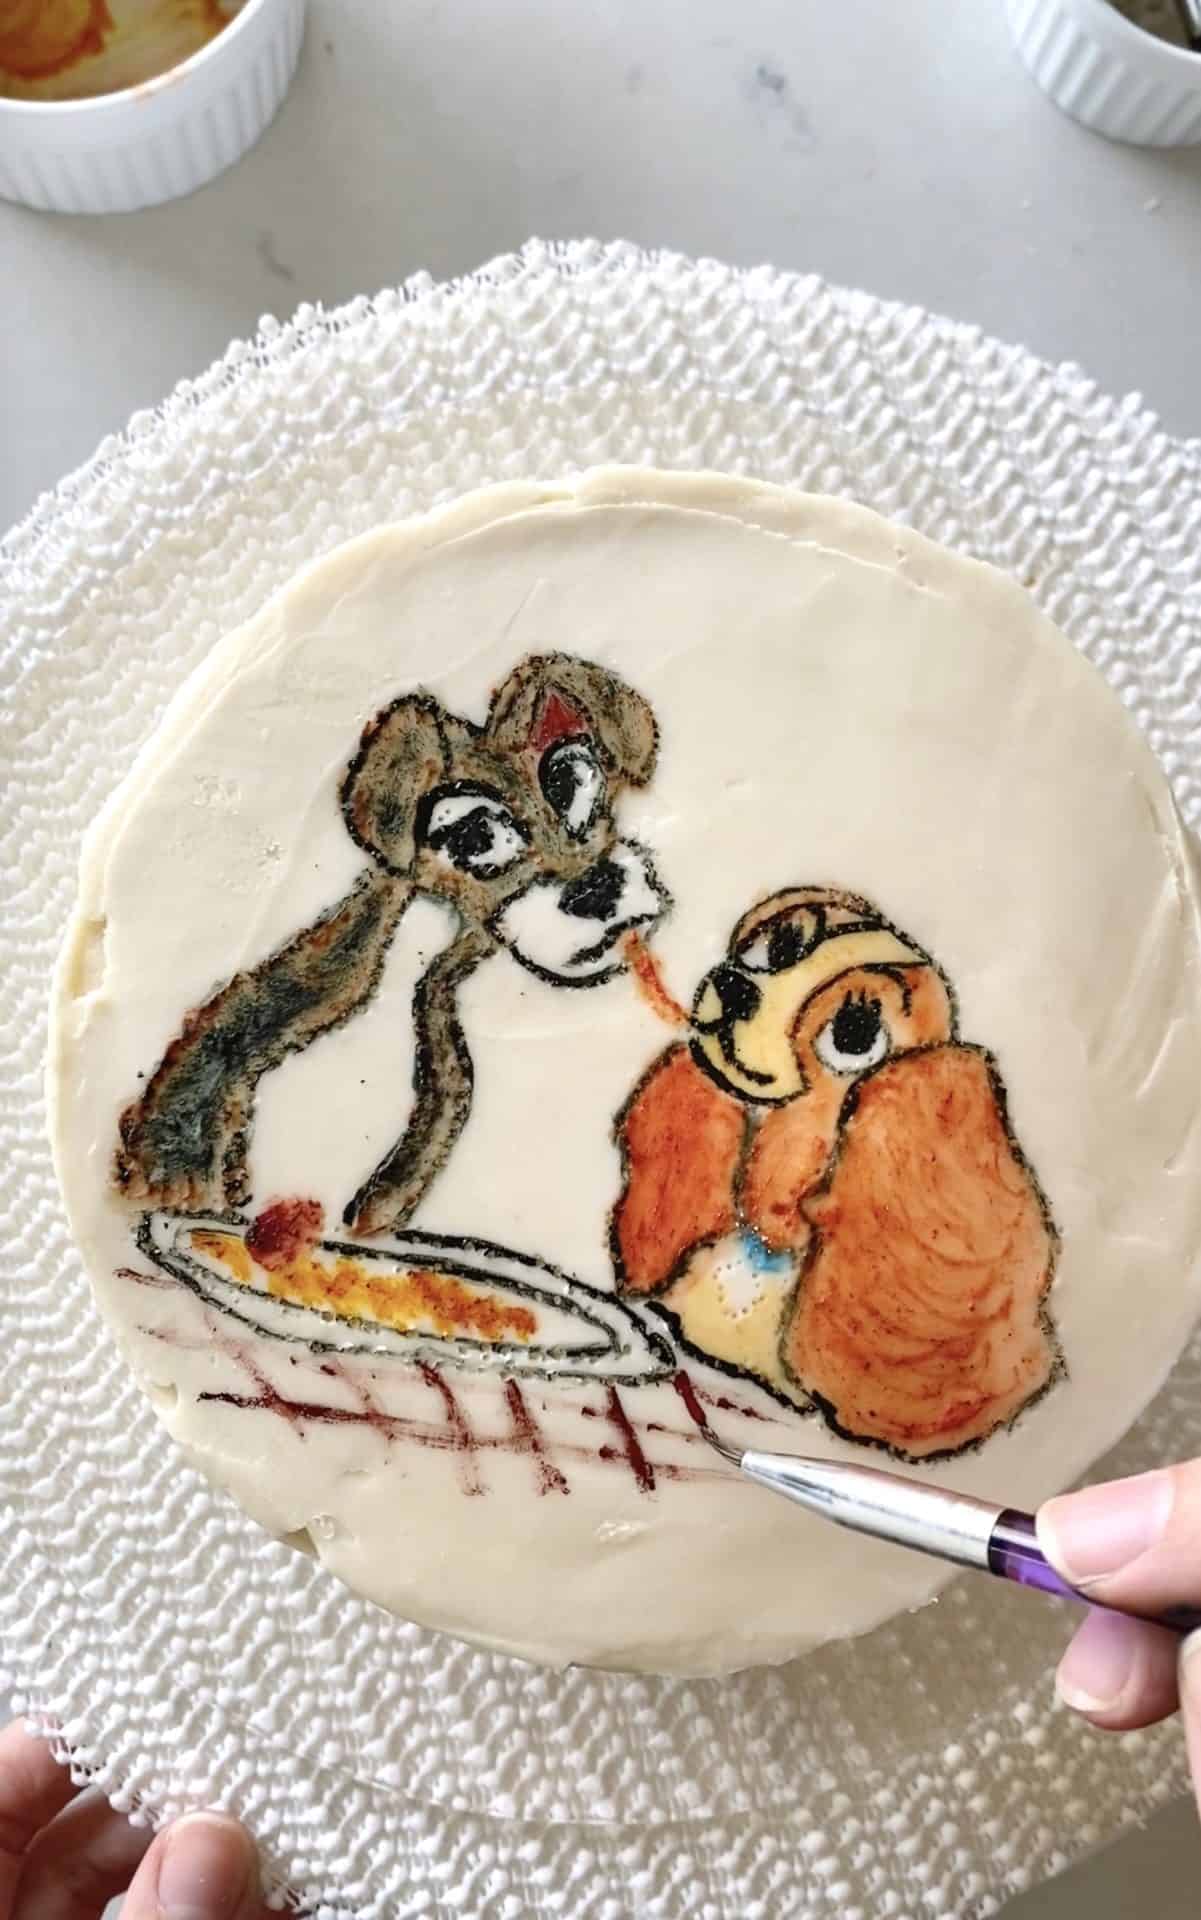
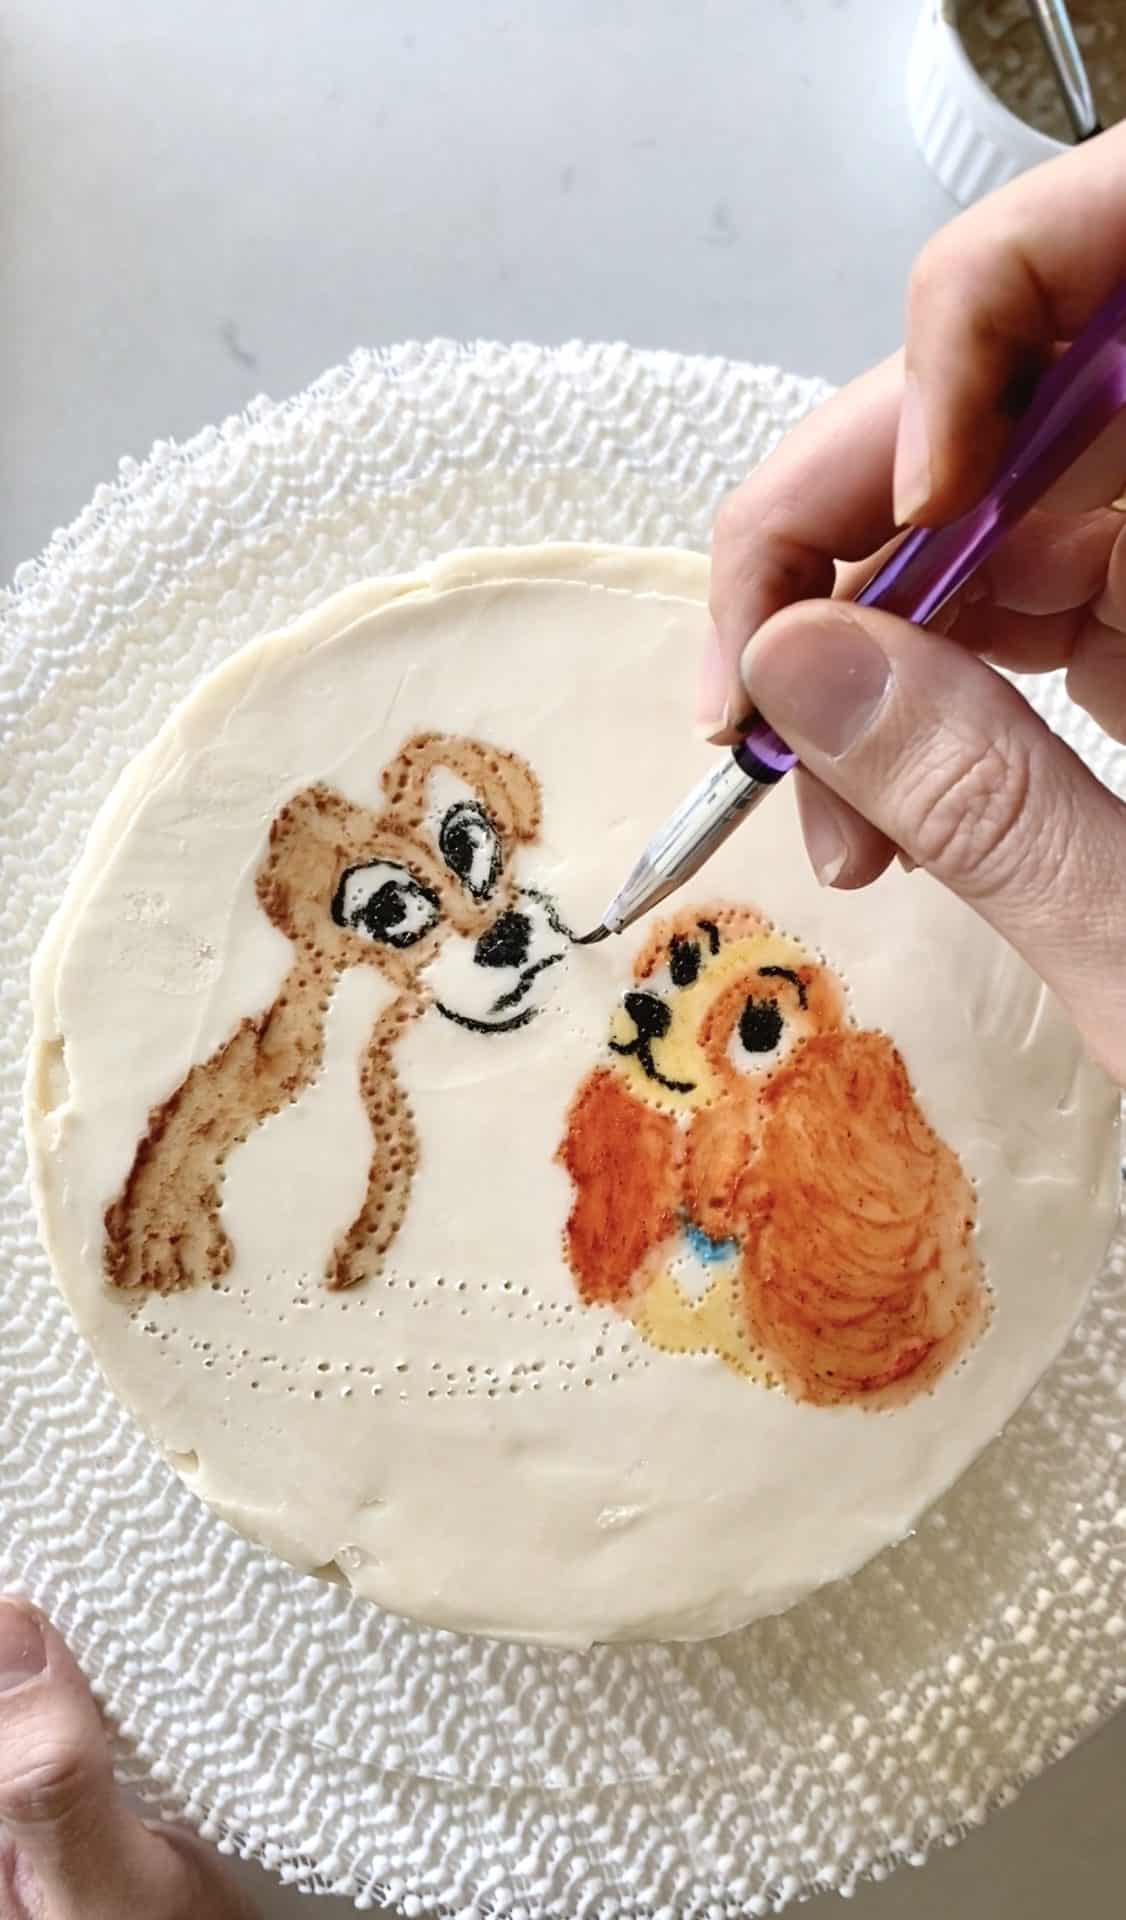
Once you’ve filled in all the interior colors, dip your thinnest food paintbrush into your black food gel to outline all the features. This took me about 15 minutes.
Once done, if desired, dip a clean food-safe paintbrush until your bottle of blue gel and paint a thin stripe for Lady's collar. Press gold flakes beneath it for the tag.

To make a border, with some of your leftover white frosting, dye it red, and put it into a piping bag fitted with an open star tip, like Wilton 32. Pipe around the cake’s top and/or bottom as desired.
Place some heart-shaped sprinkles around your piping for a little additional romance!
More Cake Tutorials
Looking for a cake design with fewer steps or tools? My textured buttercream cake tutorial is one you can recreate at home in under an hour. And you only need three piping tips (or fewer - tweak it with whatever tools and piping tips you already have!).
And if you recreate this Lady and the Tramp cake (or any of my others), I'd love to see you tag me on social media so I can find it!
Print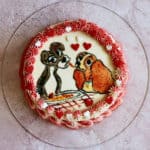
Lady and the Tramp Cake
- Total Time: 1 hour
- Yield: One 6" 2-layer cake 1x
Description
Seldom has there been a sweeter romance in a movie than the one in the famous meatball scene from Lady and the Tramp. And adding this image to cake only makes it sweeter!
Ingredients
For painted design:
- 1 cake,
- White frosting, like my vanilla buttercream recipe
- 1-2 drops of brown food gel
- 1-2 drops of red food gel
- 1-2 drops of black food gel
- 1-2 drops of yellow food gel
- Optional for Lady’s collar: The teeniest drop of blue food gel
- A few teaspoons of clear extract (like almond, lemon, or another flavor you choose)
- A few teaspoons of powdered sugar
Equipment:
- Set of 3-4 food-safe brushes for cake decorating
- Offset spatula
- Toothpicks for your food gels
- Printed image of iconic meatball scene from Lady and the Tramp
- Minimum of 4 small containers like shot glasses, mugs, or ramekins for mixing your food gels
- Thumbtacks, T-pins, sewing needles, or another object with a very fine point to trace the details of the scene
- Wax paper and pen or permanent marker for tracing the scene onto your cake
- Optional but helpful: A cake turntable as well as disposable or reusable cake circles
- Optional: A piping bag with a Wilton 32 tip or similar open star tip with the frosting color of your choosing for the border
- Optional: Gold flakes or paint for the tag on lady’s collar.
- Optional: Heart-shaped sprinkles for more love in the air
Instructions
Preparing your cake and design:
- Coat your cake in a thick, smooth layer of white-colored frosting, like my vanilla buttercream and let it chill in the refrigerator until firm to the touch (at least 15 minutes).
- Meanwhile, size and print the meatball scene from Lady and the Tramp to cover the middle third of your cake. It helps to print an image with a stronger contrast (or boost it yourself on Canva or even Microsoft Word) so you can more easily see the lines when you go to trace them.
- As your cake continues to chill and buttercream hardens, on your piece of wax paper, use a permanent marker to trace the outline of Lady, Tramp, and their plate of spaghetti and meatballs.
- Bring your cake out of the refrigerator and if/when buttercream has hardened, attach wax paper to the cake using thumbtacks, needles, T-pins, or something similarly small and sharp. Punch tiny holes through the wax paper to create a faint outline of all the details.
- Remove the wax paper to begin painting.
To create the painted design:
- Pour a drop of your red, yellow, brown, and black food gels into your four small containers. You’ll ultimately need yellow and an orange-y red color for Lady’s fur as well as the meatballs. You’ll be creating a brownish color for Tramp’s fur and using a touch of red for the color of his inner ear.
- Add ¼ teaspoon of powdered sugar and ½ teaspoon of clear extract to each of these bowls. Combine all ingredients together in your respective containers with the food safe paintbrush you plan to use for each of the colors. Add more powdered sugar or extract to each bowl as needed to achieve a paste-like consistency. Compare your food gel colors to your original printed image and lighten or darken as needed. Your design will not be large, so you don’t need a ton of paint here; a little goes a long way.
- For my colors, I took tiny amounts of brown and added that to my red to darken it. Once I painted the yellow of Lady’s fur, I also added that to the red to create a more burnt-orange color for Lady’s fur.
- Set your frosted cake on a cake stand or turntable, ideally with a cardboard or reusable cake circle underneath it.
- Fill in the colors of the scene, starting with the lightest colors. Once done, if desired, dip a clean food-safe paintbrush until your bottle of blue gel and paint a stripe for Lady's collar. Press gold flakes beneath it for the tag. All of step #4 took me about 30 minutes.
- Once you’ve filled in all the colors, dip your thinnest food paintbrush into your black food gel to outline all the features. This took me about 15 minutes.
- To make a border, with some of your leftover white frosting, dye it red, and put it into a piping bag fitted with an open star tip, like Wilton 32. Pipe around the cake’s top and/or bottom as desired.
- Place some heart-shaped sprinkles around your piping for a little additional romance!
- Prep Time: 15 minutes
- Decorating Time: 45 minutes
- Category: Cakes
- Cuisine: American

Crissy
So helpful. Love it!
Susan
Thank you, and I had such a fun time creating this cake design! 🙂