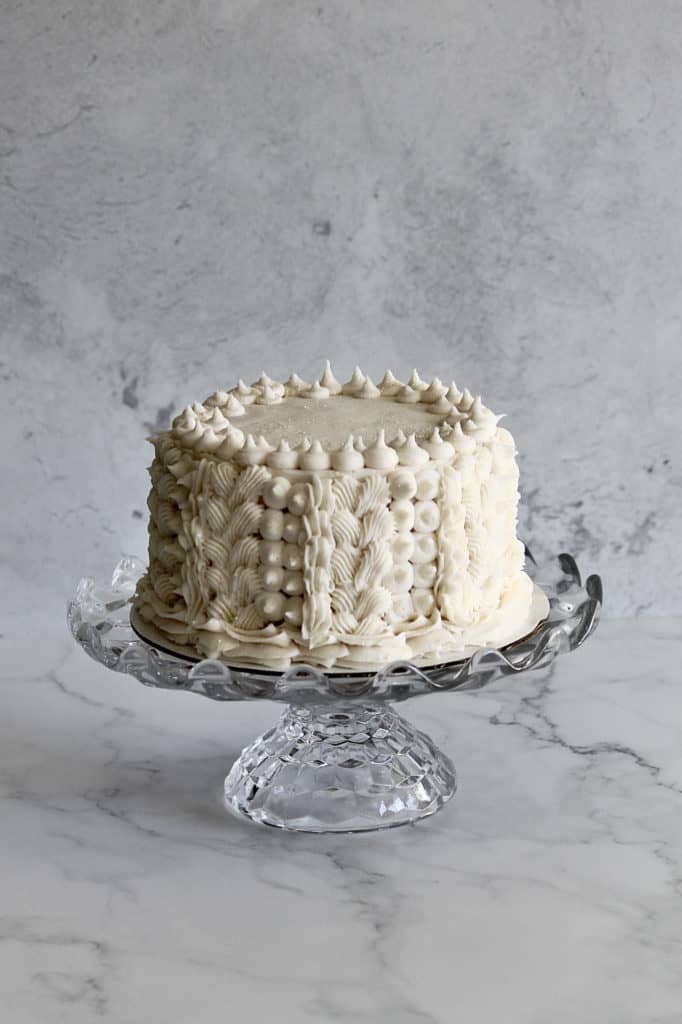
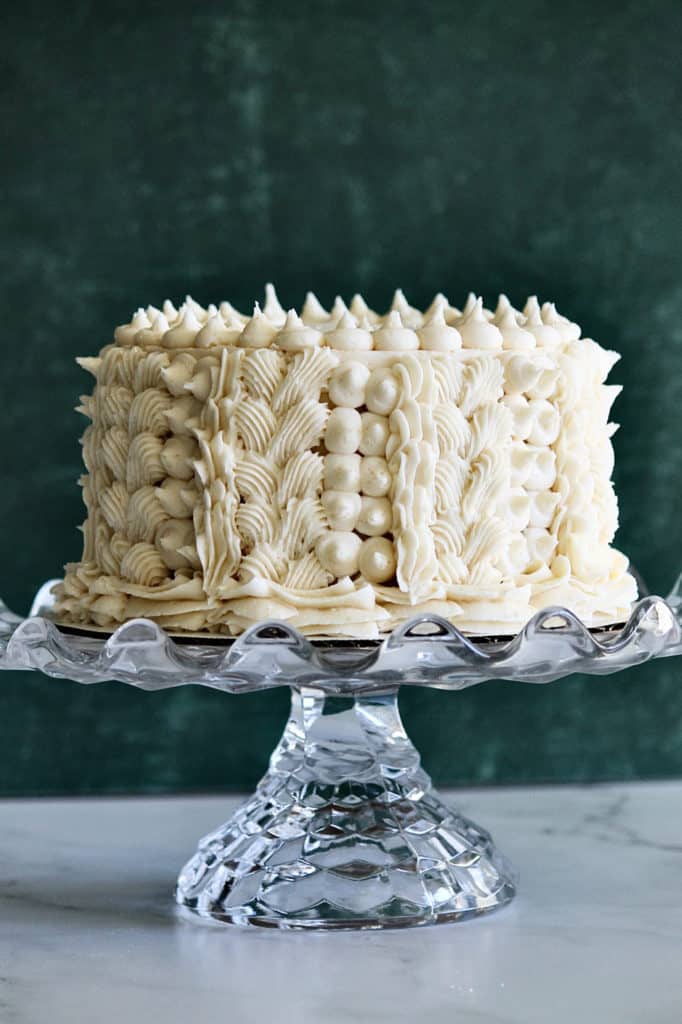
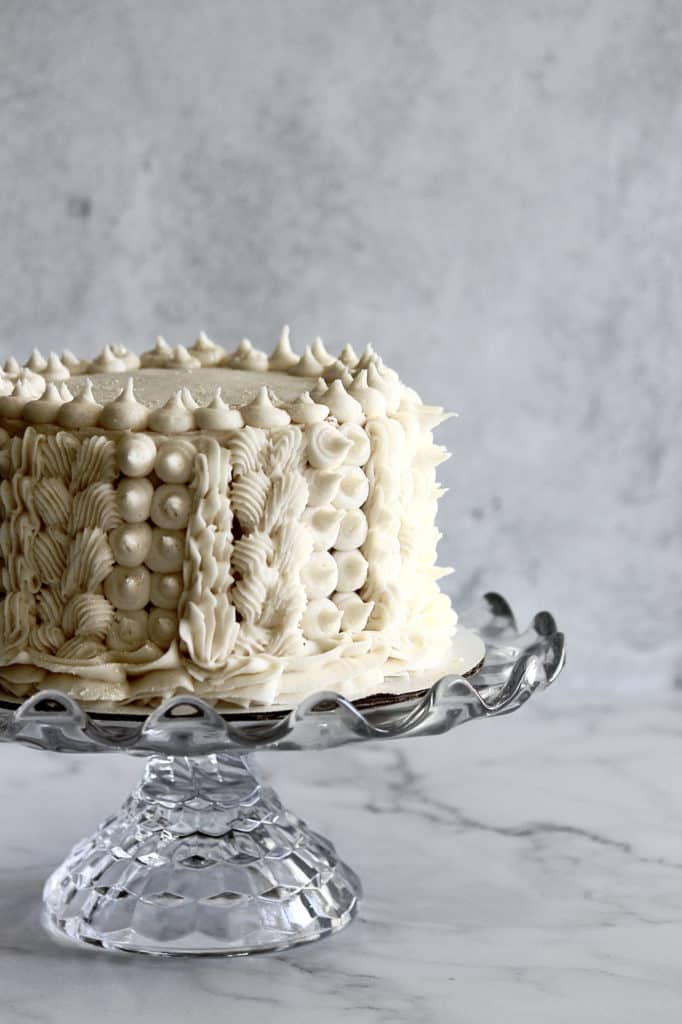
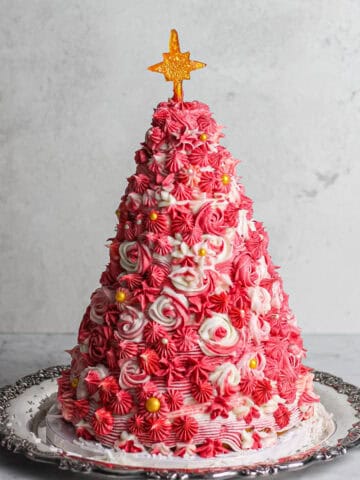
After Googling and brainstorming a slew of cake ideas and designs, I dreamed up my own white textured buttercream cake that you see here. I wanted it to be a playful cake, with all its textures, but also make it a bit more elevated. Something about a bright white cake feels classy and right for any time of year. Let me show you how you can recreate this buttercream cake at home.
Why You'll Love this Textured Buttercream Cake
Over the holidays, I gifted this cake to a family member! The inside layers come from this Southern Living eggnog cake recipe. I actually made the four layers in that linked cake but then made two 2-layer cakes from it. The design you see here is how I decorated one of those two small cakes!
And while I was proud of this cake's exterior, my favorite part was how quickly it came together. This buttercream cake tutorial would be great for beginners because it allows you to play with a variety of piping tips and textures. If you make mistakes, it's pretty easy to scrape them down here or cover them up with your piping tip and design of choice.
Although I wrote out the steps I followed, you could definitely tweak this process to your comfort level. Don't know how to create a shell border for your cake? Pipe dots of buttercream around the base instead! Only have one or two piping tips available to you? Then use those!
While this cake design only uses three piping, it looks a bit more intricate because of the repetition in this final look. But my hand is not so steady that I did this all by sight! Thanks to a handy toothpick, I drew some lines on my cake and used them to guide me throughout this process.
Backstory on this Winter Cake Design
I love the look of a bright white cake. I was going for a unique, fancier Christmas cake, but you could totally play with this design and its colors any time of year. It's a fun and easy winter cake idea, but I will definitely return to this style throughout other seasons.
This tutorial is especially helpful if you want easy steps for decorating your cake and don't have time for more complicated designs. Below are the steps for making this textured buttercream cake! Covering it with frosting literally took under half an hour. Quick cake designs are the best.
Basics of Creating this Textured Buttercream Cake

Place your first of two 6" cake layers onto your cake circle and turntable or whatever surface you're using to decorate your cake.
Using a spoon or offset spatula, spread a light, even coat of buttercream atop that cake layer. Your cake will be covered in a lot of buttercream so no need for a particularly thick amount of frosting between layers.
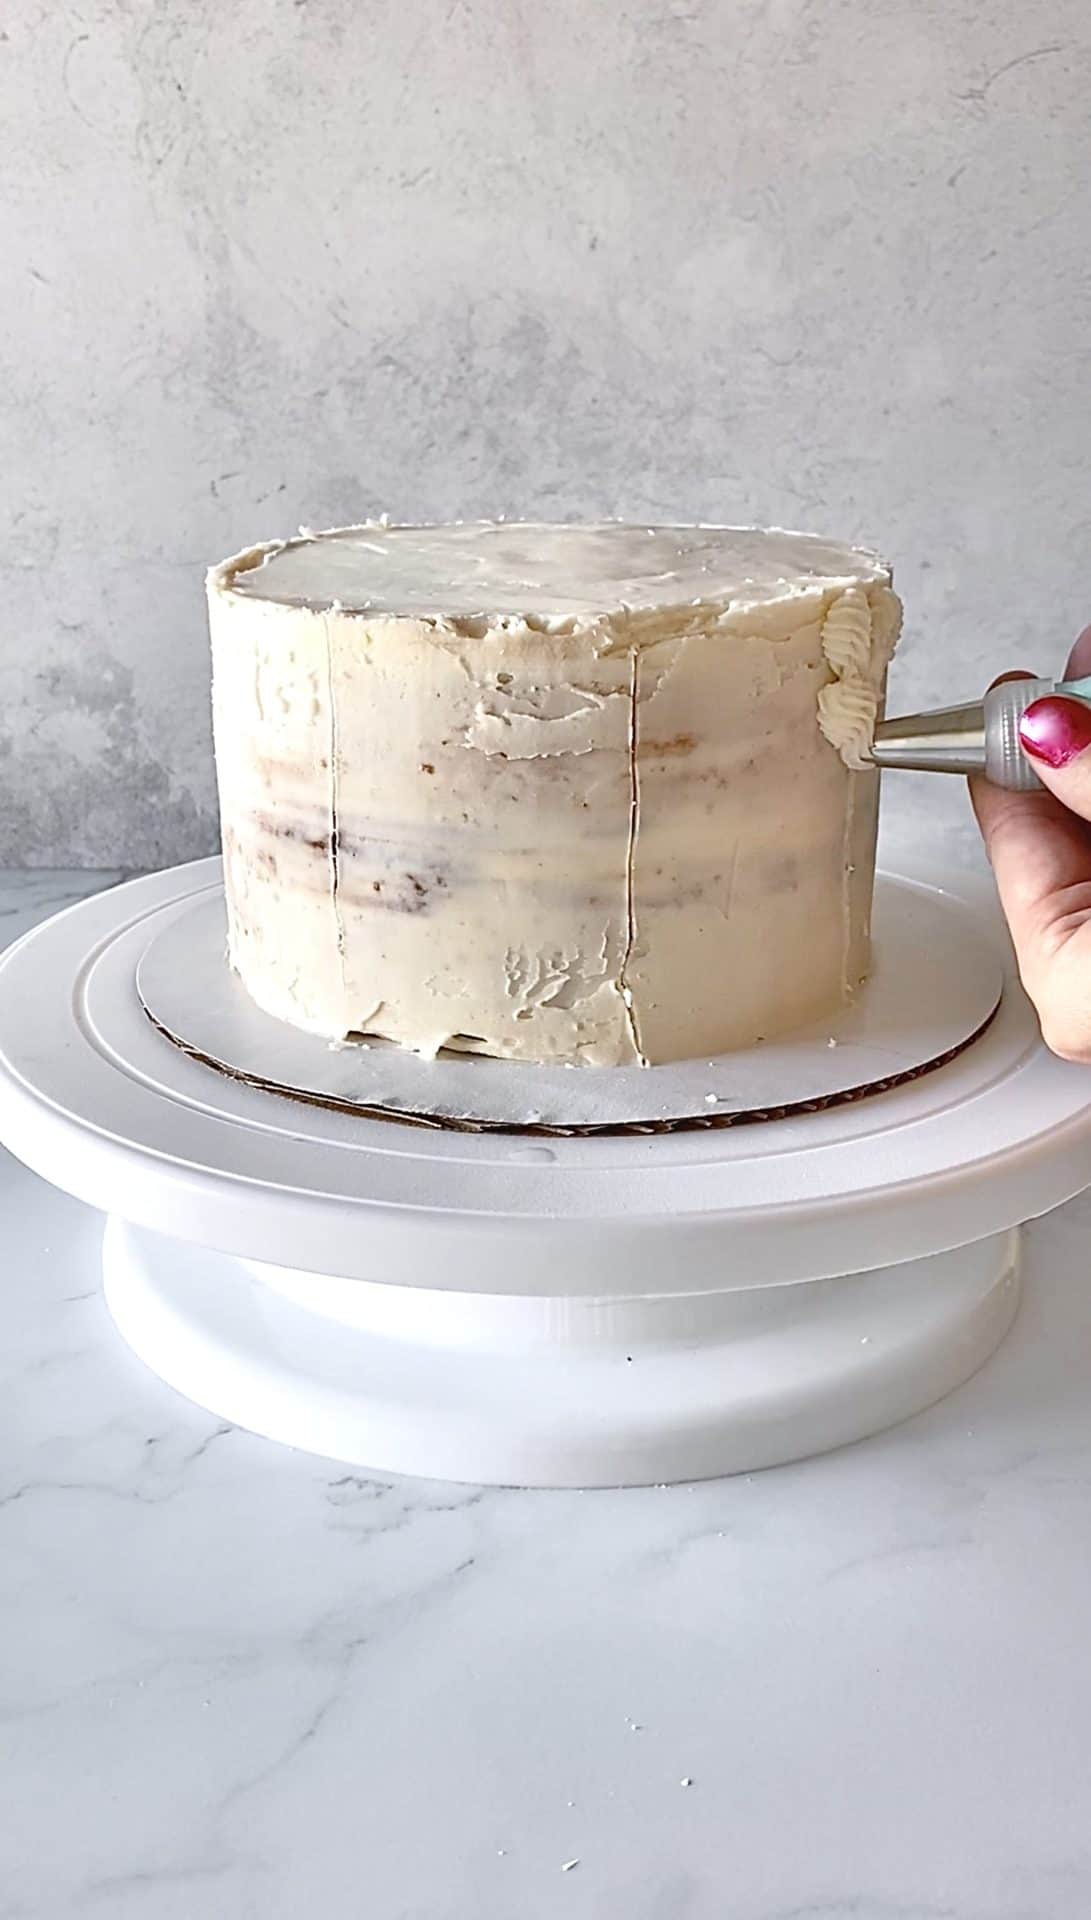
Stack your next 6" cake layer on top of the first one. Use your offset spatula and cake scraper to apply a thin crumb coat all over your cake.

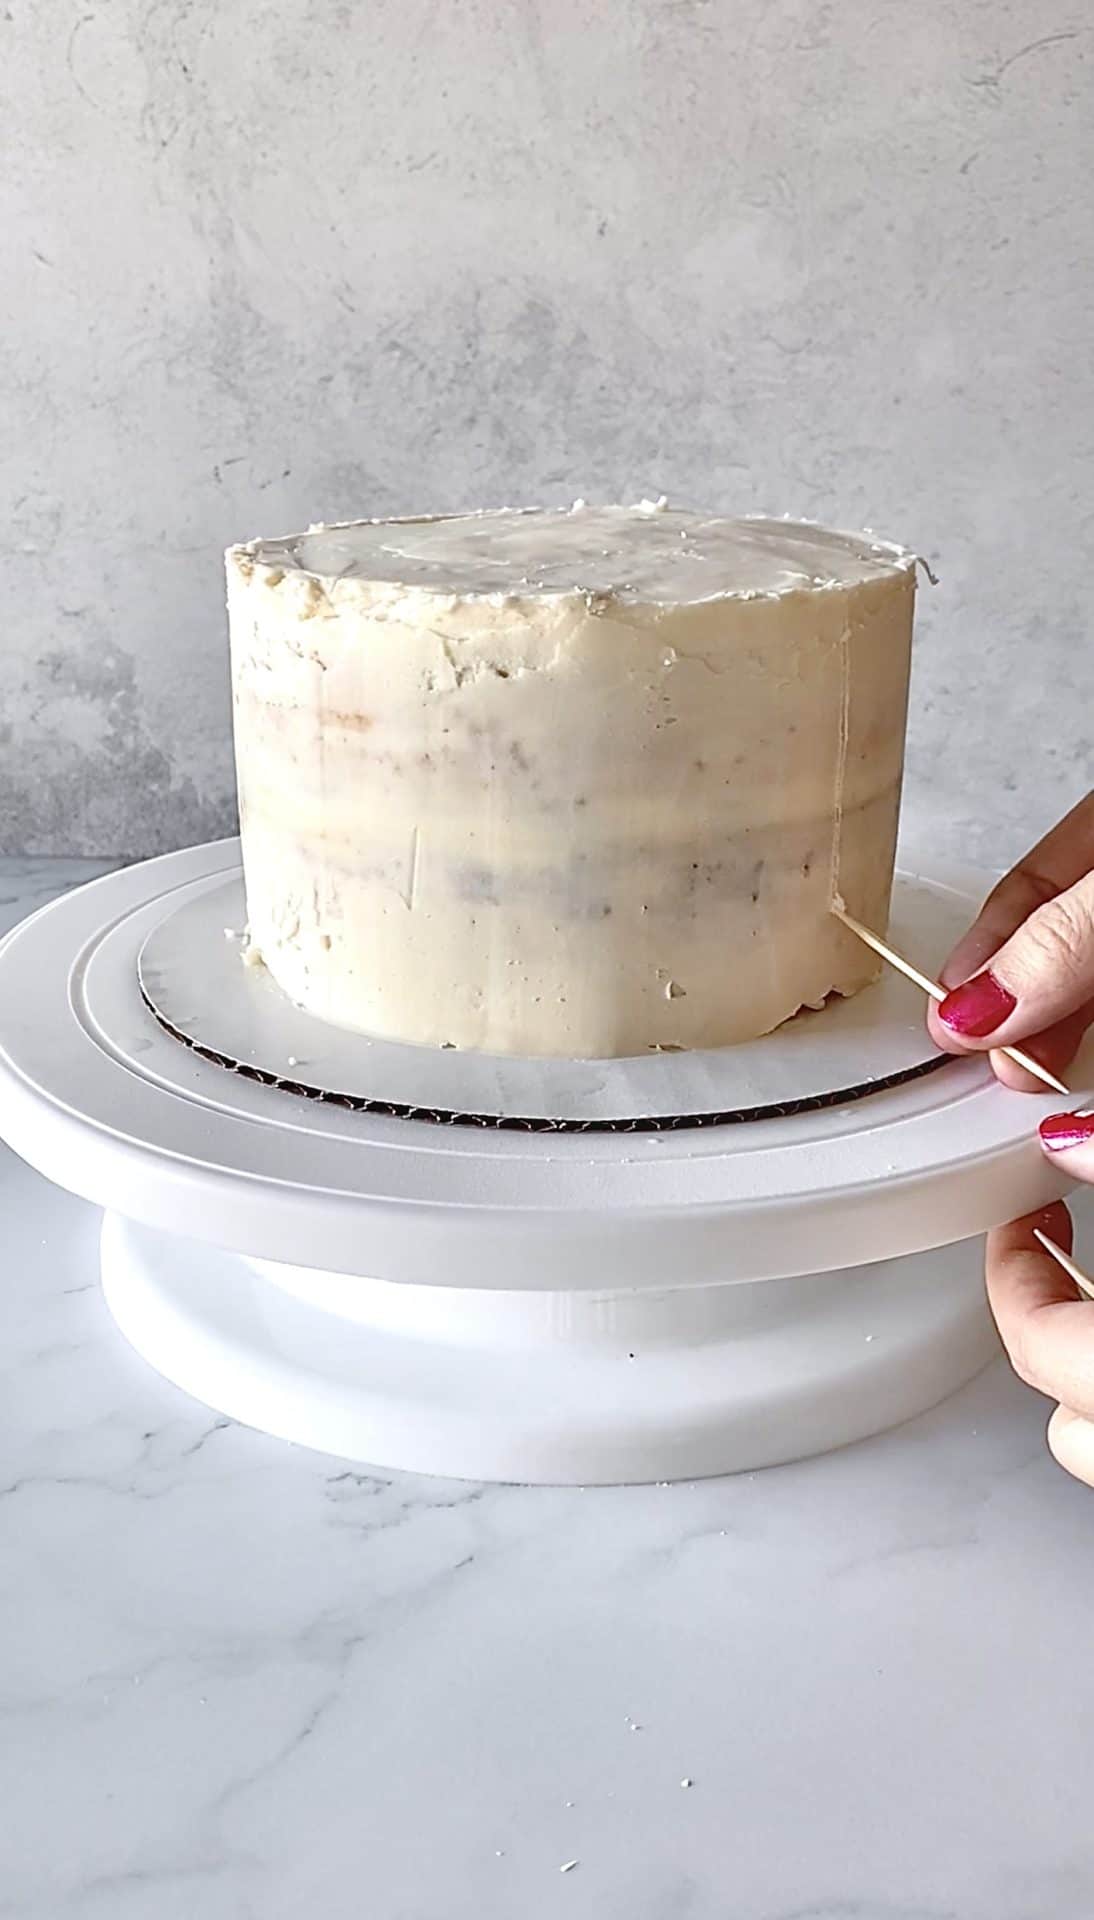
Use a toothpick or similarly small sharp object to score your cake. Look at your cake from above, and imagine it's the face of an analog clock. With your toothpick, make small marks along the edge at its 12 o'clock, 3 o'clock, 6 o'clock, and 9 o'clock positions. Then make small marks halfway between each of those positions around the cake's rim. You'll have eight indentions when all is said and done.
Details, Details, Details for this Winter Cake Design
Use those marks as a guide to draw straight lines from them to the bottom edge of your cake. You'll cover everything with buttercream so these will not be visible for long.
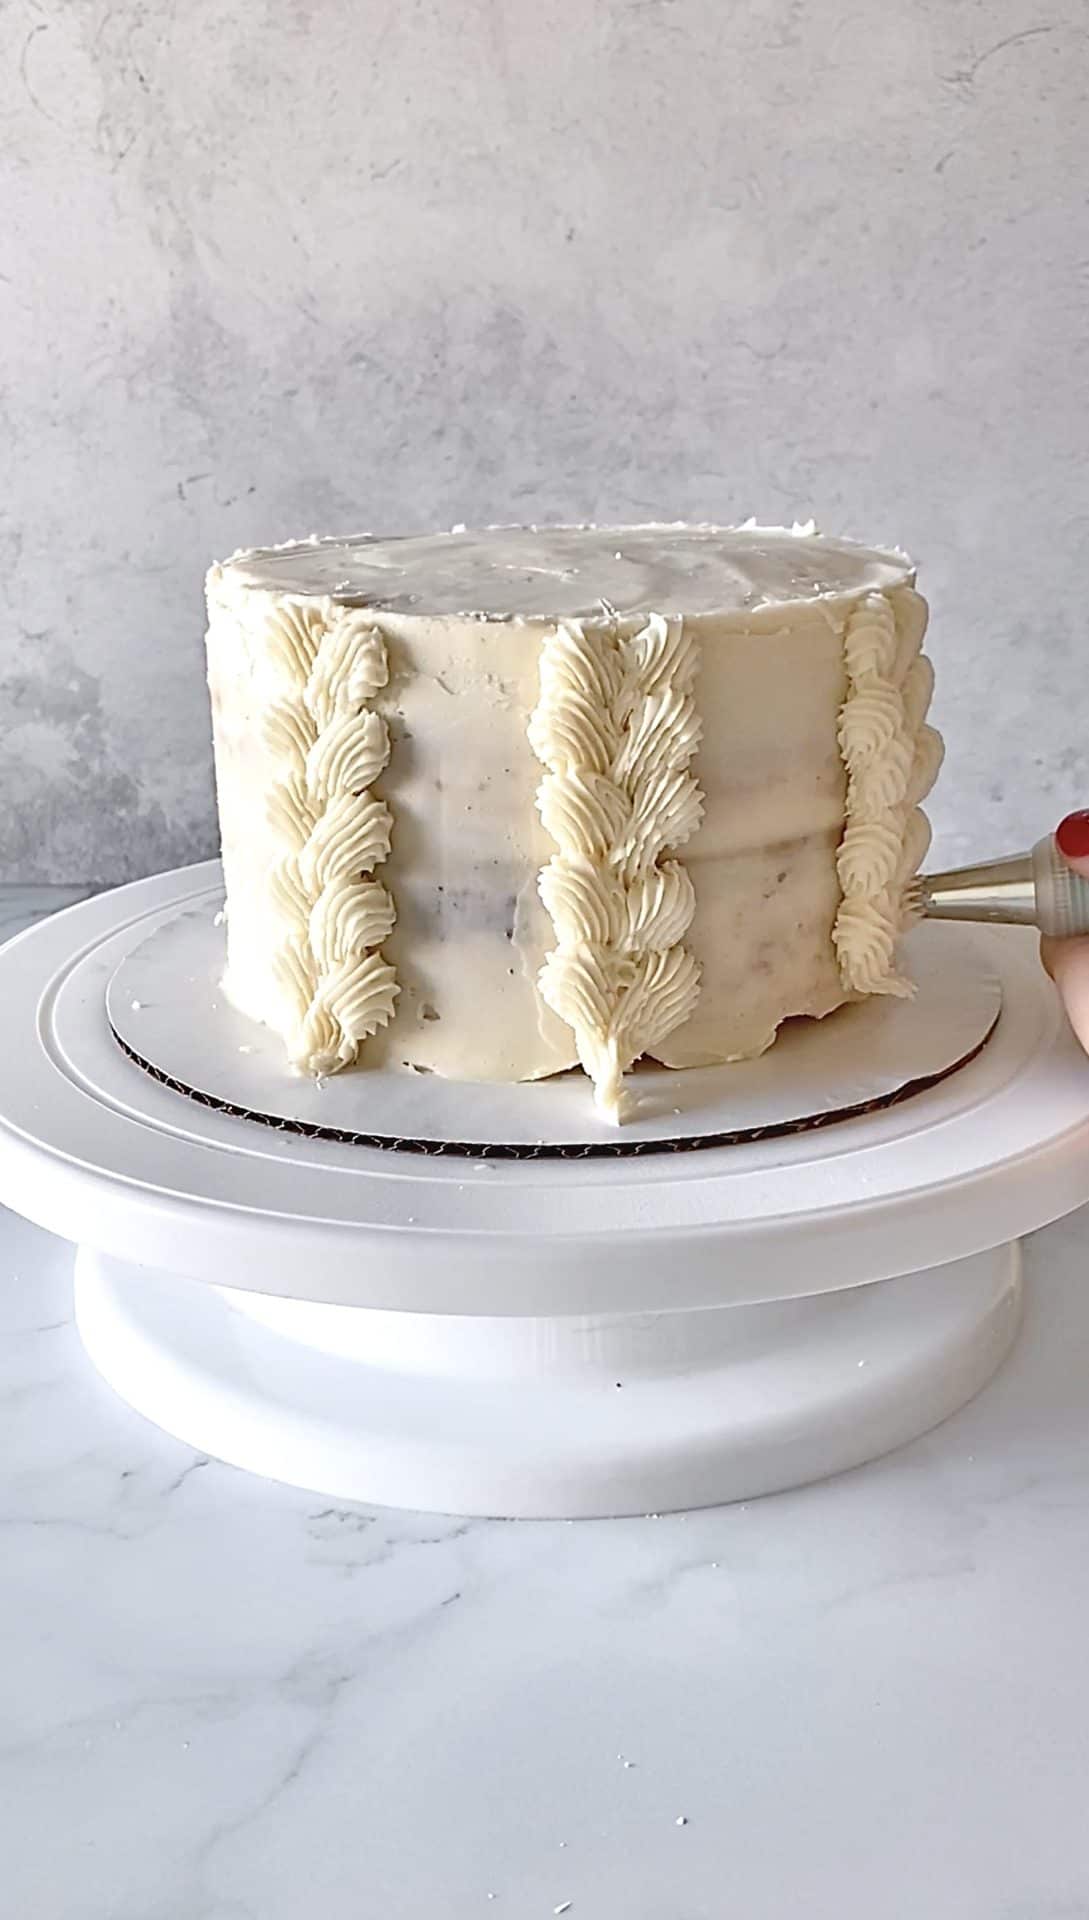
Hold your decorating bag so that it forms a 90-degree angle with the cake's side, with the tip slightly above the surface. Take it to one side of the line you just drew. Squeeze bag as you drag frosting in a downward, diagonal direction to meet the line and release to form a point. Do the same from the opposite side of the line so that the two shapes you’ve made form a small heart. Repeat this motion about 5 times (or more or less, depending on your cake’s height). You're creating a column of hearts in a straight line down your cake. Continue doing this to cover all 8 vertical lines you’ve used to score your cake.
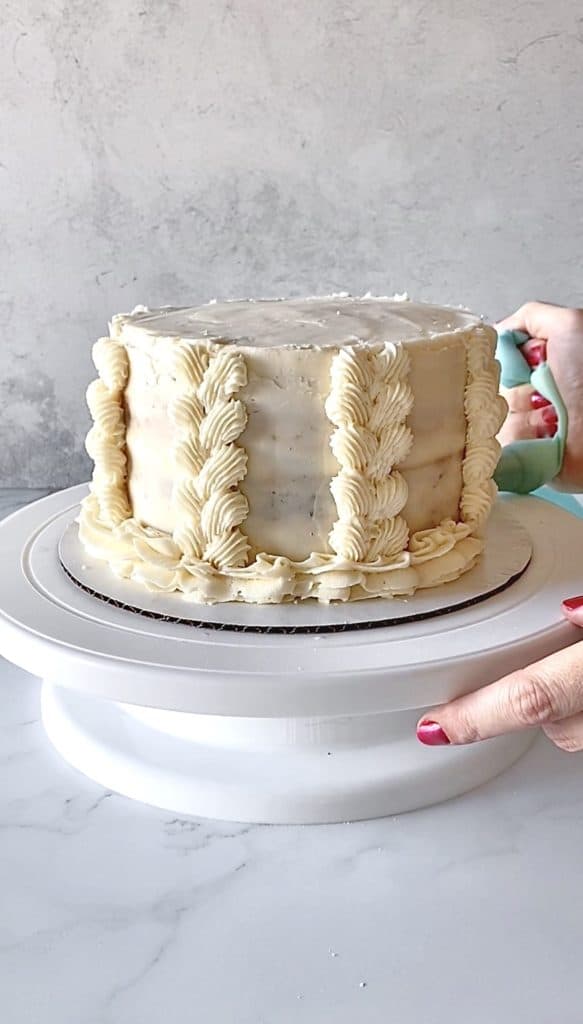
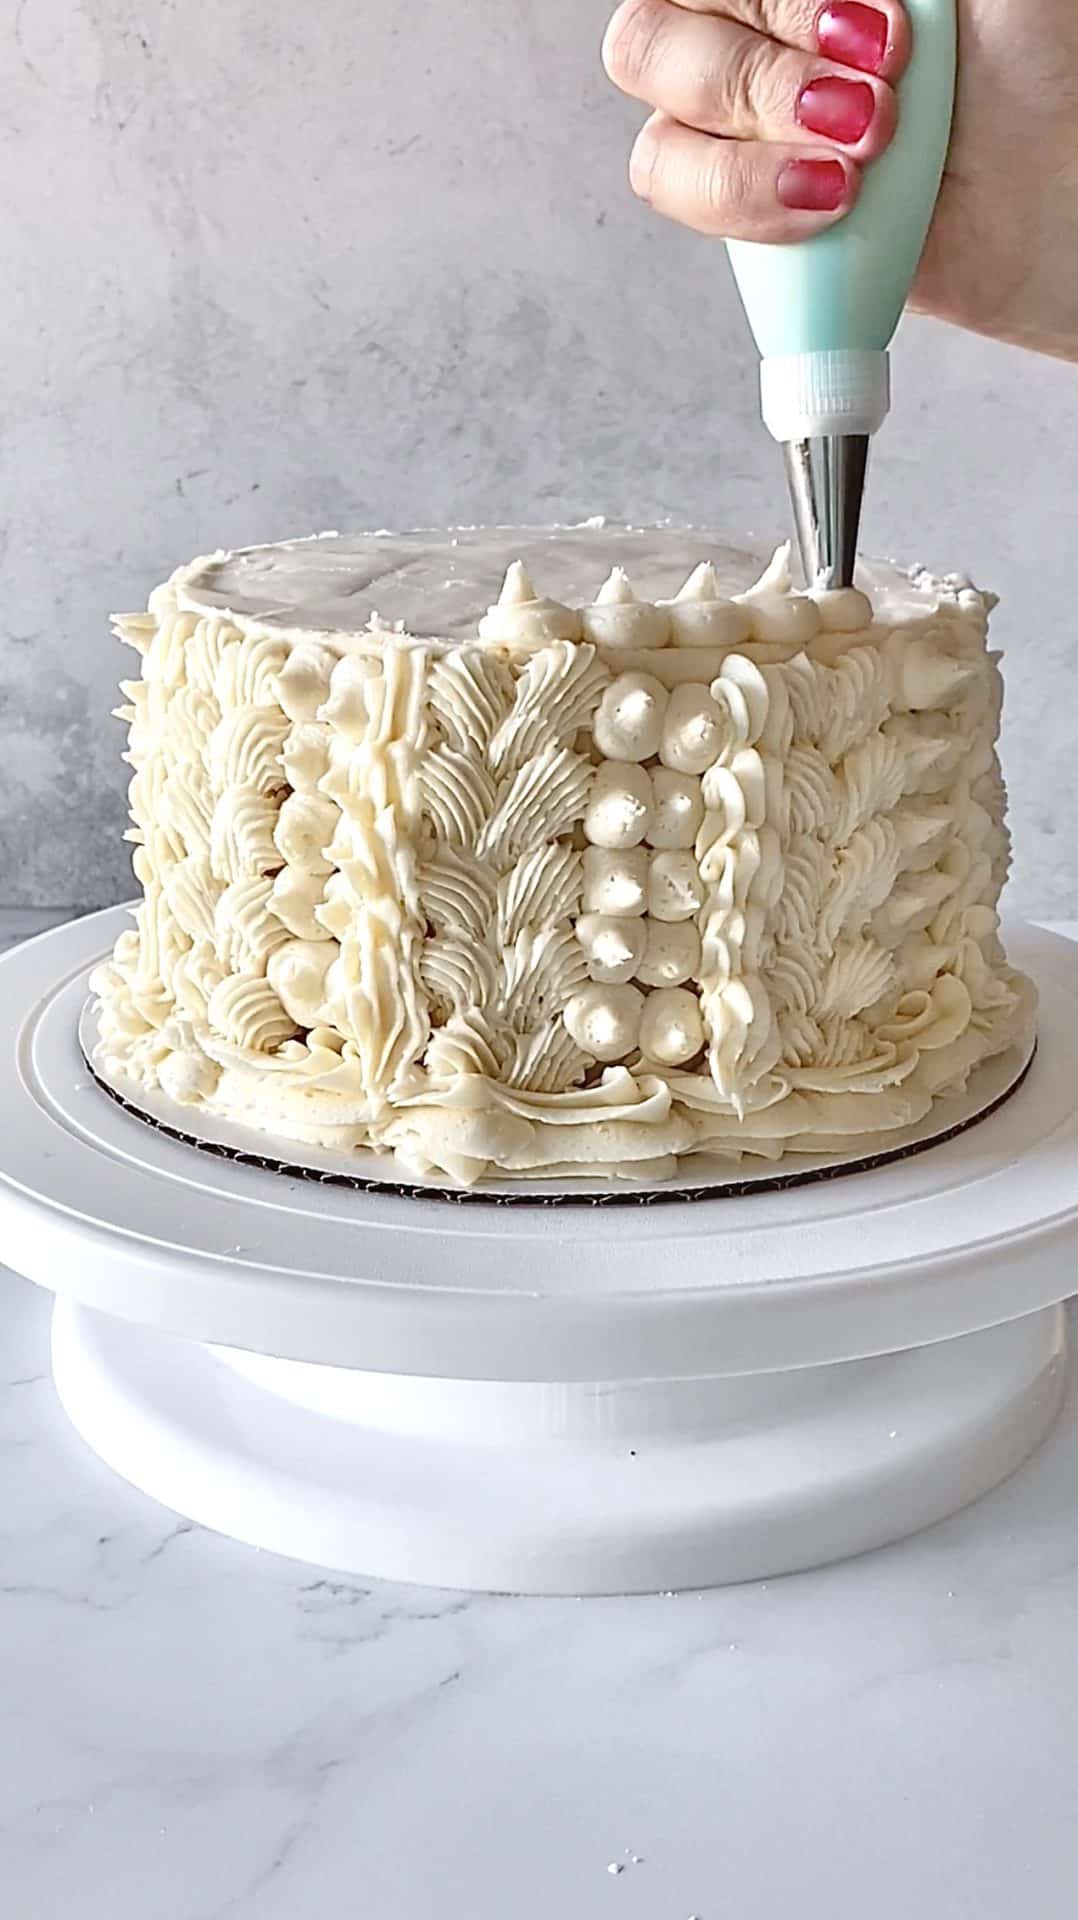
Now, place more buttercream into your frosting bag fitted with the large open star tip (I used Wilton 1M). You’ll be creating a shell border. To do so, push the buttercream from your piping bag so that the end of each pull of your frosting covers the tail of the preceding design. It’ll form a chain around the bottom edge of your cake. Watch this tutorial from Wilton for extra guidance - it's super helpful!
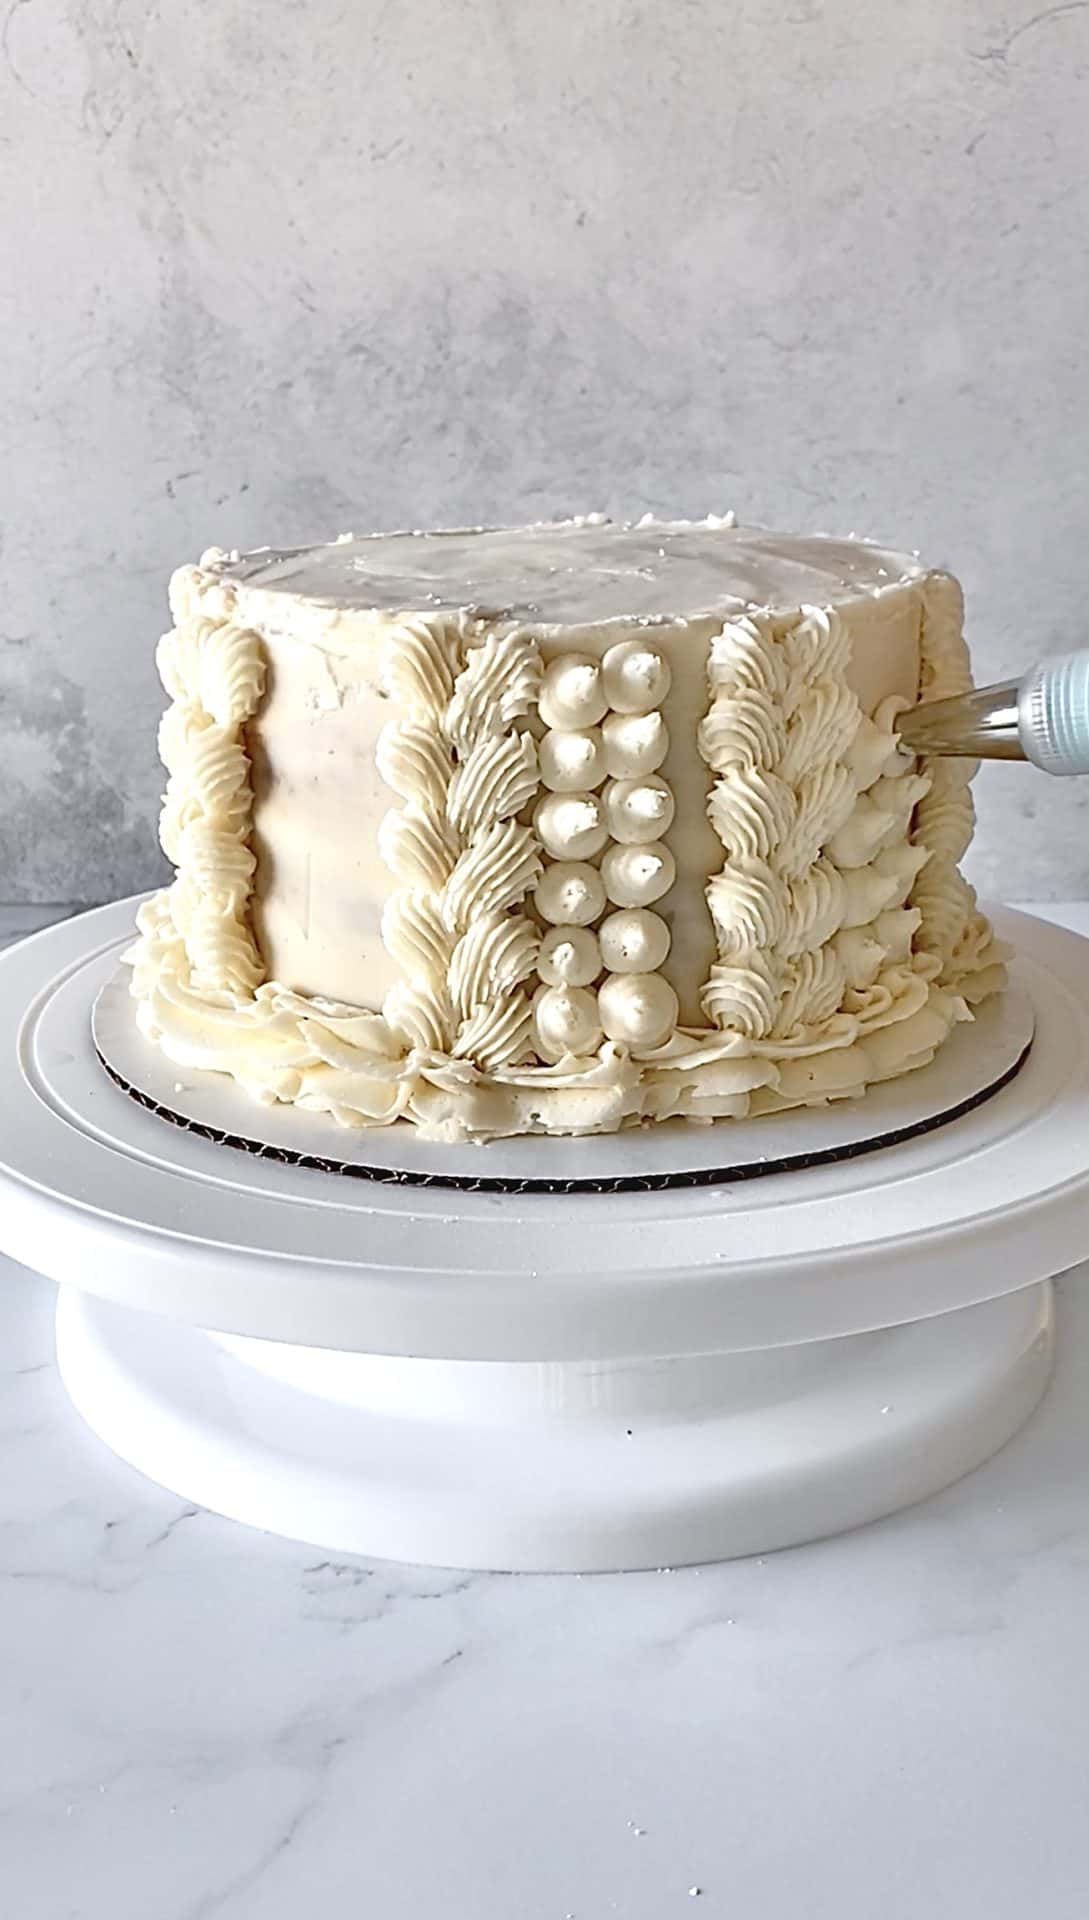
Fill your piping bag fitted with your open circular tip. Again, form a 90-degree angle with the cake while the tip is slightly above the surface. Press frosting outward to form dots/dollops of frosting to the right side of each of your lines with heart-shaped designs. Form about six rows of two dots.
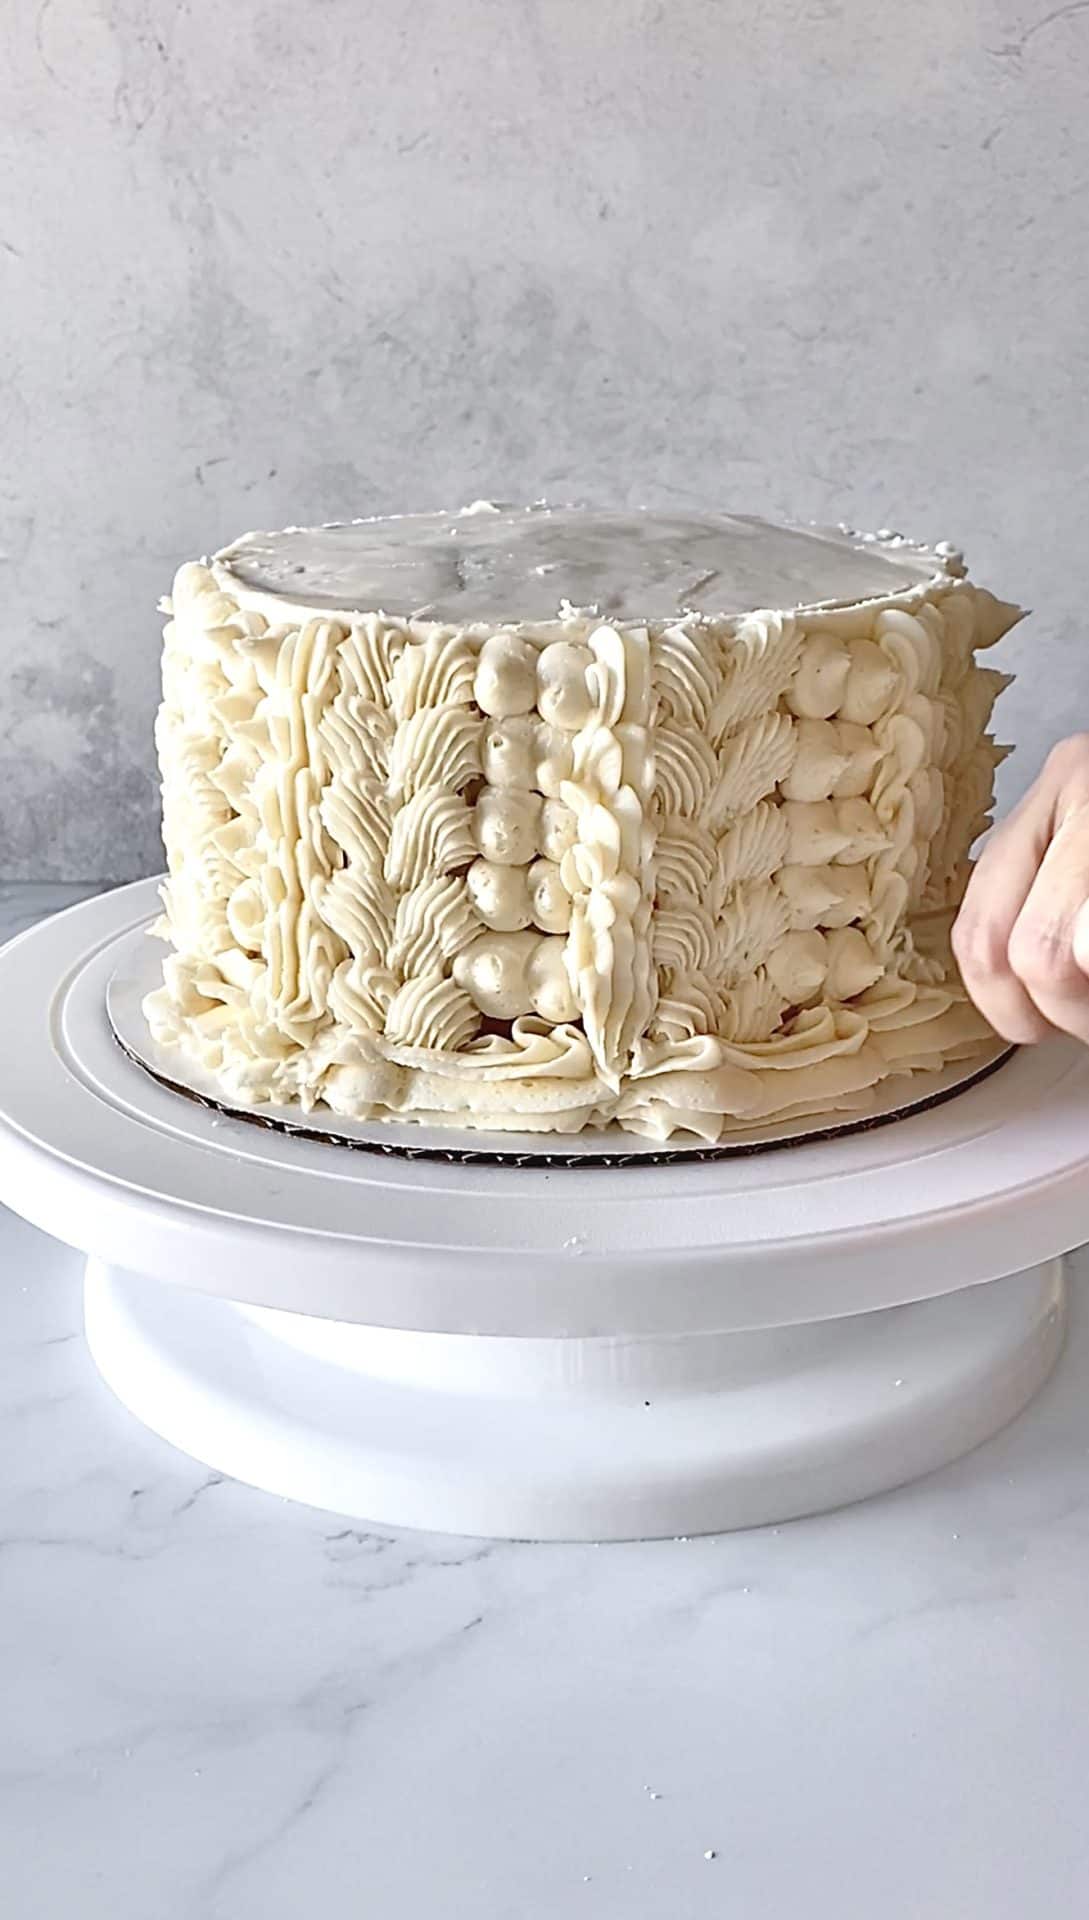
Return to your larger star tip, and pipe a vertical shell border to fill in the cake's remaining open spaces.
Finishing Touches on this Textured Buttercream Cake
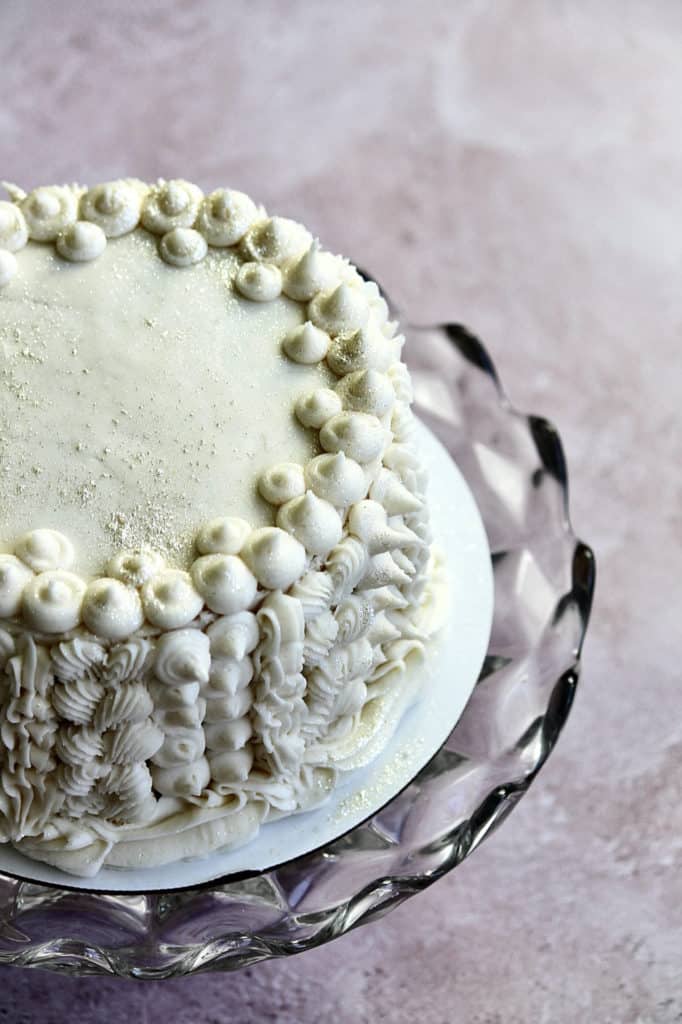
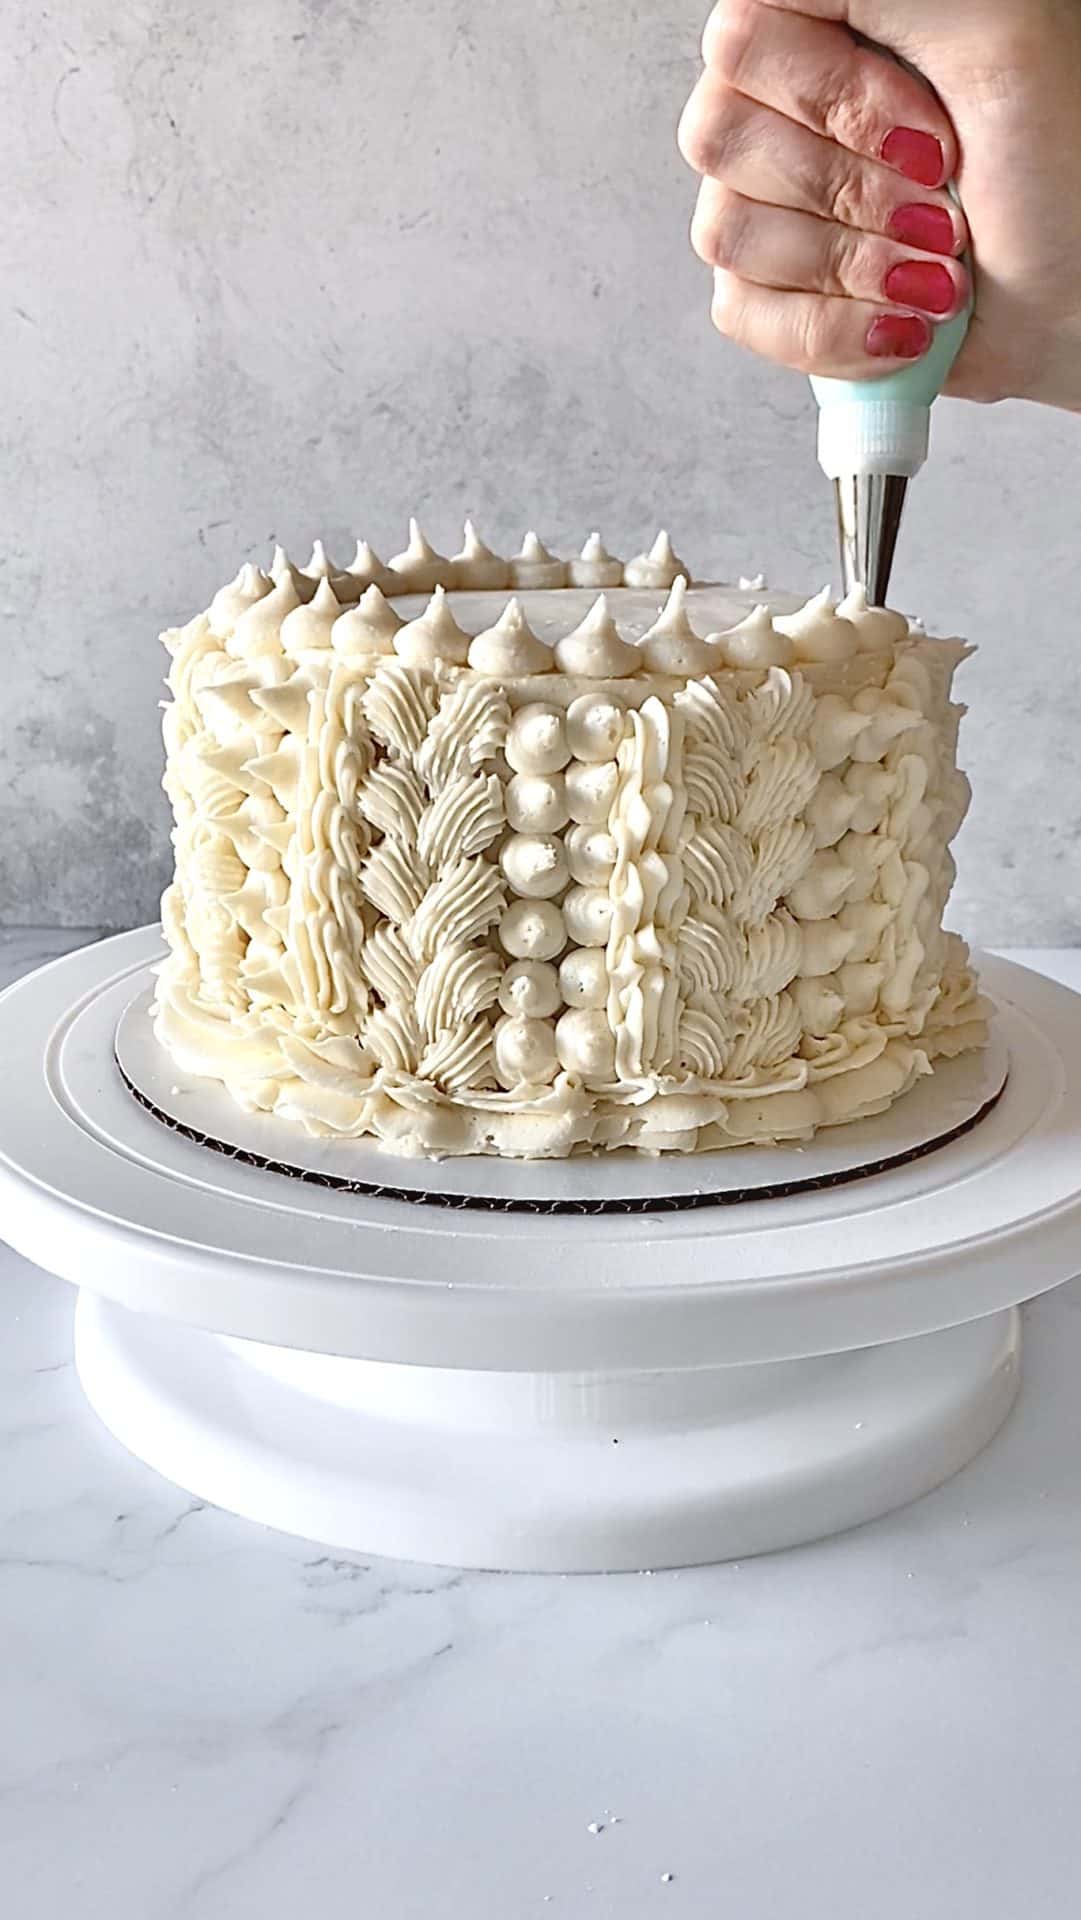
For the top, if you wish and have leftover frosting, pipe two concentric rings of dots around the edge of the your cake. Now you have a textured buttercream cake from every view!
And as I tend to do myself and advise to others, add some edible glitter for some extra *pizazz* on your cake.
More Cake Designs for You
Check out the rest of my decorating tutorials for cakes and desserts on the section of my website for cake decorating and tutorials. My guide for decorating cake with a spoon is another easy one I'd recommend!

Textured Buttercream Cake
- Total Time: 45 minutes
- Yield: One 6" 2-layer cake 1x
Description
Make this textured buttercream cake following the steps in this tutorial! This winter cake design is an easy one to recreate and gives you lots of freedom, depending on the piping tips you most enjoy using.
Ingredients
Equipment:
- Toothpicks to score your cake
- Three piping bags, reusable or disposable fitted with the tips below:
- One medium-sized circular open tip (like Wilton 8 or 10)
- One larger open star tip (like Wilton 1M)
- One smaller open star tip (like Wilton 32)
- Optional but helpful: Offset spatula and/or cake scraper for initial crumb coat
- Optional but helpful: A cake turntable as well as disposable or reusable cake circles
Ingredients to make this winter cake design:
- A batch of frosting that makes at least 5 cups - My vanilla buttercream recipe works great!
- Your favorite two-layer cake (This tutorial is based off of a 6″ round cake that’s two layers tall.)
- Optional but fun: Edible glitter to add some flair to your finished cake design!
Instructions
- Place your first of two 6" cake layers onto your cake circle and turntable or whatever surface you're using to decorate your cake.
- Using a spoon or offset spatula, spread a light, even coat of buttercream on top of that cake layer.
- Stack your next 6" cake layer on top of the first one. Use your offset spatula and cake scraper to apply a thin crumb coat around your cake. Make sure the top is fully covered, as you'll only add textured buttercream to its rim.
- Score your cake. View your cake from above, and imagine it's the face of an analog clock. With your toothpick, make small marks along the edge at its 12 o'clock, 3 o'clock, 6 o'clock, and 9 o'clock positions. Then make small marks halfway between each of those positions around the cake's rim. You'll have eight indentions when all is said and done.
- Use those marks as your guide to draw straight lines from the top to bottom edge of your cake.
- Hold your decorating bag so that it forms a 90-degree angle with the cake's side. Take the bag to one side of the line you just drew. Squeeze bag as you drag frosting in a downward, diagonal direction to meet the line. Release to form a point. Do the same from the opposite side of the line so that the two shapes you’ve made form a small heart. Repeat this motion about 5 times as you create a column of hearts in a straight line down your cake. Continue doing this to cover all 8 vertical lines you’ve used to score your cake.
- Place more buttercream into your frosting bag fitted with the large open star tip (I used Wilton 1M). You’ll be creating a shell border. To do so, push the buttercream from your piping bag so that the end of each pull of your frosting covers the tail of the preceding design. It’ll form a chain around the bottom edge of your cake.
- Fill your piping bag fitted with your open circular tip. With your decorating bag again forming a 90-degree angle with the cake's side, push frosting outward to form dots/dollops to the right side of each of your columns of heart-shaped designs. Form about six rows of two dots.
- Return to your larger star tip, and pipe a vertical shell border to fill in the remaining spaces along the sides of your cake.
- For texture on top, pipe two concentric rings of dots around the edge of your cake.
- If desired, add some edible glitter for extra *pizazz* on your cake.
Notes
I made this tutorial for a 6″ round cake that’s two layers tall. If you’re creating this design on a larger layer cake, you may need additional frosting to cover the sides of your cake and between the layers.
To achieve smooth buttercream and a cleaner-looking cake and design, always spend a few minutes with a spatula or spoon, pushing air pockets out of your buttercream before putting it into your piping bags. To do this, take a spatula or spoon in circles around your bowl(s) of buttercream, pressing it against the sides of the bowl and smoothing it down. Keep doing this until your frosting looks smooth and not craggly. If your arm is a little tired afterward, you probably did it right! 🙂
American buttercream crusts when it is exposed to air, even for a period as brief as 15 minutes. I recommend covering your bowls of frosting with either plastic wrap, dampened paper towels, or even a plate to prevent air from hitting them. However, if your frosting has begun to crust, no problem: Simply use your spoon or spatula to re-whip and smooth it back to life before spreading it onto your cake or putting it in your piping bags.
- Prep Time: 30 minutes
- Frosting prep time: 15 minutes
- Category: Cakes
- Cuisine: American

Leave a Reply