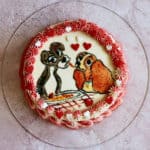
Lady and the Tramp Cake
Seldom has there been a sweeter romance in a movie than the one in the famous meatball scene from Lady and the Tramp. And adding this image to cake only makes it sweeter!
- Prep Time: 15 minutes
- Decorating Time: 45 minutes
- Total Time: 1 hour
- Yield: One 6" 2-layer cake 1x
- Category: Cakes
- Cuisine: American
Ingredients
Scale
For painted design:
- 1 cake,
- White frosting, like my vanilla buttercream recipe
- 1-2 drops of brown food gel
- 1-2 drops of red food gel
- 1-2 drops of black food gel
- 1-2 drops of yellow food gel
- Optional for Lady’s collar: The teeniest drop of blue food gel
- A few teaspoons of clear extract (like almond, lemon, or another flavor you choose)
- A few teaspoons of powdered sugar
Equipment:
- Set of 3-4 food-safe brushes for cake decorating
- Offset spatula
- Toothpicks for your food gels
- Printed image of iconic meatball scene from Lady and the Tramp
- Minimum of 4 small containers like shot glasses, mugs, or ramekins for mixing your food gels
- Thumbtacks, T-pins, sewing needles, or another object with a very fine point to trace the details of the scene
- Wax paper and pen or permanent marker for tracing the scene onto your cake
- Optional but helpful: A cake turntable as well as disposable or reusable cake circles
- Optional: A piping bag with a Wilton 32 tip or similar open star tip with the frosting color of your choosing for the border
- Optional: Gold flakes or paint for the tag on lady’s collar.
- Optional: Heart-shaped sprinkles for more love in the air
Instructions
Preparing your cake and design:
- Coat your cake in a thick, smooth layer of white-colored frosting, like my vanilla buttercream and let it chill in the refrigerator until firm to the touch (at least 15 minutes).
- Meanwhile, size and print the meatball scene from Lady and the Tramp to cover the middle third of your cake. It helps to print an image with a stronger contrast (or boost it yourself on Canva or even Microsoft Word) so you can more easily see the lines when you go to trace them.
- As your cake continues to chill and buttercream hardens, on your piece of wax paper, use a permanent marker to trace the outline of Lady, Tramp, and their plate of spaghetti and meatballs.
- Bring your cake out of the refrigerator and if/when buttercream has hardened, attach wax paper to the cake using thumbtacks, needles, T-pins, or something similarly small and sharp. Punch tiny holes through the wax paper to create a faint outline of all the details.
- Remove the wax paper to begin painting.
To create the painted design:
- Pour a drop of your red, yellow, brown, and black food gels into your four small containers. You’ll ultimately need yellow and an orange-y red color for Lady’s fur as well as the meatballs. You’ll be creating a brownish color for Tramp’s fur and using a touch of red for the color of his inner ear.
- Add 1/4 tsp of powdered sugar and 1/2 tsp of clear extract to each of these bowls. Combine all ingredients together in your respective containers with the food safe paintbrush you plan to use for each of the colors. Add more powdered sugar or extract to each bowl as needed to achieve a paste-like consistency. Compare your food gel colors to your original printed image and lighten or darken as needed. Your design will not be large, so you don’t need a ton of paint here; a little goes a long way.
- For my colors, I took tiny amounts of brown and added that to my red to darken it. Once I painted the yellow of Lady’s fur, I also added that to the red to create a more burnt-orange color for Lady’s fur.
- Set your frosted cake on a cake stand or turntable, ideally with a cardboard or reusable cake circle underneath it.
- Fill in the colors of the scene, starting with the lightest colors. Once done, if desired, dip a clean food-safe paintbrush until your bottle of blue gel and paint a stripe for Lady's collar. Press gold flakes beneath it for the tag. All of step #4 took me about 30 minutes.
- Once you’ve filled in all the colors, dip your thinnest food paintbrush into your black food gel to outline all the features. This took me about 15 minutes.
- To make a border, with some of your leftover white frosting, dye it red, and put it into a piping bag fitted with an open star tip, like Wilton 32. Pipe around the cake’s top and/or bottom as desired.
- Place some heart-shaped sprinkles around your piping for a little additional romance!
Find it online: https://susanbringsdessert.com/lady-and-the-tramp-cake/
