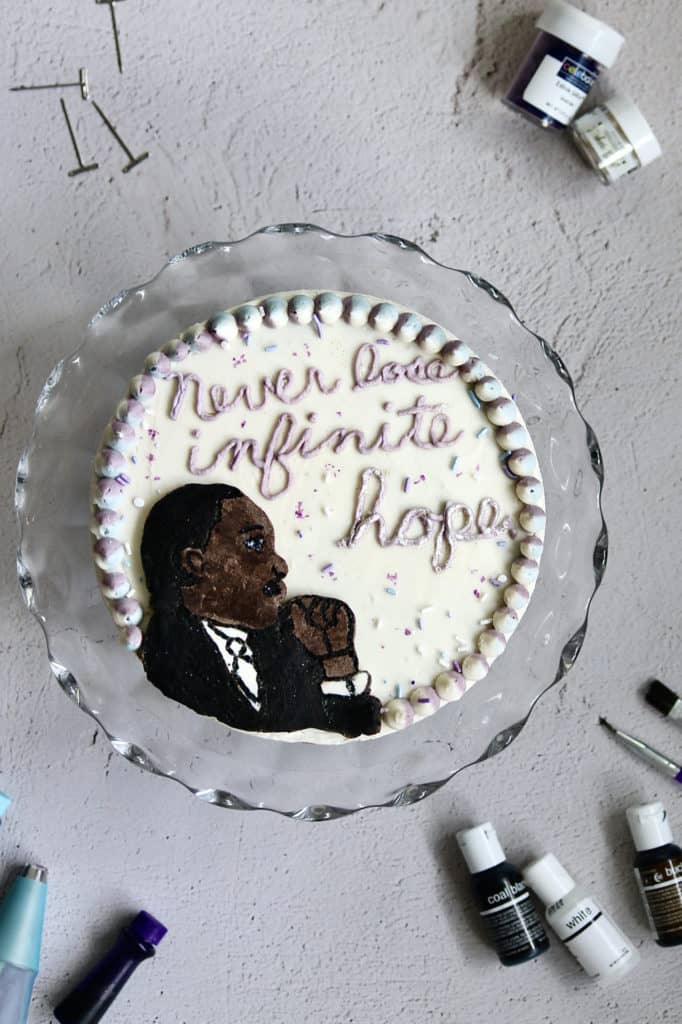
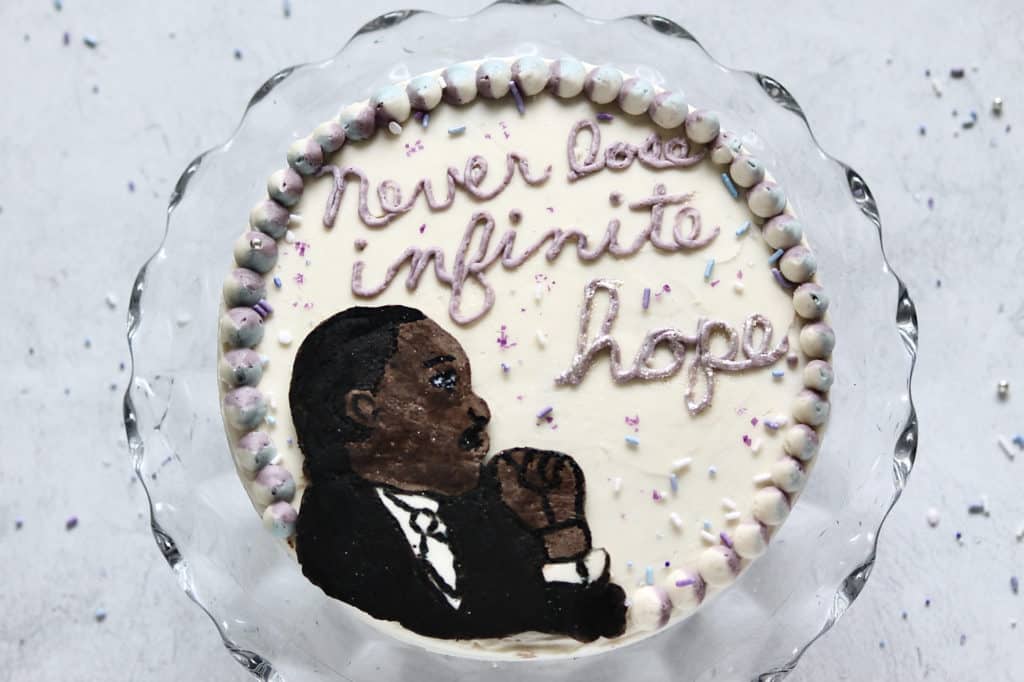
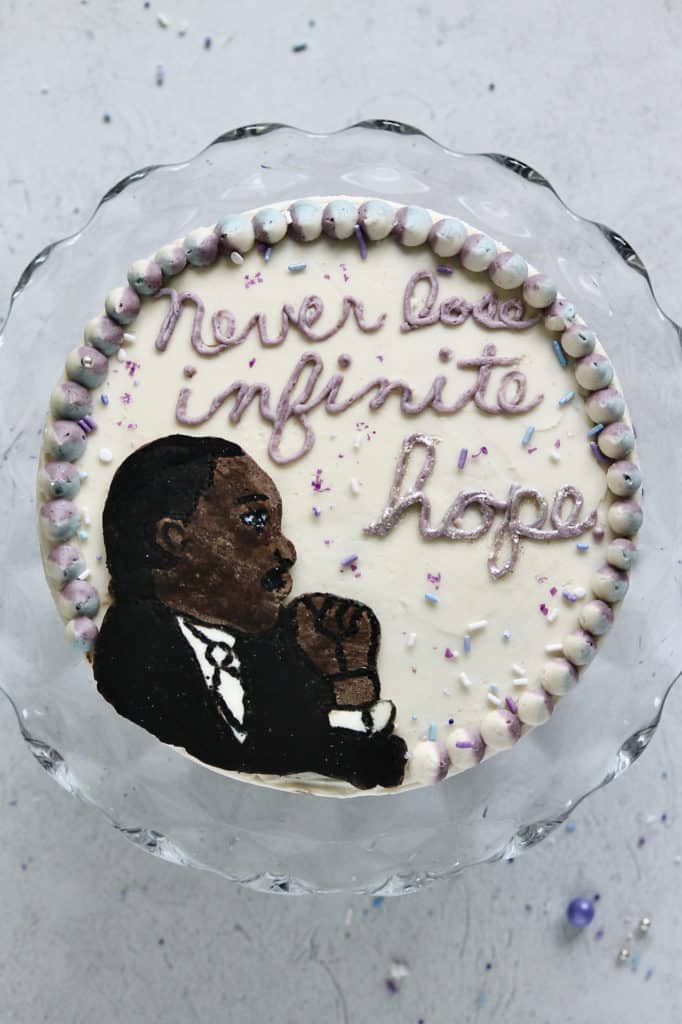
For Martin Luther King Jr. Day, I wanted to create a cake that’s meaningful and approachable for home bakers: a simple 8-inch cake topped with a buttercream transfer of Dr. King and a short quote. For this cake decorating tutorial, use any cake you love—homemade or boxed—and follow these steps to make the design. If you’ve ever wanted to try a buttercream transfer or painted buttercream, this is a very doable first project
What you’ll learn in this tutorial:
- How to make a buttercream transfer (the “freezer method”)
- How to paint details on buttercream using food gel + clear extract
- My best tips for writing on cakes
- Exactly what tools you need (and what’s optional)
For more ideas like this one, check out the tutorials on my website. My guide for crumb coating a cake is another great resource if you're getting into cake decorating!
Jump to:
- Tools for a Buttercream Transfer & Painted Cake
- Additional items needed for this MLK cake design
- Before You Start: Cake Size & Frosting Amounts
- Crumb Coating Your Cake and Creating Chocolate Frosting
- Creating a Buttercream Transfer
- More Buttercream Transfer Method Details for this Martin Luther King Jr. Cake
- Tips for writing on cakes
- Attaching your Martin Luther King Jr. buttercream transfer
- Painting your Martin Luther King Jr. Cake
- Finishing Touches for this Martin Luther King Jr. Cake
- FAQ
- More on Martin Luther King Jr. + Additional Caking Resources
- Martin Luther King Jr. Cake Tutorial (Buttercream Transfer)
Tools for a Buttercream Transfer & Painted Cake
This list looks long, but most of it is basics you’ll reuse for loads of cake projects. This Martin Luther King Jr cake uses two decorating techniques: a buttercream transfer and painted buttercream details, so a few items are specific to that.
Must-haves
- Food-safe paintbrushes
- Offset spatula
- Food gel colors (I use Chefmaster)
- Wax paper and tape
- 4 piping bags + small/medium round tips (Wilton 1–3 and 5–8 style)
- Printed mirror image of your MLK outline
Nice to have (but not required)
- Stand mixer
- Cutting board and chip clip or clipboard (I've even used a magazine in a pinch) for securing the buttercream transfer
- Cake turntable
- Cake boards/circles
Additional items needed for this MLK cake design
You'll also of course need frosting and a cake! I created this particular cake tutorial for one 8-inch circular layer of cake.
Because you may need more frosting than you anticipate, I also recommend making a full batch of my vanilla buttercream. This might sound like overkill, but I used about ¾ of mine when all was said and done here. And if you are doing a multi-layer cake, you will easily put excess frosting to use. Plus I made some chocolate frosting (more on that below) to stretch my batch of vanilla and make Martin Luther King Jr.'s skin tone, so that'll come into play, too.
Particularly worth noting is that if you're new to the buttercream transfer method or painting cake, definitely make a full batch of the buttercream. Freeze any leftovers. You'll thank yourself later if you do make a mistake and need additional buttercream and already have it on hand.
Buttercream freezes great for a few months so long as you store it in an airtight container. You can bring it out, let it reach room temperature, and rewhip it for your next cake project.
Before You Start: Cake Size & Frosting Amounts
- This tutorial is written for one 8-inch (20 cm) round cake layer.
- I recommend making a full batch of white frosting like my almond buttercream or vanilla version so you have enough for crumb coating, smoothing the top, making the transfer, lettering, and border. Any leftover buttercream freezes well.
- If you’re making a taller layer cake, plan on extra frosting for filling and sides.
Crumb Coating Your Cake and Creating Chocolate Frosting
For this Martin Luther King Jr. cake, I found it most helpful to quickly crumb coat it and place it in the refrigerator. Then I surveyed my remaining frosting to gauge how much I had left.
To create MLK's skin tone, after I'd frosted my cake, I removed from the bowl of my stand mixer some of the remaining vanilla frosting (about ¾ of my initial amount) and set it aside in another mixing bowl.
Next, in the microwave in short bursts, I heated about ¼ cup (40 grams) of chocolate chips and 3 tablespoon of heavy cream. I added all of that chocolate back into the bowl of my stand mixer. By this point, it had approximately ⅕ of my initial batch of vanilla frosting.
I used my paddle attachment to mix everything together. It was a faint brown initially, so I added a few drops of brown food gel. I added some black cocoa powder and black gel as well to deepen the shade.
If you don't have chocolate chips on hand, you could instead add cocoa powder and/or brown food gel to your vanilla frosting until you've achieved a dark brown shade. Add black gel sparingly, as you don't want to make his face a grey hue.
Creating a Buttercream Transfer
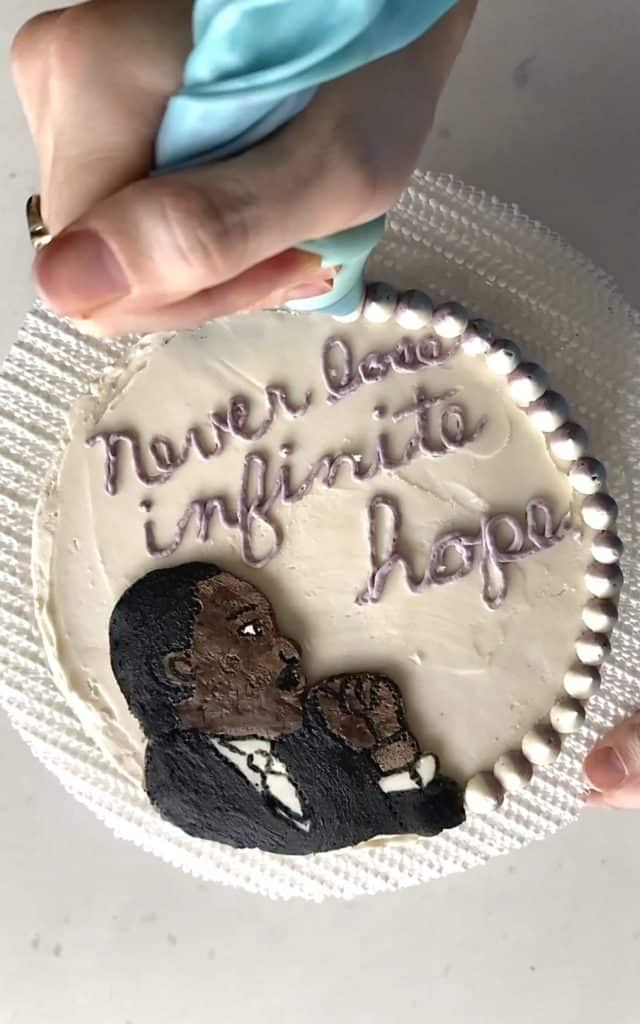
Buttercream transfers may sound intimidating, but the idea behind them is pretty simple. On wax paper, you pipe buttercream on the reverse or mirror image of a design, freeze that frosted design until it hardens, and then stick it to your cake. Let's use this cake as an example to break down those steps.
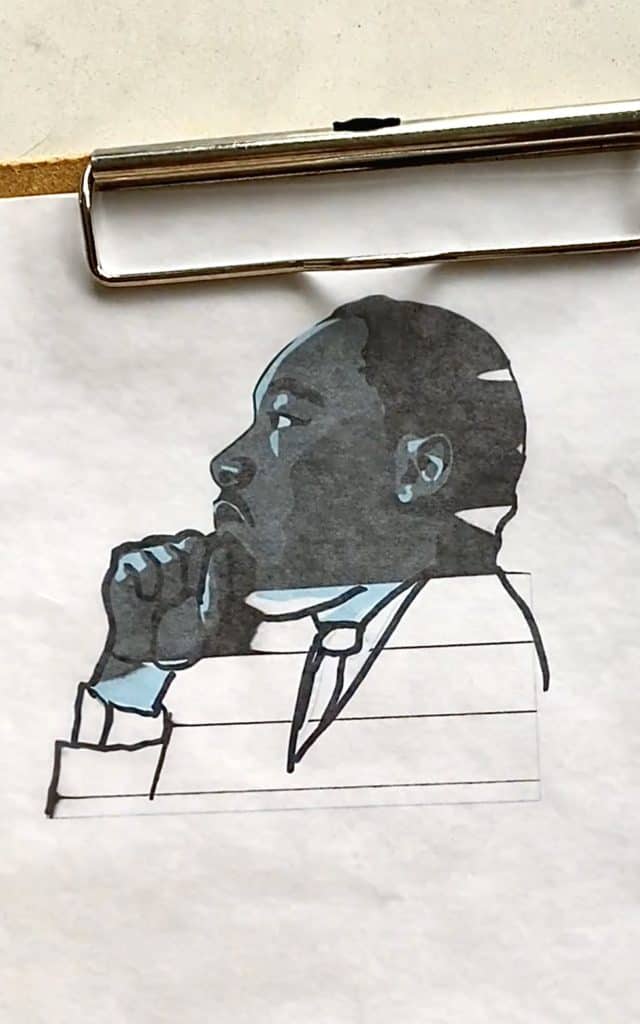
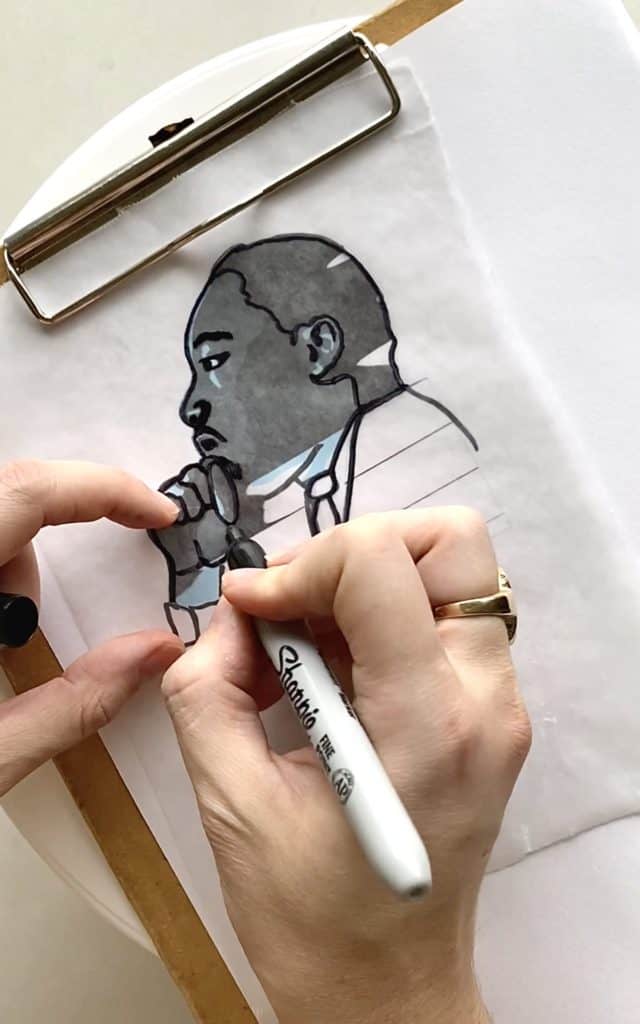
For this Martin Luther King Jr. cake, I searched for clipart of him online and soon chose this one. I picked it because the lines of his face are simple and make him recognizable. I always try to avoid an overly fussy or complicated design.
So I then pasted that image into Microsoft Word and flipped it to its mirror image before printing it. This is important because you will use buttercream to trace the outline and fill in Martin Luther King Jr.'s features on wax paper, which goes in the freezer. Once that's hardened in the freezer, you'll put some buttercream on the spot on the cake where you'd like him to go. You will next put him in that area and peel away the wax paper. That will leave the backside of your buttercream facing outward on display on your cake, hence the need to use a mirror image. Reading this step confused me so much the first time I made a buttercream transfer, but trust me! It works 100% of the time, I promise. And maybe you already understand the concept, so even better!
More Buttercream Transfer Method Details for this Martin Luther King Jr. Cake

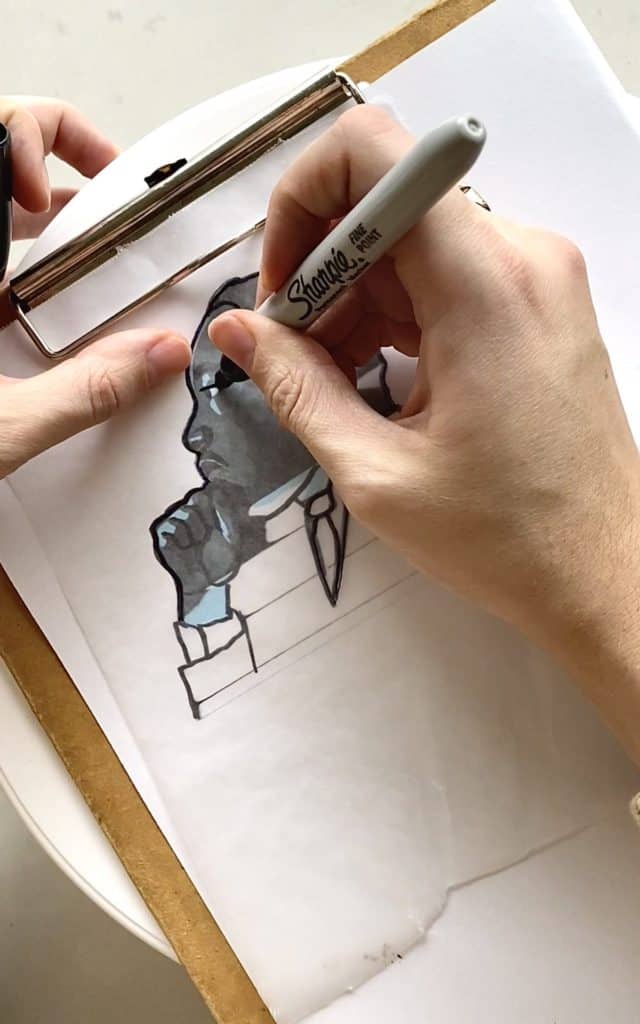
Backing up a bit here, once you've printed that mirror image, place it on a clipboard or flat surface (like a cutting board or even magazine), that you can slide into your freezer. Then put a piece of wax paper over top of the image, and tape it in place so your design doesn't move while you trace it with pen or permanent marker.
Next, put the chocolate frosting in a piping bag fitted with Wilton tip #3 or 5 to trace and fill in his outline. I used another piping bag and some of my white frosting along with a slightly smaller tip for the white parts of his shirt. Be sure to apply a generous coat of frosting to fill in these details. You can even do two layers of frosting, which I would recommend if this is one of your first buttercream transfers. It's easier to handle them when they're thicker and not flimsy. You also want to make sure that all sections of the frosting touch and connect so that once it's frozen, it'll hold together!
Once you've covered the outline with frosting, place it in the freezer.
Tips for writing on cakes
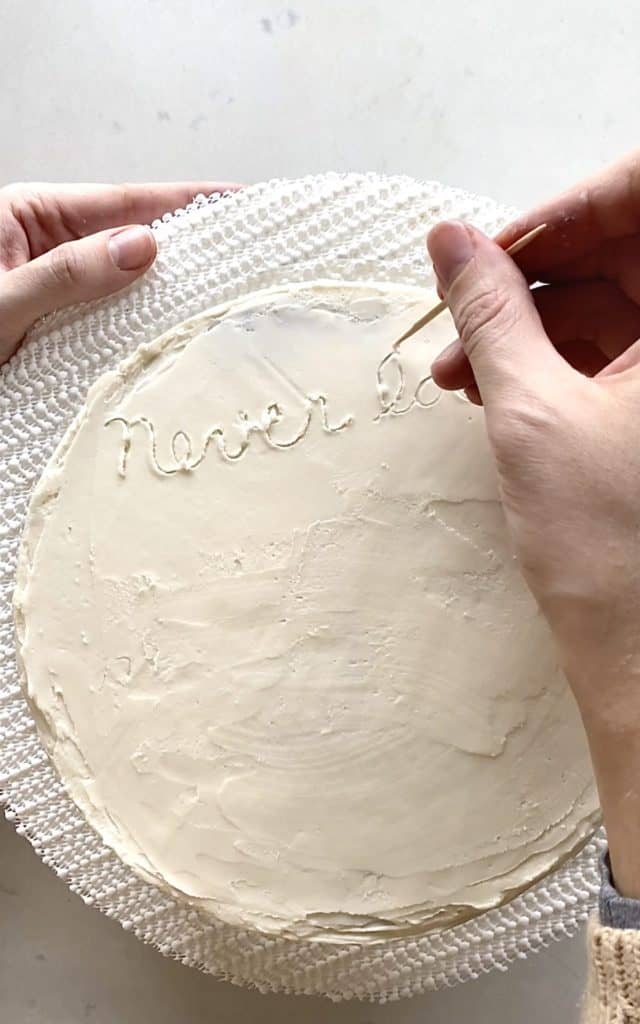
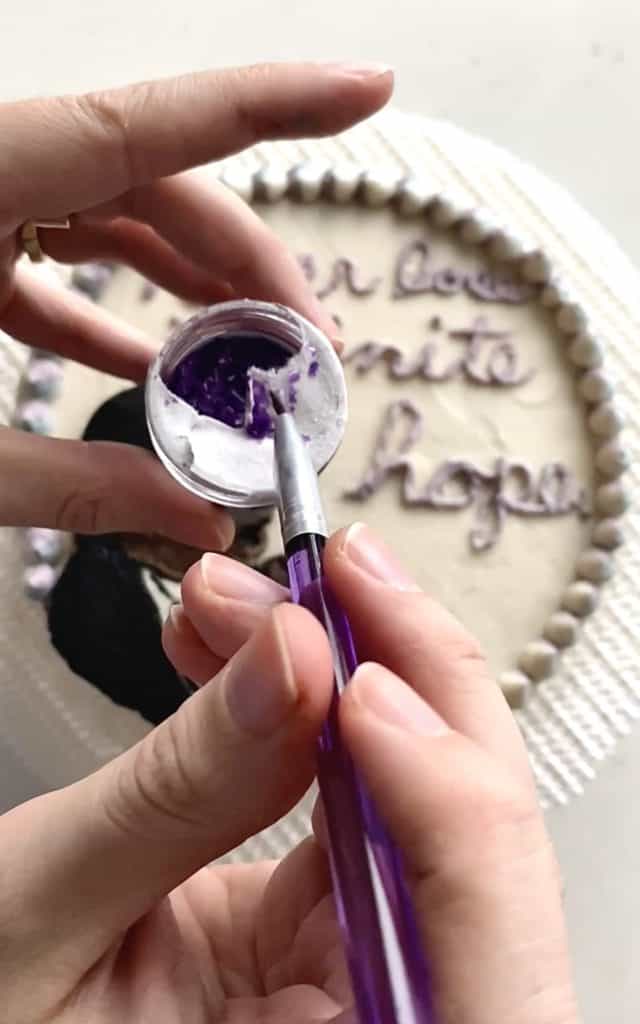
While I waited for the buttercream transfer to harden, I wrote on the cake part of a quote from Martin Luther King Jr. I removed about ⅔ of a cup of the white frosting from my smaller mixing bowl and separated that into two smaller bowls. I made the frosting of one bowl light blue and the other light purple before putting them together in a piping bag.
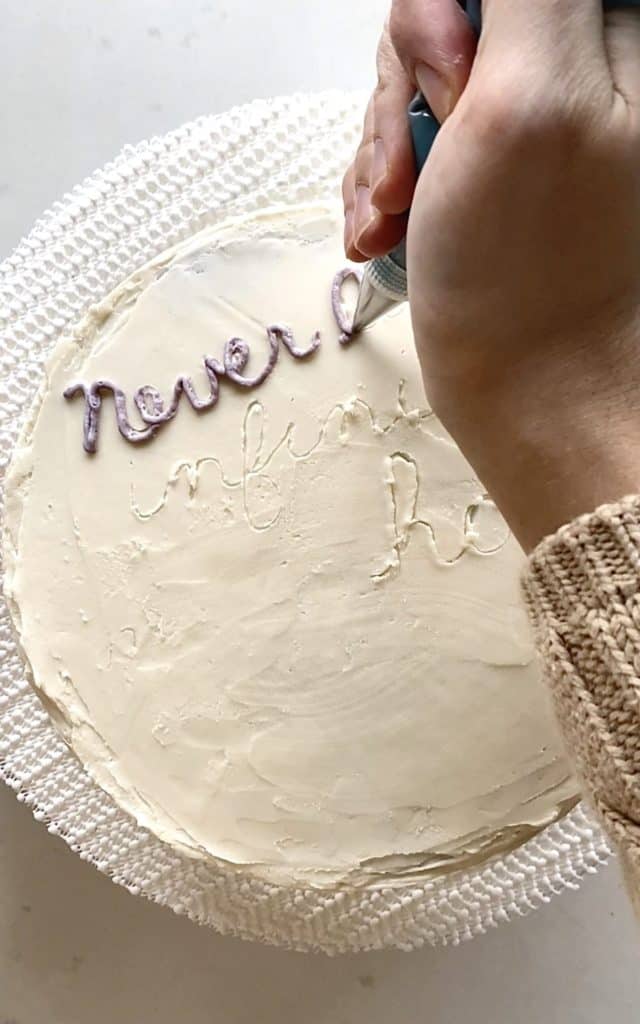
Writing on cakes is one of my least favorite parts of decorating them. It's easy for a mistake here to detract from the overall look of your cake, so I've included some tips:
- Lightly write the text on your cake with a toothpick first. This way, you can space out your words and easily redo your text if you make a mistake. If you mess up with the toothpick, fixing it is easy. Take the back of a warm spoon or spatula and smooth out any frosting blemishes.
- Use smaller piping tips. Unless you're writing a big word or two, it's generally easier to write a phrase with a finer piping tip, like Wilton tips 1-3.
- Add some heavy cream to the frosting you're using to write your text before placing it in your piping bag. If your frosting is super thick, that's great for piping flowers and designs that need to hold a shape. However, it can be harder to push that thick buttercream through a narrow piping tip. That's why I add and mix a bit of milk or heavy cream to my frosting before placing it in the piping bag. This makes it come out of the bag more easily, and I don't have to squeeze my hand to get the buttercream onto the cake.
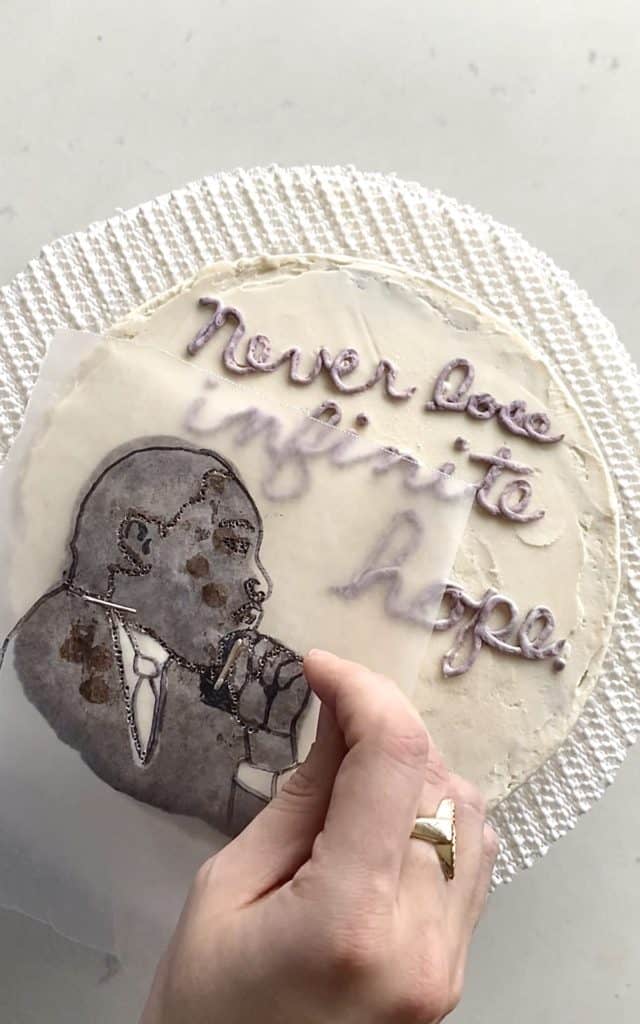
Attaching your Martin Luther King Jr. buttercream transfer
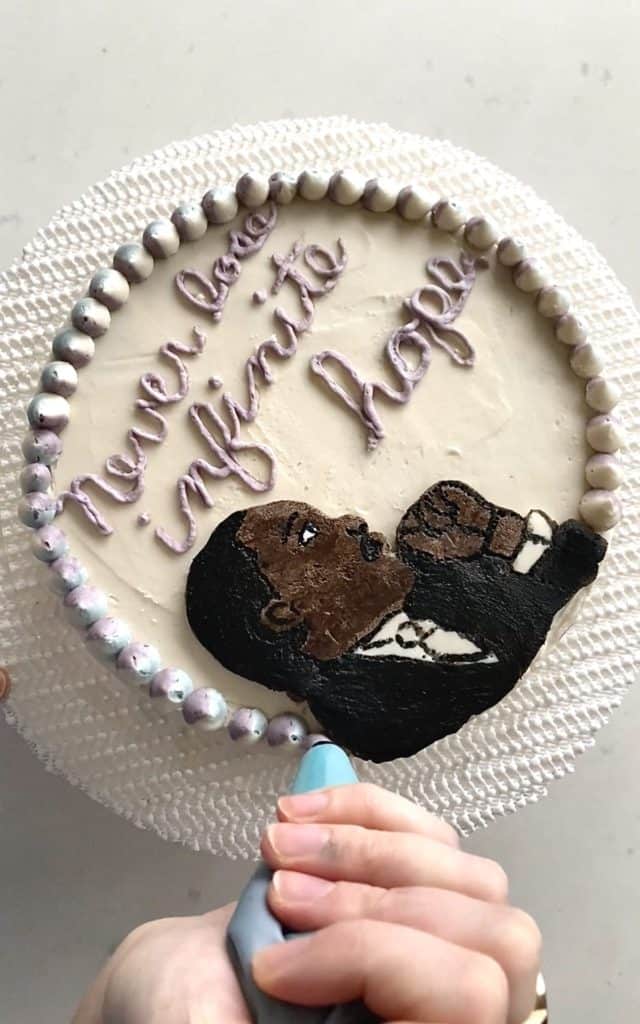
Once your transfer is firm to the touch (after about 30 minutes in the freezer), pipe some "glue" for your transfer with additional buttercream. Then press the transfer to the cake and peel away the wax paper.
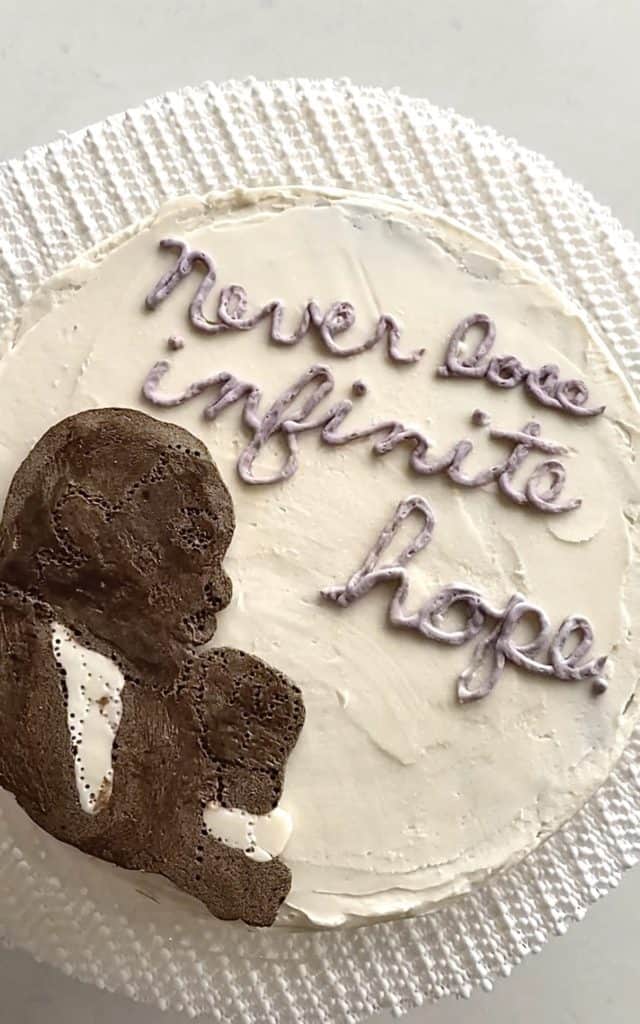
If there are noticeable creases in your frosting, gently smooth them out with the back of a warm spoon.
Also, in the process of moving my transfer, it broke along his neck! But that's an easy fix: Pipe more frosting that matches the color of your break (brown in this case), and put it all back in the freezer to briefly harden. You can again use a warm spoon to smooth out creases. That filler bit of frosting will act as a glue to bring and hold your pieces together again.
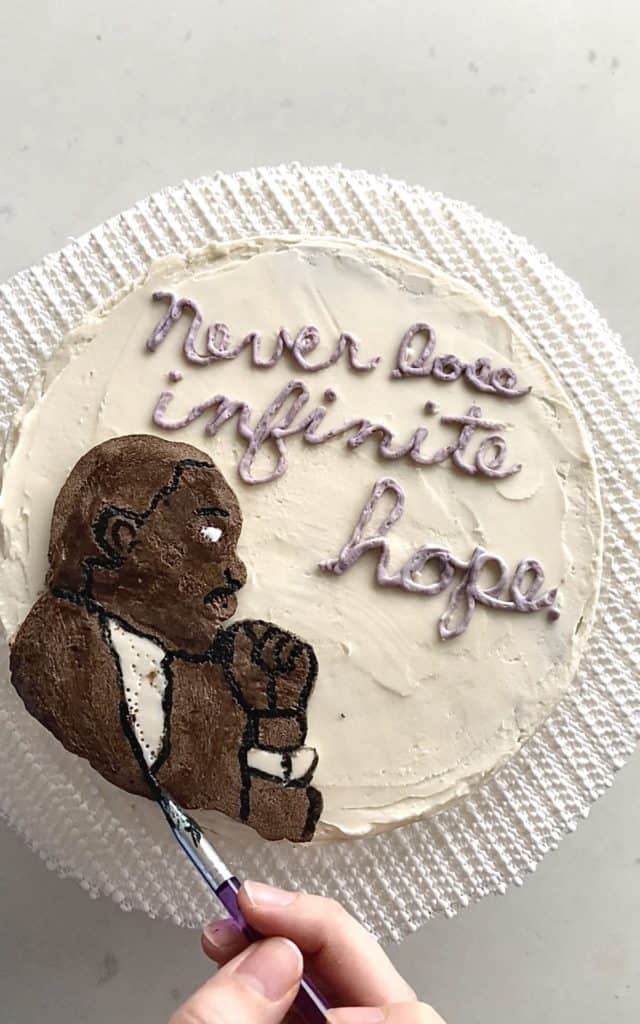
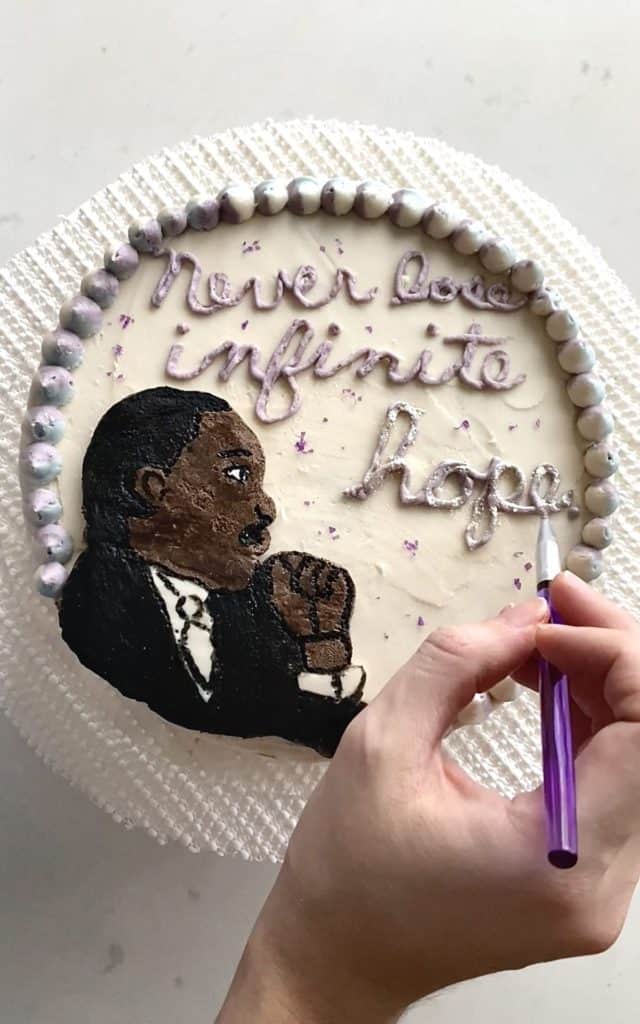
Painting your Martin Luther King Jr. Cake
Use your initial piece of wax paper (or another one if that one has any melted frosting on it - mine did) to now trace the facial details if you haven't yet.

Then, attach your wax paper with the outline of the details of MLK's face to your buttercream transfer using a few sewing needles, thumbtacks, or T-pins. Punch tiny holes through the wax paper to his skin so when you remove the paper, you'll be able to trace and fill in those lines with a paint brush and food gel. This process is similar to stippling.
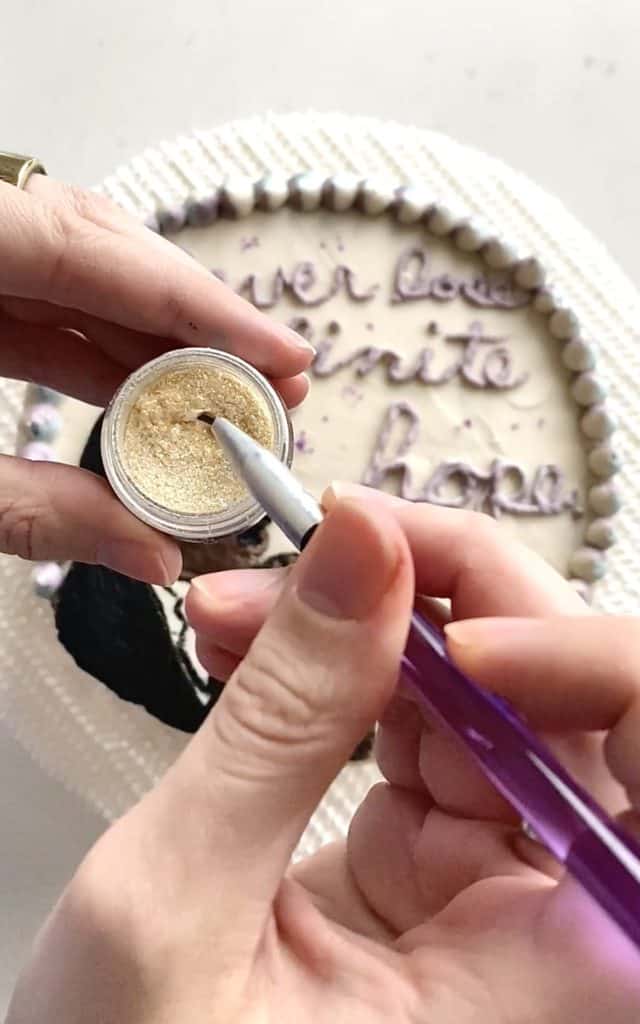
Remove the wax paper, and carefully paint the white of his eye. For precision, very carefully trace the lines you just made with the smallest food-safe paintbrush you have. I dipped the tip of my paintbrush into my bottle of white food gel because I needed such a small amount so didn't need to pour any from the bottle.
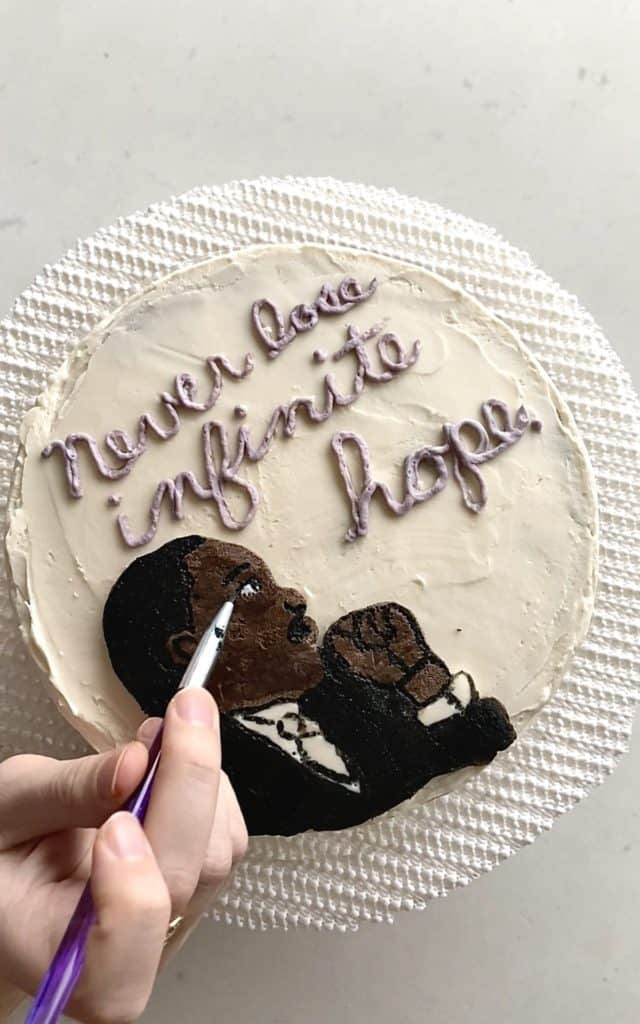
For the black, I added and mixed in a shot glass some clear extract, a few drops of black gel, and a bit of black cocoa powder. If your consistency is too thick, add more clear extract. If it's too thin, mix in a bit more black cocoa powder. Brown cocoa powder will work, too, but you may need to add a bit more black gel so that it's a truly black shade.
Next, paint away, tracing the intricate details and using a large food-safe brush to paint the larger black areas.

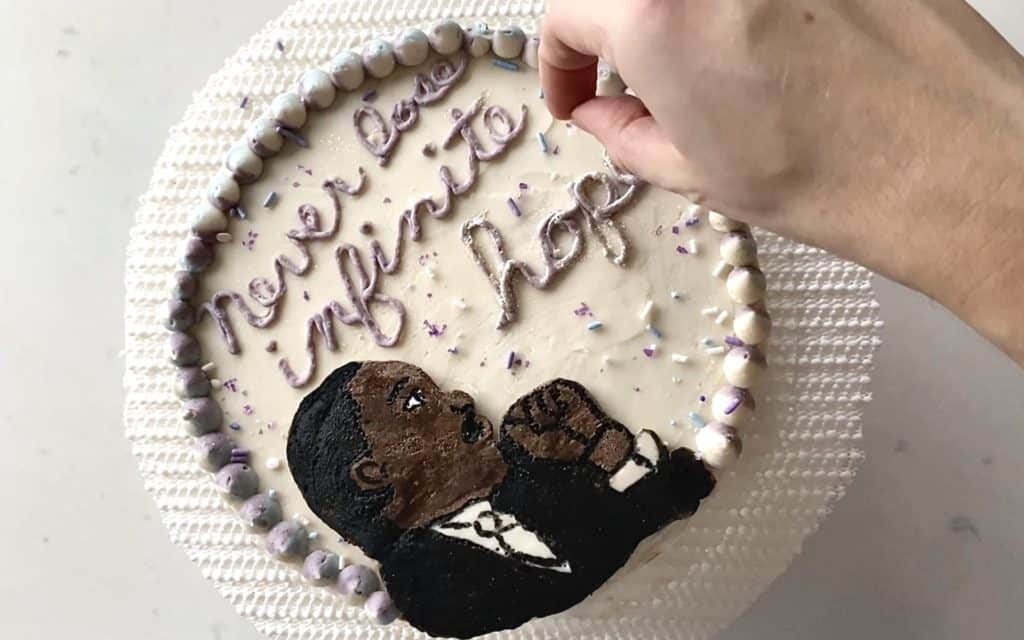
Finishing Touches for this Martin Luther King Jr. Cake
With my remaining purple and blue frosting, along with some white, I piped a cake border with a larger round open tip. I added some matching sprinkles as well as edible purple flakes and ivory glitter. Bakell and Layer Cake Shop sell some fun products for adding some flair and sparkle to your cakes.
At the end, you can also go back and fill in any sections and add finishing touches. You may want to do another coat of black gel. Remember to have fun with it all, though. Don't get too nit-picky and hard on yourself!
FAQ
- Can I use a boxed cake mix? Yes. This tutorial is about the decoration, so use any cake base you like, including homemade or boxed.
- How far ahead can I make the buttercream transfer? Make it 1–3 days ahead and keep it flat in the freezer until you’re ready to place it on the cake.
- My transfer cracked—did I ruin it? Not at all. Patch it with matching buttercream (think of it like edible spackle), then pop it back into the freezer to firm up again.
- What’s “clear extract”? It’s a clear flavoring used to thin gel color for painting—almond and lemon are common. You can also use a tiny bit of clear alcohol, but extract is easiest.
More on Martin Luther King Jr. + Additional Caking Resources
Although some of Martin Luther King Jr.'s best-known quotes may come from his "I Have a Dream" speech that he delivered in 1963, the legacy of this civil rights icon is far bigger and more nuanced than that. We can't reduce him to any single speech or text. In the making of this cake and trying to choose a shorter quote for it, I went through a few different articles and am highlighting two of them below:
- 5 Things Written by Martin Luther King Jr. That Everyone Should Read, According to an Expert
- Quotes from 7 of Martin Luther King Jr.'s Most Notable Speeches
You can also read about the missions and efforts of The King Center, which continues the work of Dr. King's legacy. Mrs. Coretta Scott King established The King Center in 1968, the year of her husband's assassination.
In 1983, Mrs. King also wrote, in regards to Martin Luther King Jr. Day that, "The holiday must be substantive as well as symbolic. It must be more than a day of celebration . . . Let this holiday be a day of reflection, a day of teaching nonviolent philosophy and strategy, a day of getting involved in nonviolent action for social and economic progress."
So to continue to honor the late, great Martin Luther King Jr., find causes that you care about in your own community. Engage with and donate to groups that champion civil rights for all. Cake is nice, but equality and fairness are far sweeter.
And if you're looking to make another cake like this one, check out my Betty White cake tutorial. There are also more tips and tricks for making frosting and cakes on my website's decorating tutorials.
Martin Luther King Jr. Cake Tutorial (Buttercream Transfer)
- Total Time: 1 hour
- Yield: One 8-inch cake round 1x
Description
Decorate a Martin Luther King Jr. cake using a simple buttercream transfer and painted buttercream details. Step-by-step photos, tools list, & more.
Ingredients
Equipment:
- Food-safe paintbrushes
- Offset spatula
- Food gels (I use Chefmaster.)
- Toothpicks for your food gels
- A set of small mixing bowls and spoons, plus the bowl of your stand-mixer
- Printed Mirror image cartoon or clipart of Martin Luther King Jr., sized to cover roughly a third of your cake
- Thumbtacks, T-pins, sewing needles, or another object with a very fine point to trace the details on MLK's face
- Wax paper and pen or permanent marker for the buttercream transfer
- Small containers (like mugs, ramekins, or shot glasses) for mixing food gel colors
- Minimum of four piping bags, fitted with the piping tips below:
- Two larger circular open tips (like Wilton 5 and 8) and two small circular open tips (like Wilton 1-3)
Items that are optional but quite helpful:
- Stand mixer
- Cutting board and chip clip or clipboard (I've even used a magazine in a pinch) for the buttercream transfer
- Tape to hold the buttercream transfer in place
- A cake turntable
- Disposable or reusable cake circles
Ingredients to make this buttercream transfer and painted design:
- One batch of my vanilla buttercream recipe for covering the cake, creating MLK's face, and adding the detailing and text.
- 2 sticks (227 grams) of room temperature butter
- ⅓ cup (80 grams) of room temperature milk, heavy cream, or whipping cream
- 6–7 cups (720 – 840 grams) of powdered sugar
- 1 tbsp of vanilla extract
- ¼ tsp of salt
- Optional but strongly recommended: A few drops of lemon juice or vinegar to cut the sweetness to your liking
- A one-layer cake (this tutorial is based off of one 8" round cake layer; I made mine from about half of a chocolate box mix.)
- Clear extract (like almond, peppermint, lemon, or another clear extract of your choice) to mix with your black food gel
- Cocoa powder for painting your cake
- 3 tbsp of heavy cream
- ¼ cup (40 grams) chocolate chips
- Optional but fun:
- Sprinkles for finishing touches
- Edible glitter and flakes for more pops of color
Food gel colors:
- White
- Black
- Other colors of your choosing for the text and border
- I used purple and blue to match my sprinkles and edible glitter
Instructions
Preparing your cake and frosting:
- Print the mirror image of an MLK cartoon or clipart.
- After making one batch of my vanilla buttercream recipe, crumb coat your cake with an offset spatula, and set it in the refrigerator.
- Remove approximately ¾ of the remaining vanilla frosting from your stand mixer's bowl and set it aside in another mixing bowl.
- In the microwave in short bursts to avoid burning, heat ¼ cup (40 grams) of chocolate chips and 3 tablespoon of heavy cream. Continue heating until you're able to whisk it smoothly together.
- Add that chocolate back into the bowl of your stand mixer, which should now hold about ⅕ of your initial batch of vanilla frosting.
- Use your paddle attachment to mix everything together. Depending on the kind of chocolate you use, you'll need to add a few drops of brown food gel.
- You can also add some black or brown cocoa powder to deepen the shade to your liking.
- Place all of your chocolate frosting in one piping bag, fitted with a medium-sized tip like Wilton #5.
- Place 4 tablespoon of your white frosting into another piping bag, fitted with a slightly smaller tip, like Wilton #3.
Creating the buttercream transfer:
- Set your mirror image of Martin Luther King Jr. on the clipboard or surface of your choosing and secure with tape. Place wax paper on top, and trace the outline using pen or marker.
- Make a buttercream transfer by piping one generous coat of chocolate frosting over top the image, covering everything except the white areas of MLK's shirt. Fill in those areas with your white frosting
- Return any remaining white frosting to the bowl of white vanilla buttercream.
- Place the wax paper with piped buttercream into the freezer to harden.
Writing on your cake
- While your buttercream transfer freezes, bring your crumb-coated cake out of the refrigerator. Soften any blemishes with the back of a warm spoon. Fill in any gaps with white frosting and smooth with offset spatula or spoon.
- Remove about ⅔ of a cup of the white frosting from your smaller mixing bowl, and separate that into two smaller bowls.
- Dye one bowl light blue and the other light purple before putting them together in a piping bag fitted with a small open tip, like Wilton 1-3.
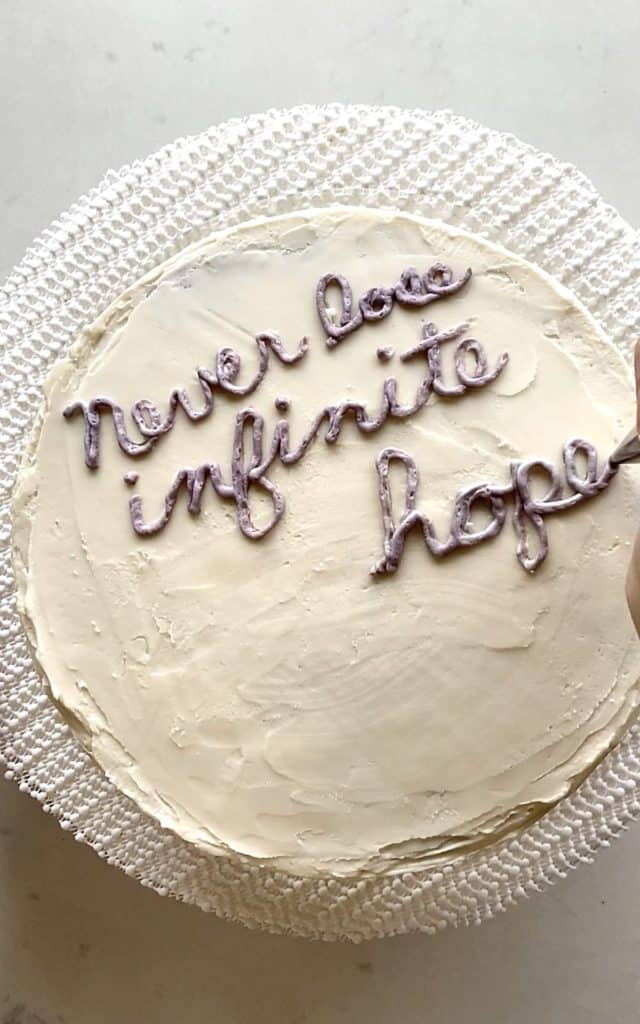
- Faintly outline with a toothpick then fill in, "Never lose infinite hope," using your piping bag full of blue and purple frosting.
Attaching your buttercream transfer:
- Once your transfer is firm to the touch (after about 30 minutes in the freezer), put some frosting on the side of your cake where you'll be placing it. Press it to the cake and peel away the wax paper on top of the buttercream to reveal your buttercream transfer!
- Gently use the back of a warm spoon to smooth out any creases in your frosting.
Details, details, details for painting MLK's face:
- On your same piece of wax paper or a fresh one if needed, trace the details of MLK's face.
- Attach that to your buttercream transfer using thumbtacks or T-pins. Punch tiny holes through the wax paper to create faint outlines of those facial details.
- Remove the wax paper, and carefully paint the whites of his eye. Very carefully trace the remaining details with the smallest food-safe paintbrush you have.
- Pipe a border around the cake using your remaining blue and purple frosting and a piping tip of your choosing. Add sprinkles, edible flakes, and glitter as desired.
Notes
- I made this tutorial for a one-layer 8-inch round cake. If you're creating this design on a layer cake, you may need additional frosting to cover the sides of your cake and between its layers.
- If you haven't made detailed buttercream transfers before, I highly recommend making a full batch of my vanilla buttercream. You may have leftovers, but you can easily freeze any remaining buttercream. In an airtight container, it will remain fresh for 3-4 months. It's much better to have excess frosting than to get halfway through a cake decorating project and realize you need a little (or a lot!) more frosting. So go ahead and make the whole batch.
- To achieve smooth buttercream and a cleaner-looking cake and design, always spend a few minutes with a spatula or spoon, pushing air pockets out of your buttercream before putting it into your piping bags. To do this, take a spatula or spoon in circles around your bowl(s) of buttercream, pressing it against the sides of the bowl and smoothing it down. Keep doing this until your frosting looks smooth and not craggly. If your arm is a little tired afterward, you probably did it right! 🙂
- American buttercream crusts when it is exposed to air, even for a period as brief as 15 minutes. I recommend covering your bowls of frosting with either plastic wrap, dampened paper towels, or even a plate to prevent air from hitting them. However, if your frosting has begun to crust, no problem: Simply use your spoon or spatula to re-whip and smooth it back to life before spreading it onto your cake or putting it in your piping bags.
- If at any point you notice moisture or condensation forming on the surface of your buttercream transfer while you paint it, I recommend popping it back into the refrigerator or lowering the temperature of your room so that your cake stays cool. It'll make it much easier to paint without creating smudges!
- Prep Time: 15 minutes
- Decorating Time: 45 minutes
- Category: Dessert
- Cuisine: American

Leave a Reply