Description
Decorate a Martin Luther King Jr. cake using a simple buttercream transfer and painted buttercream details. Step-by-step photos, tools list, & more.
Ingredients
Scale
Equipment:
- Food-safe paintbrushes
- Offset spatula
- Food gels (I use Chefmaster.)
- Toothpicks for your food gels
- A set of small mixing bowls and spoons, plus the bowl of your stand-mixer
- Printed Mirror image cartoon or clipart of Martin Luther King Jr., sized to cover roughly a third of your cake
- Thumbtacks, T-pins, sewing needles, or another object with a very fine point to trace the details on MLK's face
- Wax paper and pen or permanent marker for the buttercream transfer
- Small containers (like mugs, ramekins, or shot glasses) for mixing food gel colors
- Minimum of four piping bags, fitted with the piping tips below:
- Two larger circular open tips (like Wilton 5 and 8) and two small circular open tips (like Wilton 1-3)
Items that are optional but quite helpful:
- Stand mixer
- Cutting board and chip clip or clipboard (I've even used a magazine in a pinch) for the buttercream transfer
- Tape to hold the buttercream transfer in place
- A cake turntable
- Disposable or reusable cake circles
Ingredients to make this buttercream transfer and painted design:
- One batch of my vanilla buttercream recipe for covering the cake, creating MLK's face, and adding the detailing and text.
- 2 sticks (227 grams) of room temperature butter
- 1/3 cup (80 grams) of room temperature milk, heavy cream, or whipping cream
- 6–7 cups (720 – 840 grams) of powdered sugar
- 1 tbsp of vanilla extract
- 1/4 tsp of salt
- Optional but strongly recommended: A few drops of lemon juice or vinegar to cut the sweetness to your liking
- A one-layer cake (this tutorial is based off of one 8" round cake layer; I made mine from about half of a chocolate box mix.)
- Clear extract (like almond, peppermint, lemon, or another clear extract of your choice) to mix with your black food gel
- Cocoa powder for painting your cake
- 3 tbsp of heavy cream
- 1/4 cup (40 grams) chocolate chips
- Optional but fun:
- Sprinkles for finishing touches
- Edible glitter and flakes for more pops of color
Food gel colors:
- White
- Black
- Other colors of your choosing for the text and border
- I used purple and blue to match my sprinkles and edible glitter
Instructions
Preparing your cake and frosting:
- Print the mirror image of an MLK cartoon or clipart.
- After making one batch of my vanilla buttercream recipe, crumb coat your cake with an offset spatula, and set it in the refrigerator.
- Remove approximately 3/4 of the remaining vanilla frosting from your stand mixer's bowl and set it aside in another mixing bowl.
- In the microwave in short bursts to avoid burning, heat 1/4 cup (40 grams) of chocolate chips and 3 tbsp of heavy cream. Continue heating until you're able to whisk it smoothly together.
- Add that chocolate back into the bowl of your stand mixer, which should now hold about 1/5 of your initial batch of vanilla frosting.
- Use your paddle attachment to mix everything together. Depending on the kind of chocolate you use, you'll need to add a few drops of brown food gel.
- You can also add some black or brown cocoa powder to deepen the shade to your liking.
- Place all of your chocolate frosting in one piping bag, fitted with a medium-sized tip like Wilton #5.
- Place 4 tbsp of your white frosting into another piping bag, fitted with a slightly smaller tip, like Wilton #3.
Creating the buttercream transfer:
- Set your mirror image of Martin Luther King Jr. on the clipboard or surface of your choosing and secure with tape. Place wax paper on top, and trace the outline using pen or marker.
- Make a buttercream transfer by piping one generous coat of chocolate frosting over top the image, covering everything except the white areas of MLK's shirt. Fill in those areas with your white frosting
- Return any remaining white frosting to the bowl of white vanilla buttercream.
- Place the wax paper with piped buttercream into the freezer to harden.
Writing on your cake
- While your buttercream transfer freezes, bring your crumb-coated cake out of the refrigerator. Soften any blemishes with the back of a warm spoon. Fill in any gaps with white frosting and smooth with offset spatula or spoon.
- Remove about 2/3 of a cup of the white frosting from your smaller mixing bowl, and separate that into two smaller bowls.
- Dye one bowl light blue and the other light purple before putting them together in a piping bag fitted with a small open tip, like Wilton 1-3.
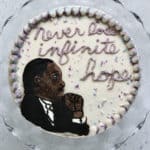
- Faintly outline with a toothpick then fill in, "Never lose infinite hope," using your piping bag full of blue and purple frosting.
Attaching your buttercream transfer:
- Once your transfer is firm to the touch (after about 30 minutes in the freezer), put some frosting on the side of your cake where you'll be placing it. Press it to the cake and peel away the wax paper on top of the buttercream to reveal your buttercream transfer!
- Gently use the back of a warm spoon to smooth out any creases in your frosting.
Details, details, details for painting MLK's face:
- On your same piece of wax paper or a fresh one if needed, trace the details of MLK's face.
- Attach that to your buttercream transfer using thumbtacks or T-pins. Punch tiny holes through the wax paper to create faint outlines of those facial details.
- Remove the wax paper, and carefully paint the whites of his eye. Very carefully trace the remaining details with the smallest food-safe paintbrush you have.
- Pipe a border around the cake using your remaining blue and purple frosting and a piping tip of your choosing. Add sprinkles, edible flakes, and glitter as desired.
Notes
- I made this tutorial for a one-layer 8-inch round cake. If you're creating this design on a layer cake, you may need additional frosting to cover the sides of your cake and between its layers.
- If you haven't made detailed buttercream transfers before, I highly recommend making a full batch of my vanilla buttercream. You may have leftovers, but you can easily freeze any remaining buttercream. In an airtight container, it will remain fresh for 3-4 months. It's much better to have excess frosting than to get halfway through a cake decorating project and realize you need a little (or a lot!) more frosting. So go ahead and make the whole batch.
- To achieve smooth buttercream and a cleaner-looking cake and design, always spend a few minutes with a spatula or spoon, pushing air pockets out of your buttercream before putting it into your piping bags. To do this, take a spatula or spoon in circles around your bowl(s) of buttercream, pressing it against the sides of the bowl and smoothing it down. Keep doing this until your frosting looks smooth and not craggly. If your arm is a little tired afterward, you probably did it right! 🙂
- American buttercream crusts when it is exposed to air, even for a period as brief as 15 minutes. I recommend covering your bowls of frosting with either plastic wrap, dampened paper towels, or even a plate to prevent air from hitting them. However, if your frosting has begun to crust, no problem: Simply use your spoon or spatula to re-whip and smooth it back to life before spreading it onto your cake or putting it in your piping bags.
- If at any point you notice moisture or condensation forming on the surface of your buttercream transfer while you paint it, I recommend popping it back into the refrigerator or lowering the temperature of your room so that your cake stays cool. It'll make it much easier to paint without creating smudges!
- Prep Time: 15 minutes
- Decorating Time: 45 minutes
- Category: Dessert
- Cuisine: American