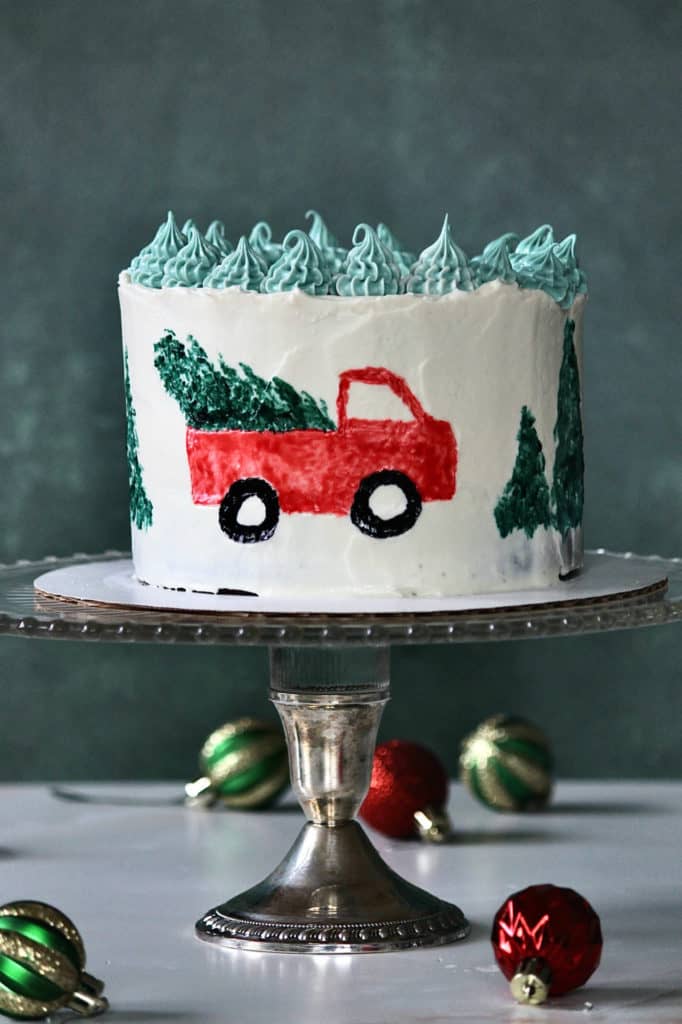
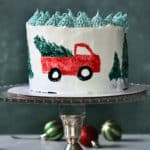
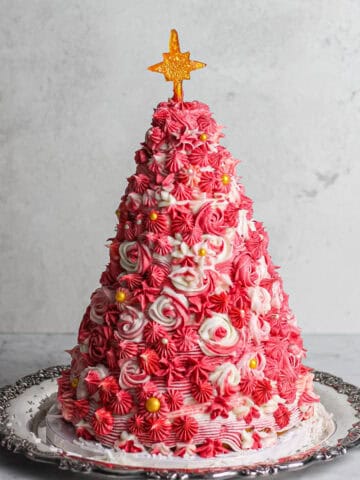
Of all the holidays for cake-decorating, Christmas tops my list. But the holidays can be busy, so making time for cake also poses challenges. That's why I created this easy Christmas tree farm cake tutorial for you. This cake design is a simple one that basically requires cake, frosting, and three food gel colors. Food-safe paintbrushes are key here, too, and you'll need a piping bag and star tip for the trees on top. Beyond that, this cake is about as easy as you can get. I finished the entire design in under half an hour!
Jump to:
A sugar free Christmas cake
This design is easy to make, and below are step-by-step photos. You'll of course need a cake, and if you're in a time crunch, whip up your favorite box mix. This Christmas cake was for a diabetic family member who likes Pillsbury's sugar free cake mix as well as their sugar free vanilla frosting. Because of that, I went the store-bought route here for everything. I'm still learning about sugar free alternatives in baking and wanted to stick with frosting I knew my family member could eat instead of trying to create my own. I used the entire 15-oz (415 grams) can to cover this cake. Mine was six inches around and two layers tall. That can of frosting had enough to finish the tree design on top, too.
However, if you're not using a can of frosting, check out my vanilla buttercream recipe and scale it up or down, depending on the size of your cake. And if you have leftovers, you can store excess in the freezer for up to three months.

Tools for making this Christmas tree farm cake
For the painted design on this Christmas tree farm cake, you'll need red, green, and black food gel. You'll also need food-safe paintbrushes and small bowls or containers to mix the colors. For the trees on top, you'll need to dye some of your vanilla frosting green. That will then go in a piping bag fitted with a small open star tip like Wilton 32 or 21. I like Wilton food gel, though here I used Chef Master. I've heard great things about Americolor, too. Any of these (or another brand of food gel) should work fine.
I also recommend a cake stand or turntable for decorating cakes, though it's not totally necessary. You just need to decorate your cake on whatever surface you plan to serve it if you don't have a stand or turntable. Cardboard cake rounds or cake circles are also very helpful for placing underneath your cake while decorating and transferring it between surfaces.
Steps for making the painted design on this sugar-free Christmas cake
Start by baking your favorite cake recipe or box mix before making frosting or opening up a can of store-bought frosting.
Pour your red, green, and black food gels into three separate mixing bowls or small containers. Add powdered sugar and ½ teaspoon of clear extract to each of these bowls. Combine all ingredients together in your three bowls with the food safe paintbrush you plan to use for each of the colors. Add more powdered sugar or extract to each bowl as needed to achieve a paste-like consistency.
And if you're using a sugar free frosting like I did, you can still make this work. In 5 second bursts in the microwave on a low setting, heat about ½ teaspoon of your frosting until it's melted. Add it into your food gels until you've achieved a slightly thickened "paint" for your cake.
Once you've mixed your colors, set your frosted cake on a cake stand, turntable, or whatever surface on which you'll be serving your cake.
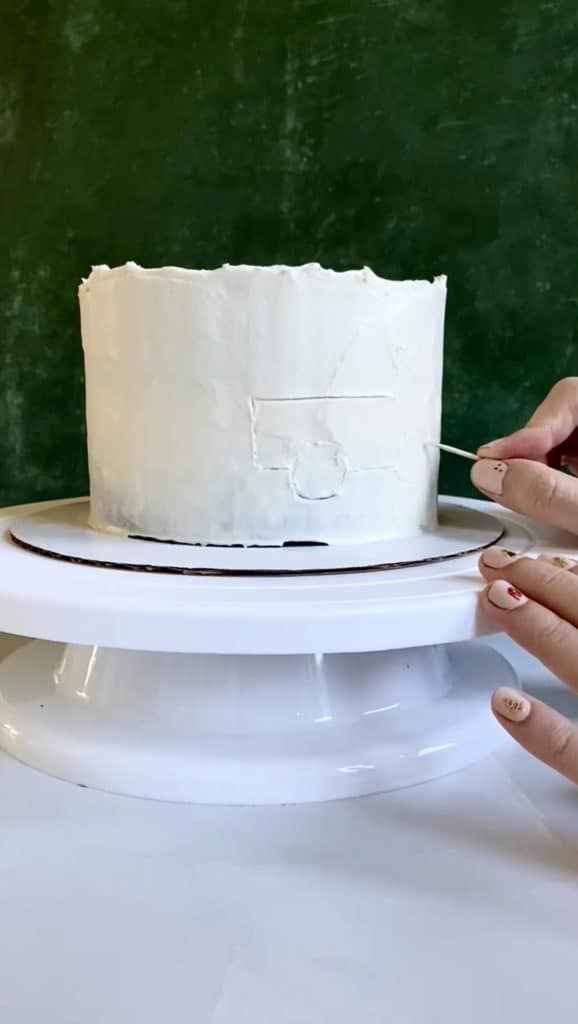
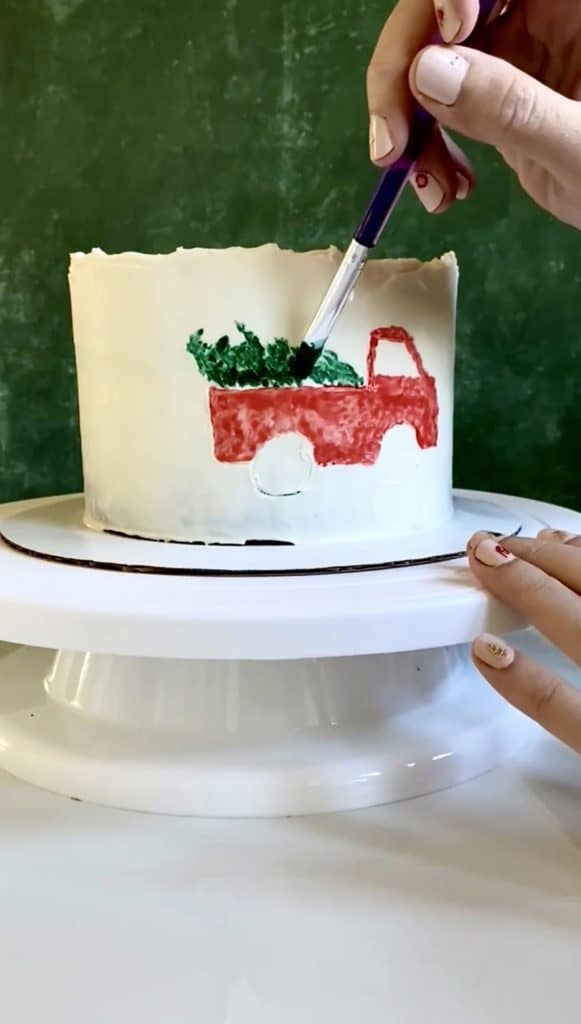
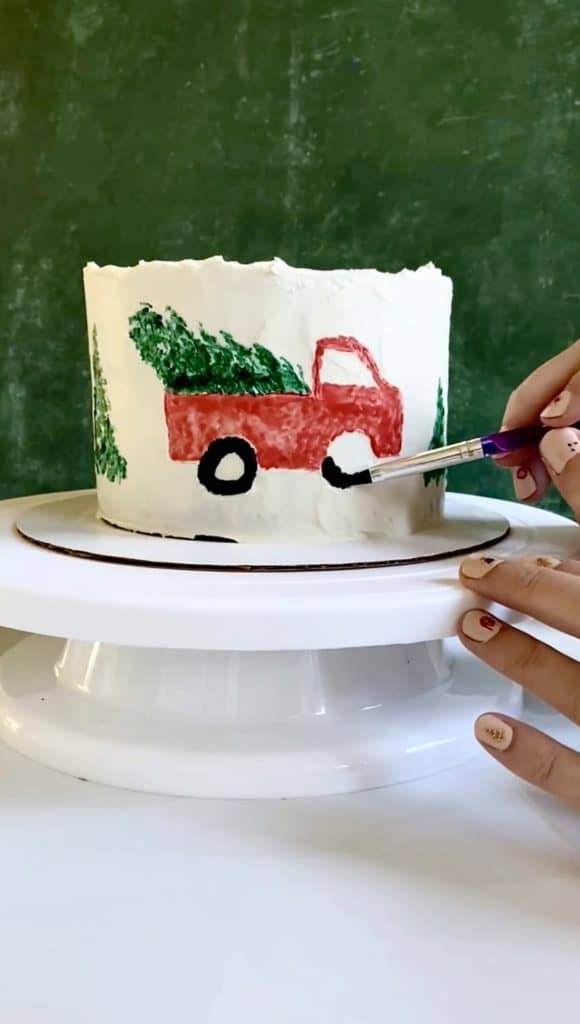
Draw the outline of a truck and its tires on your cake with a toothpick. The lines will not be visible once you paint in all the details.
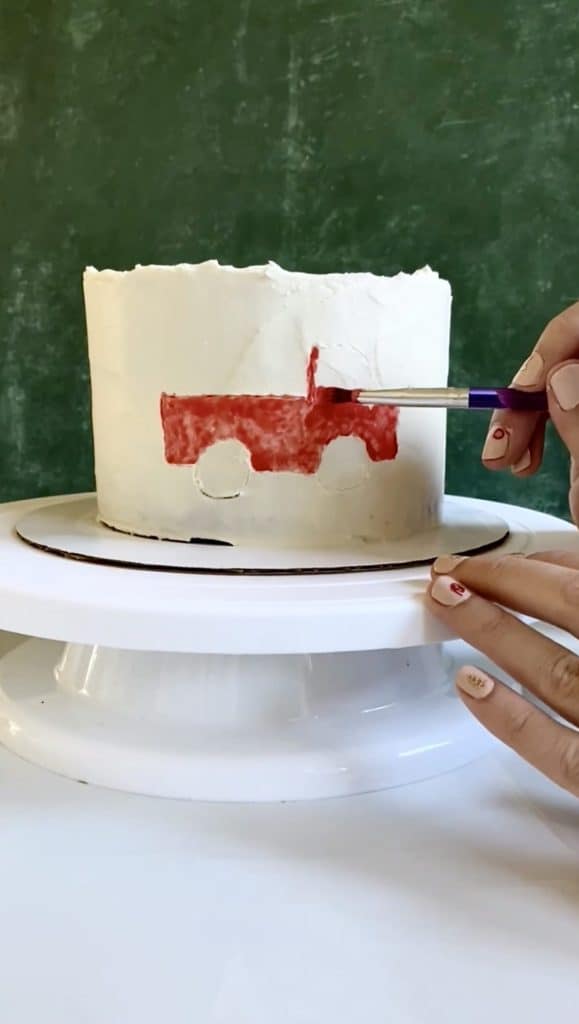
Fill in the design with your red “paint,” and color the tires with your black food gel mixture.
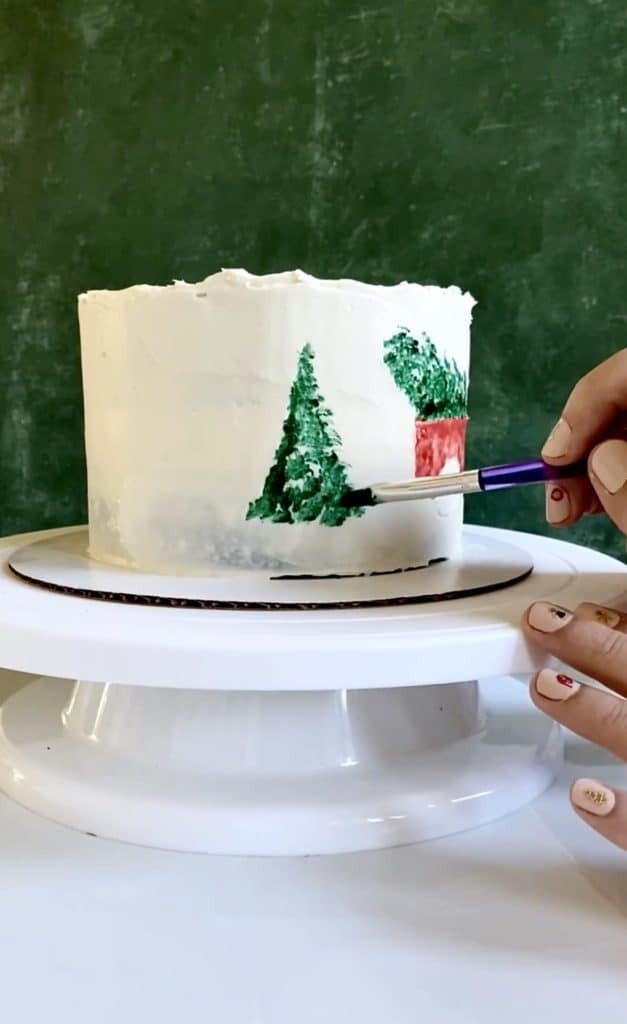
Use your green food gel to create a few trees surrounding your truck and one peeking out of the bed of it. To make the trees like mine, gently make repeated small strokes and blots of paint on the cake in triangular shapes that resemble Christmas trees.

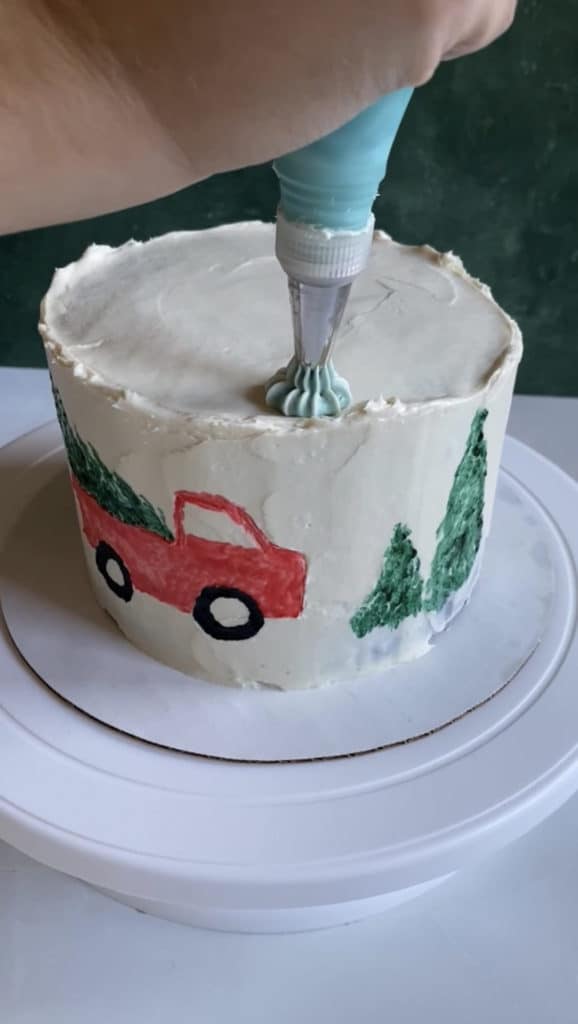
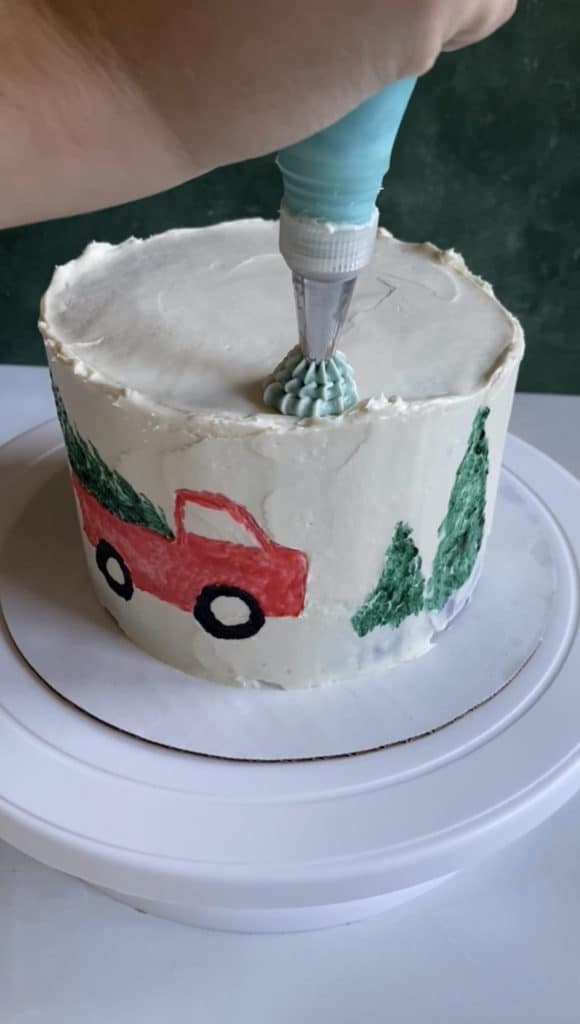
Making the Trees on the top of this Christmas tree farm cake
Worth noting is that often the frosting you'll find in small tubs at the store isn't particularly thick. You can see that my trees don't quite stand up straight, but if you're making your own buttercream, you can absolutely create a stiffer frosting. As is, you still get the same effect with the one from the store. And I liked how the less sturdy frosting gives my trees a bit of character!

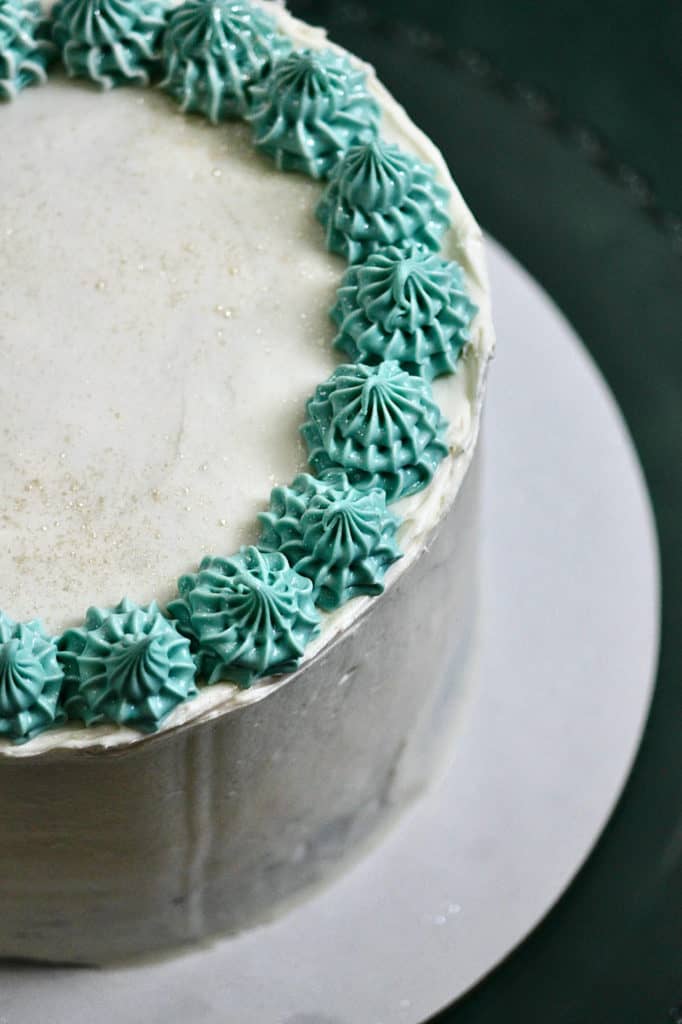
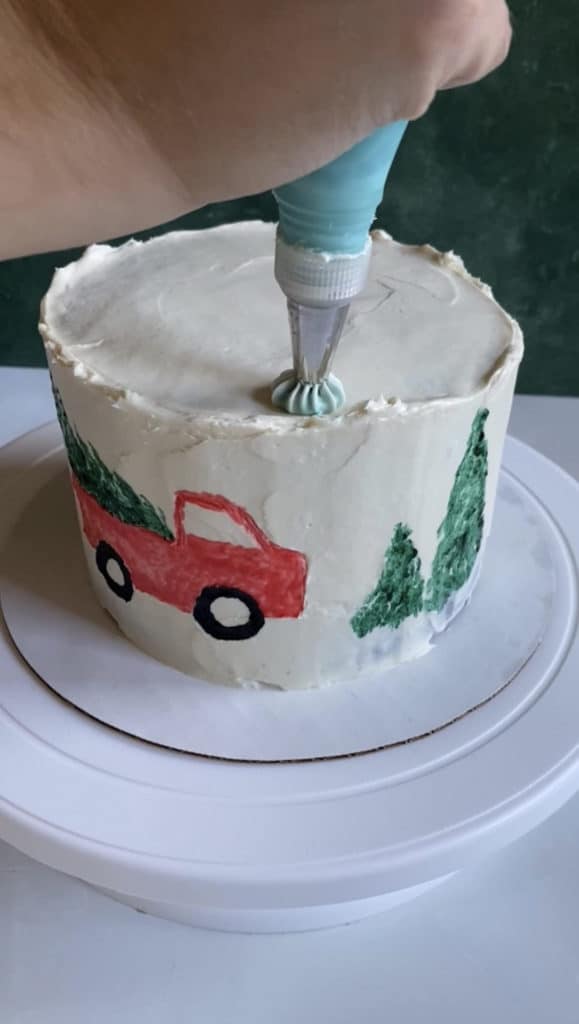
Dye your white frosting of choice green and put it inside your piping bag fitted with an open star tip. You'll need about ¼ cup of frosting for this part if you make trees the size of mine. Use more frosting for larger trees (I'd say mine were a little less than an inch tall).
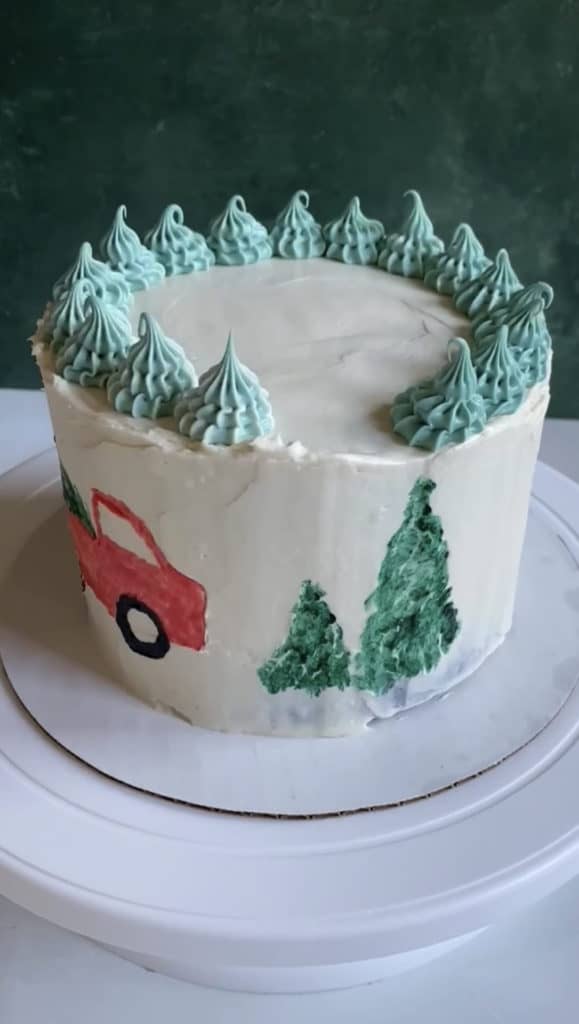
Press your piping tip to the rim of the top of your cake. Make the tree by pressing your piping bag down, releasing as you pull it up, and repeating this motion three times to make each tier of the tree.
Repeat that same motion around the edge of the top until it’s covered with small trees.
If you wish, add some edible, food-safe glitter for snowy vibes on top! I get mine from Bakell.

More Holiday Baking
I hope you enjoyed this Christmas tree farm cake tutorial and have a happy holiday season! If you're looking for other sweet treats, check out my cranberry sour cream Bundt cake or mini apple apple Bundt cake recipe.
For a more decadent layer cake for the holidays, my pumpkin chai latte cake recipe would be a really fun and tasty one.

Christmas Tree Farm Cake Tutorial
- Total Time: 25 minutes
- Yield: 1 cake 1x
Description
Looking for an easy Christmas cake-decorating idea? The design for this Christmas tree farm cake comes together in under 30 minutes!
Ingredients
Equipment:
- Food-safe brushes for cake decorating
- 3 small mixing bowls
- Toothpick for tracing design
- Optional but helpful: A cake turntable as well as disposable or reusable cake circles
Ingredients for painted design:
- 1 cake, covered in white frosting
- 1-2 drops of green food gel
- 1-2 drops of red food gel
- 1-2 drops of black food gel
- 1 ½ tsp of clear extract (like almond extract, imitation vanilla, or another clear extract of your choosing), divided into thirds
- 3 tsp of powdered sugar, divided into thirds
Trees on top of cake:
- Piping bag fitted with an open star piping tip
- 4 tbsp of white frosting (or more for larger trees)
- A few drops of green food gel
- Edible glitter for dusting on top
Instructions
- To create the painted design, pour your red, green, and black food gels into three separate mixing bowls or small containers like mugs.
- Add 1 teaspoon of powdered sugar and ½ teaspoon of clear extract to each of these bowls. Combine all ingredients together in your three respective bowls with the food safe paintbrush you plan to use for each of the colors. Add more powdered sugar or extract to each bowl as needed to achieve a paste-like consistency.
- Set your frosted cake on a cake stand or turntable, ideally with a cardboard or reusable cake circle underneath it.
- Using a toothpick, draw the outline of a truck on your cake. The lines will not be visible once you paint in all the details.
- Fill in the truck’s design with your red “paint,” and draw the tires with your black food gel mixture.
- Use your green food gel mixture to create a few trees surrounding your truck and peeking out of the bed of it. To make the trees like mine, gently make repeated small strokes of paint on the cake in triangular shapes of the Christmas trees. Think of it as sponge painting with a paintbrush.
- To decorate the top of the cake with a ring of trees, dye your white frosting green (you could mix it in the small container you used with the remnants of green food gel), and put it inside your piping bag fitted with an open star tip.
- Press your piping tip to the rim of the top of your cake, and make a tree by pressing your piping bag down, releasing as you pull it up, and repeating this motion three times to make each tier of the tree.
- Repeat that same motion around the edge of the top until it’s covered with small trees.
- Add edible glitter for snowy vibes. Enjoy!
Notes
The cake I decorated here was a 6" cake with two thick layers. You will likely need to increase your frosting as you increase the size of your cake. Here's one guide for frosting ratios, but know that you will need minimal, if any, increases to your food gel mixtures if you're only increasing your cake by a few inches. A little goes a long way with mixing food gels, powdered sugar (or a sugar-free frosting alternative), and extracts! You can stretch those far for making a painted cake design.
- Prep Time: 5 minutes
- Category: Dessert

Leave a Reply