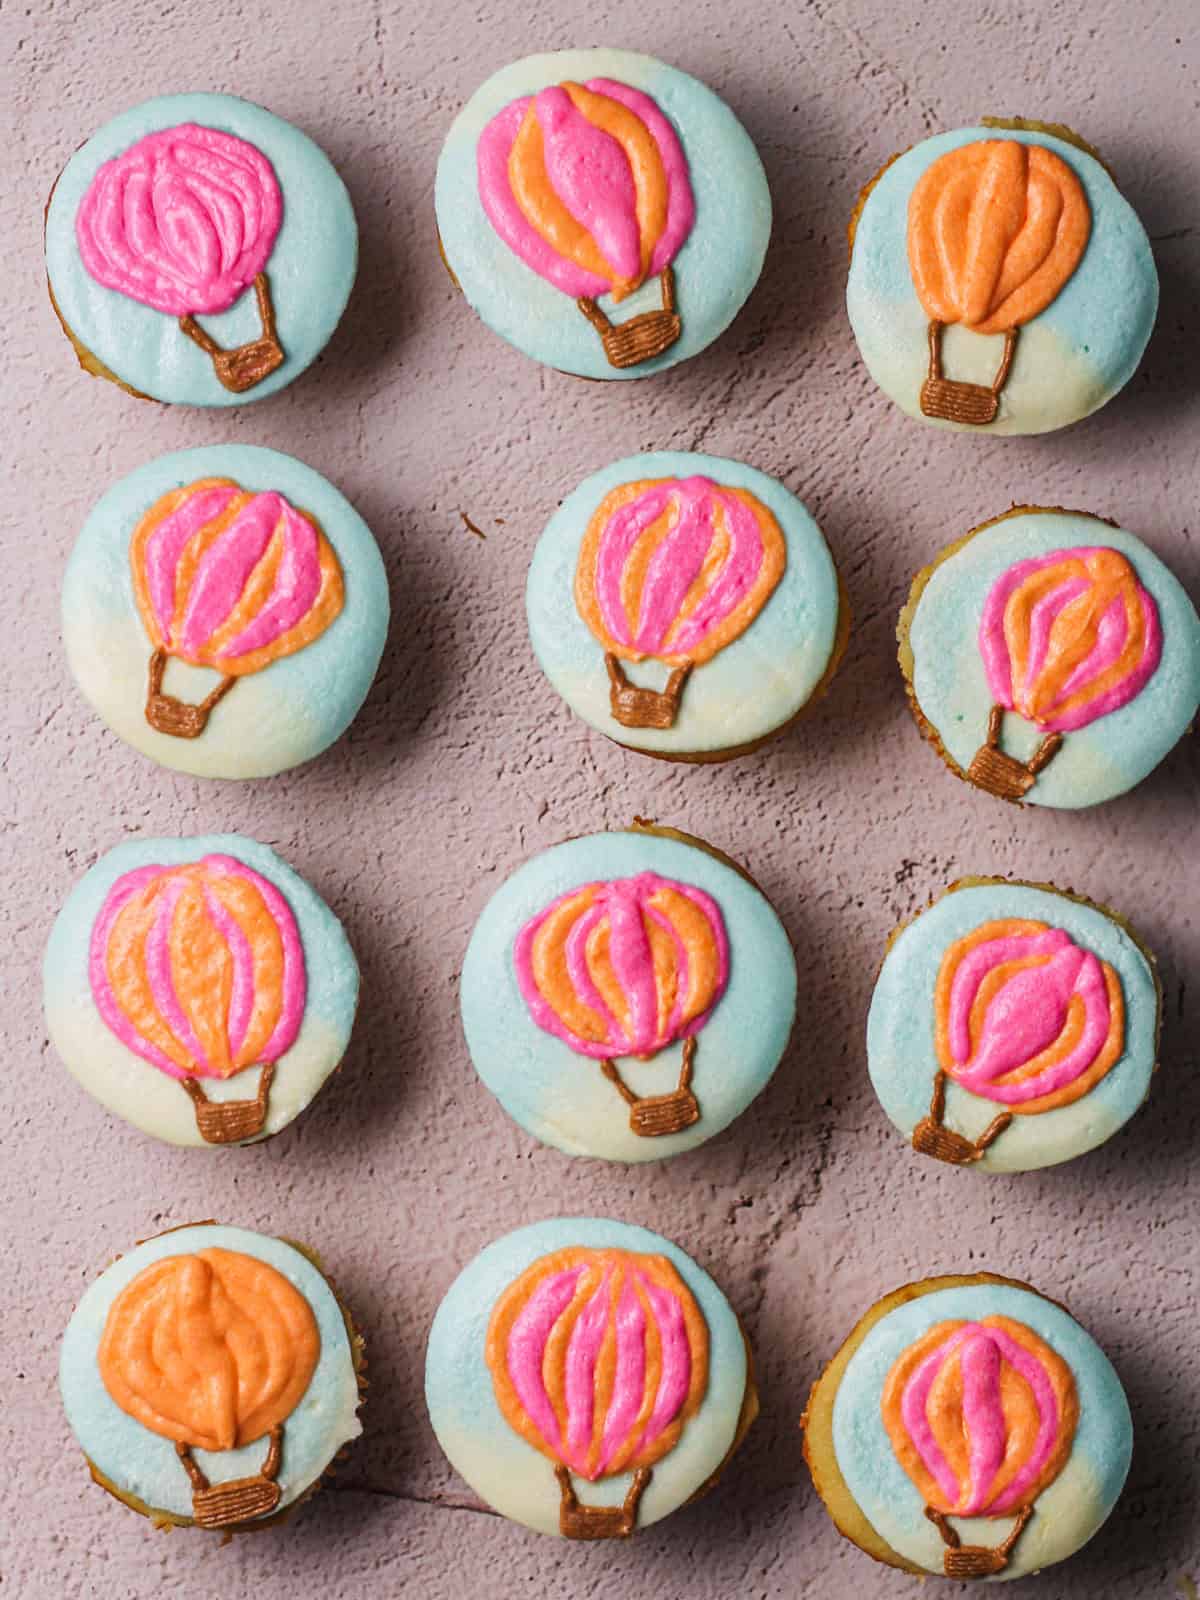
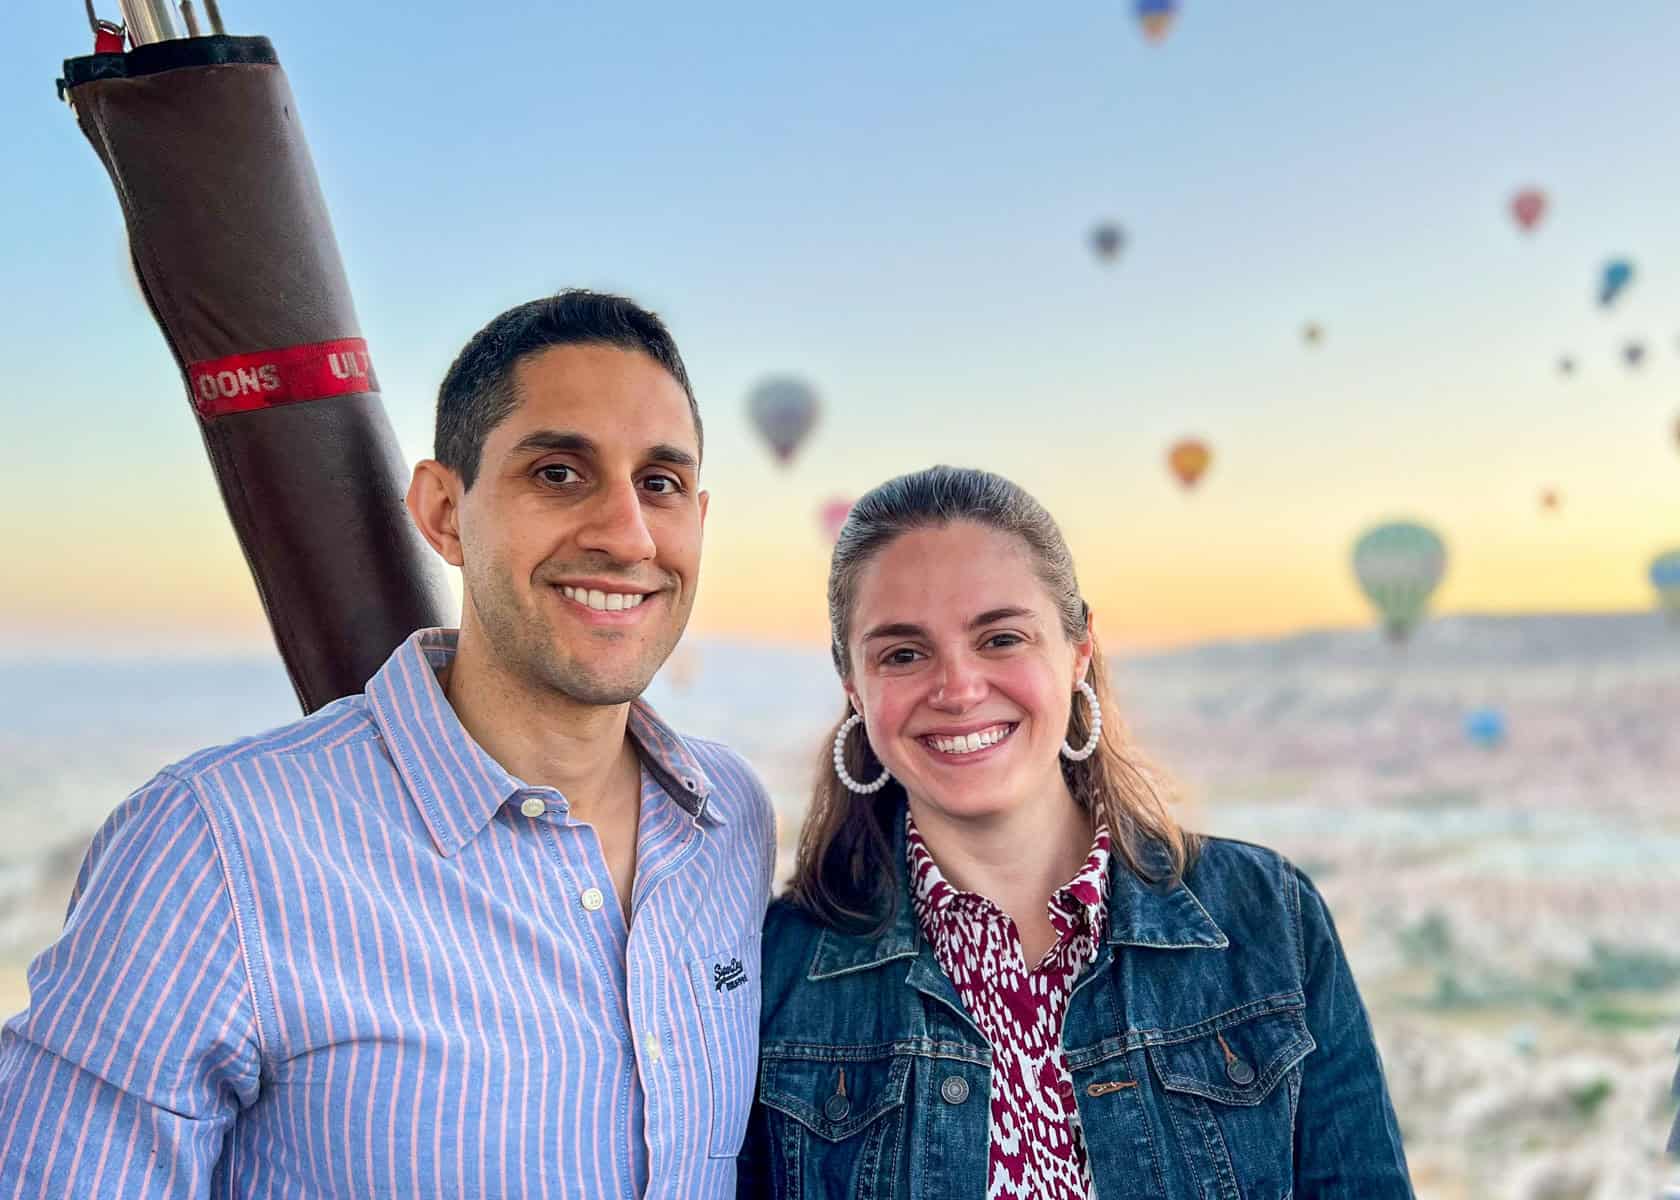
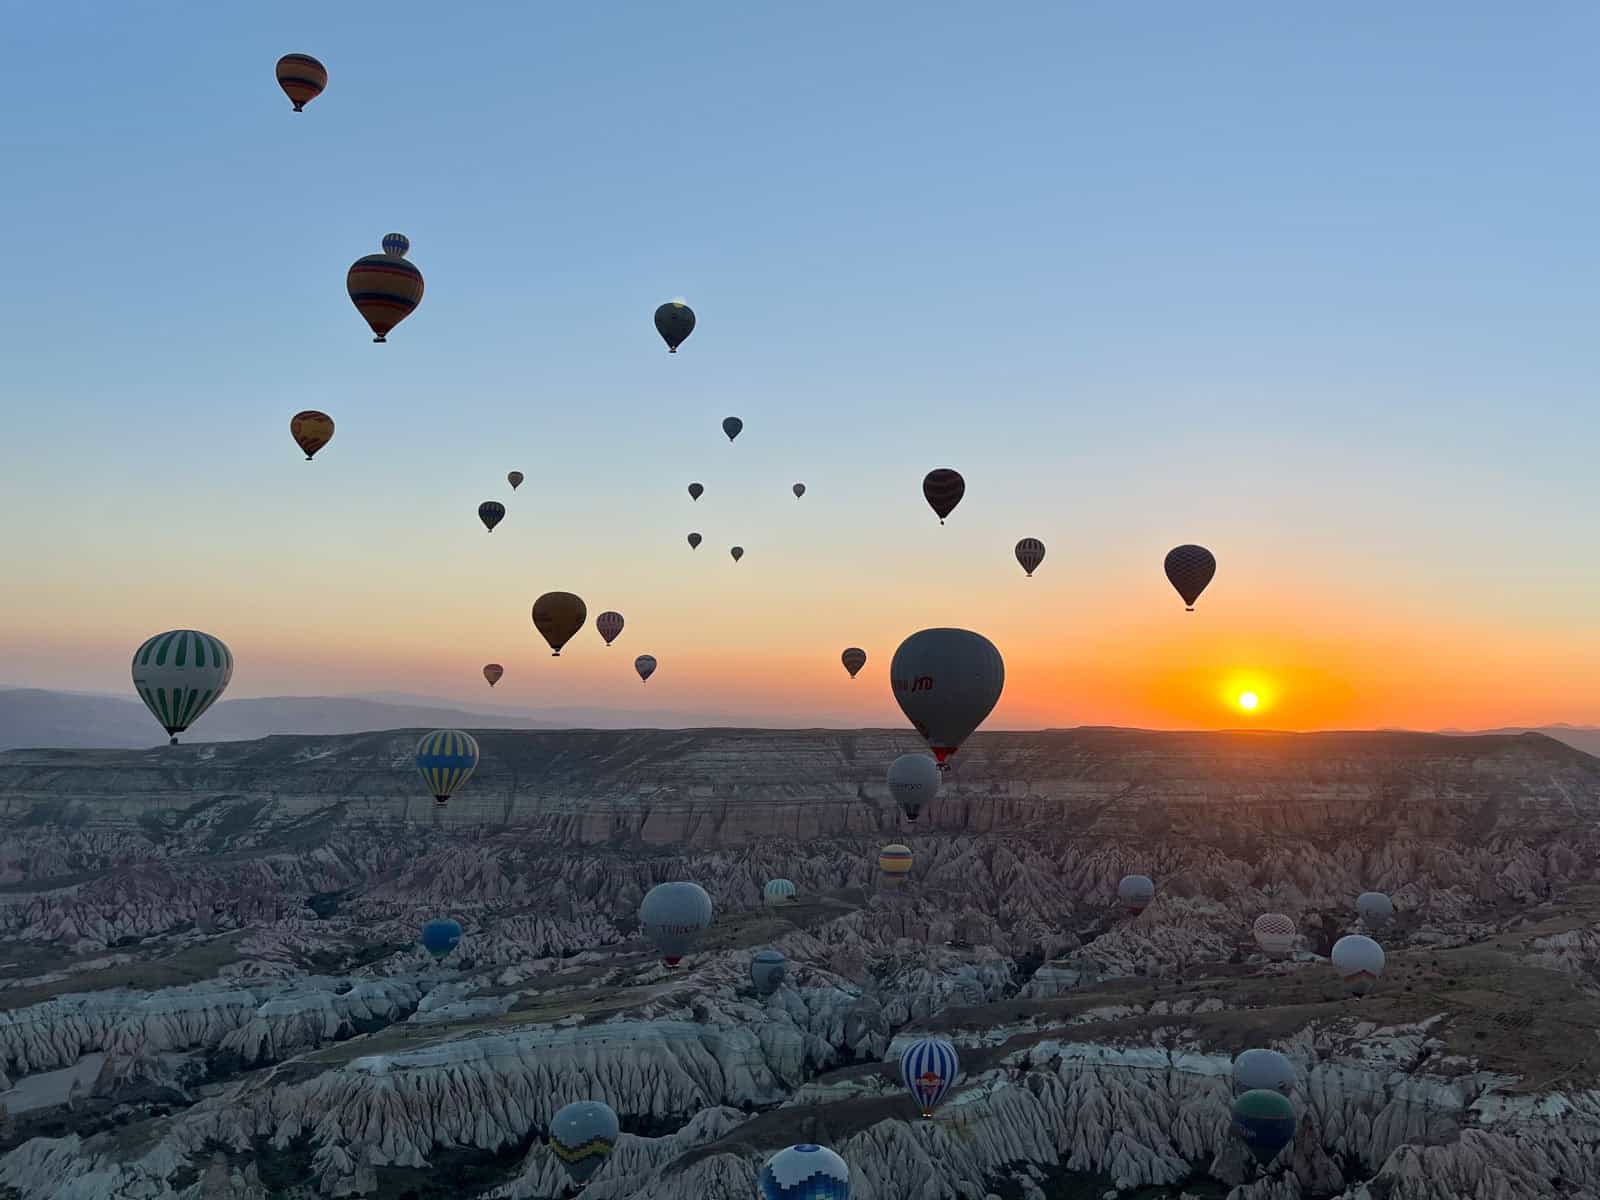
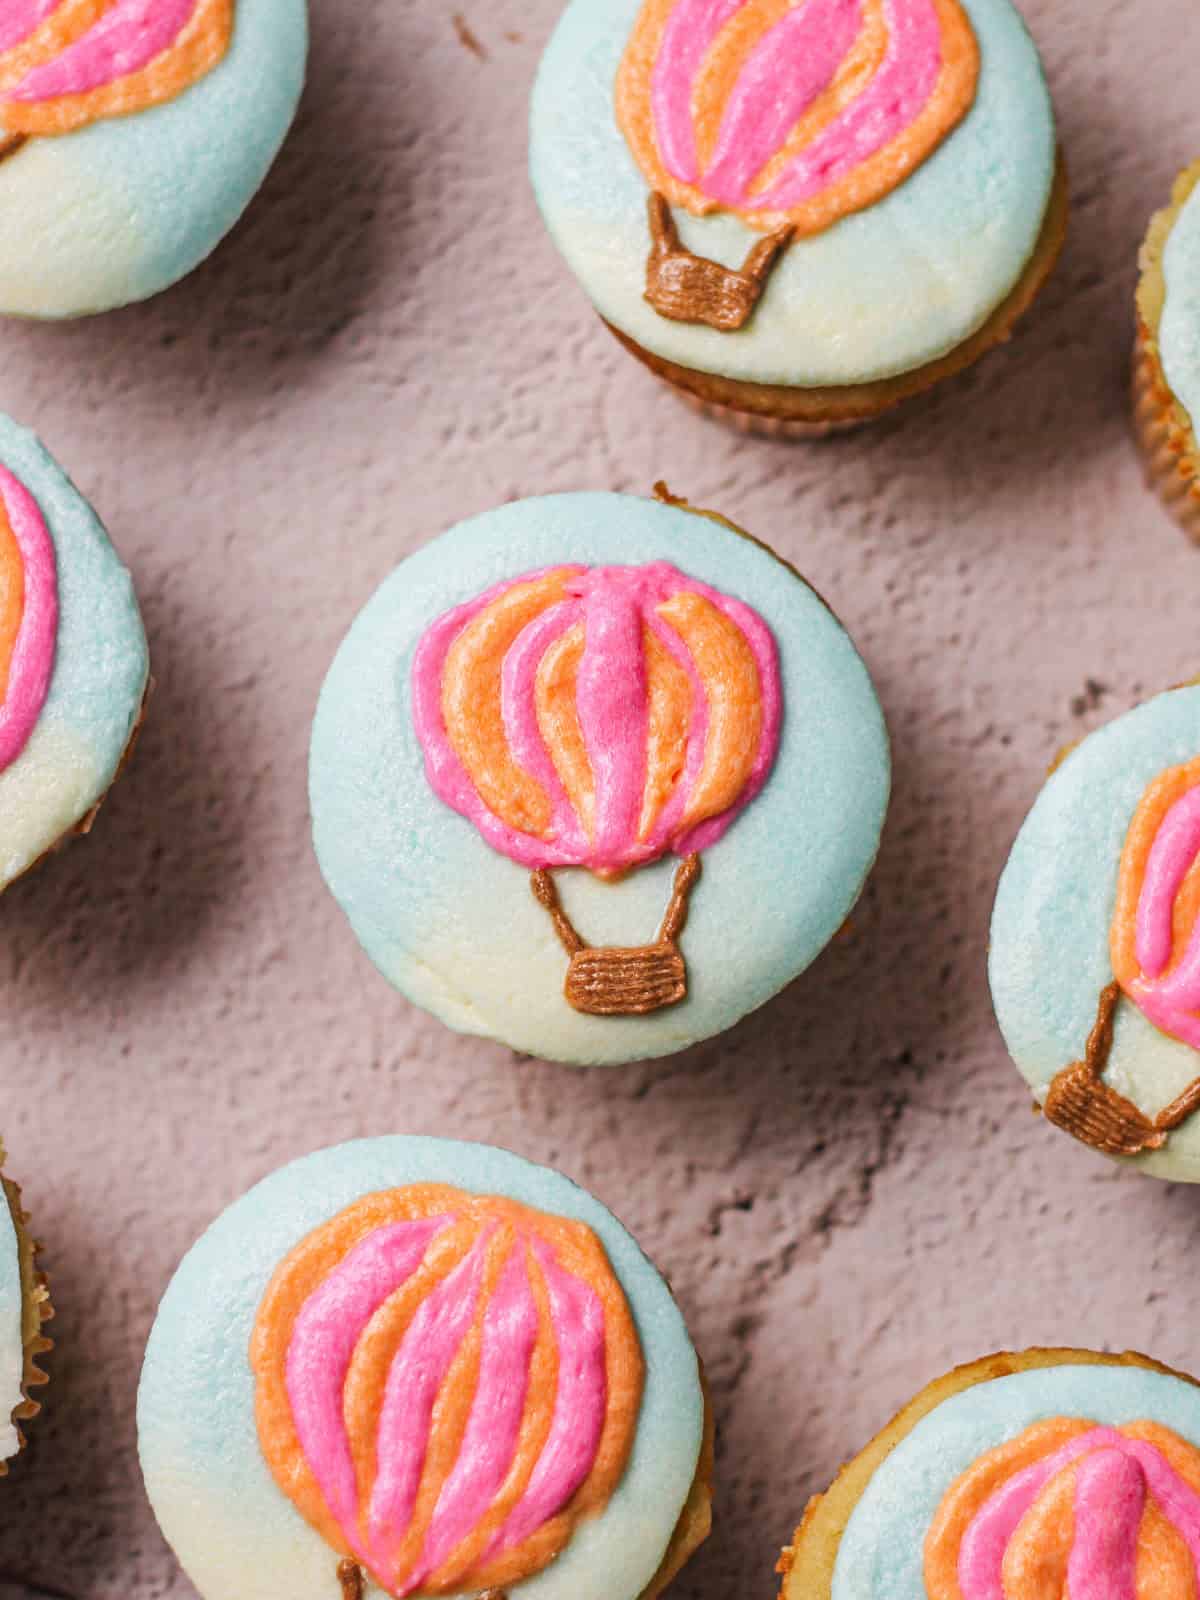
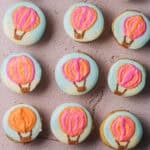
The morning we took a hot air balloon ride at sunrise in Cappadocia is still one of my favorite travel memories, so I turned that moment into dessert. In this tutorial for decorating hot air balloon cupcakes, I’ll walk you through how to create the smooth “sky” background and pipe the balloon and basket designs with just a few piping tips, pastry bags, and colored buttercream. It’s a fun, travel-inspired cupcake decorating project that’s completely doable at home, even if you’re not a professional decorator.
Jump to:
- 🇹🇷 Traveling in Turkey
- 🎥 Quick Decorating Video
- 📋 Equipment and Materials for this Tutorial for Hot Air Balloon Cupcakes
- 🎨 Frosting and Color Ideas for Hot Air Balloon Cupcakes
- 🧁 Recipes for Cupcakes and Frosting
- 🤫 The Secret to Super Smooth Frosting
- 🖌️ How to Decorate Hot Air Balloon Cupcakes Step by Step
- 💡Pro Tip for Filling a Piping Bag
- ❓Tutorial FAQ
- 🧊 Cupcake Storage
- 🪄 More Tutorials
- Hot Air Balloon Cupcake Tutorial
🇹🇷 Traveling in Turkey
Inspired by that morning sky in Cappadocia, I decided to turn the memory into these hot air balloon cupcakes.
I know, I know. Most folks don’t want a long story in blog posts these days. BUT I wouldn’t be doing our Turkey trip justice if I didn’t share a few of the very cool details behind that unforgettable flight!
A few highlights from our hot air balloon ride:
- Location: Cappadocia, Turkey is a region famous for its otherworldly rock formations and hundreds of hot air balloons rising at once.
- Timing: We visited in the heat of July, which meant takeoff was very early. And by that, I mean our wake-up call came at 3:00 a.m.! 😳
- Worth it: The sunrise view was beyond anything I’ve seen. There was peaceful, golden light across the valleys and a sea of balloons surrounded us.
- Weather matters: Flights can be canceled last-minute due to wind or heat, so if you ever plan this trip, stay in Cappadocia a day or two for the best odds of flying.
I can’t say enough about the experience, so I’ll let these photos (and the cupcakes!) do the rest of the talking. 🙂
My website has a series of tutorials for decorating cakes and cupcakes so I recommend giving that a look if you also enjoy dressing up your desserts in fun and creative ways!
🎥 Quick Decorating Video
📋 Equipment and Materials for this Tutorial for Hot Air Balloon Cupcakes
On my post for crumb coating cake, I share a really thorough breakdown of basic cake-decorating tools. I’m resharing a simplified version here with a few tweaks specific to this project — but if you’re newer to decorating, definitely check out that post too!
- Cupcake tin — Essential for baking your cupcakes, along with cupcake liners.
- Wax paper — Used to create flat-topped cupcakes. You’ll press each frosted cupcake upside down onto a sheet of wax paper, then freeze before decorating.
- Baking sheet or cookie tray — Needed to hold your cupcakes flat while freezing.
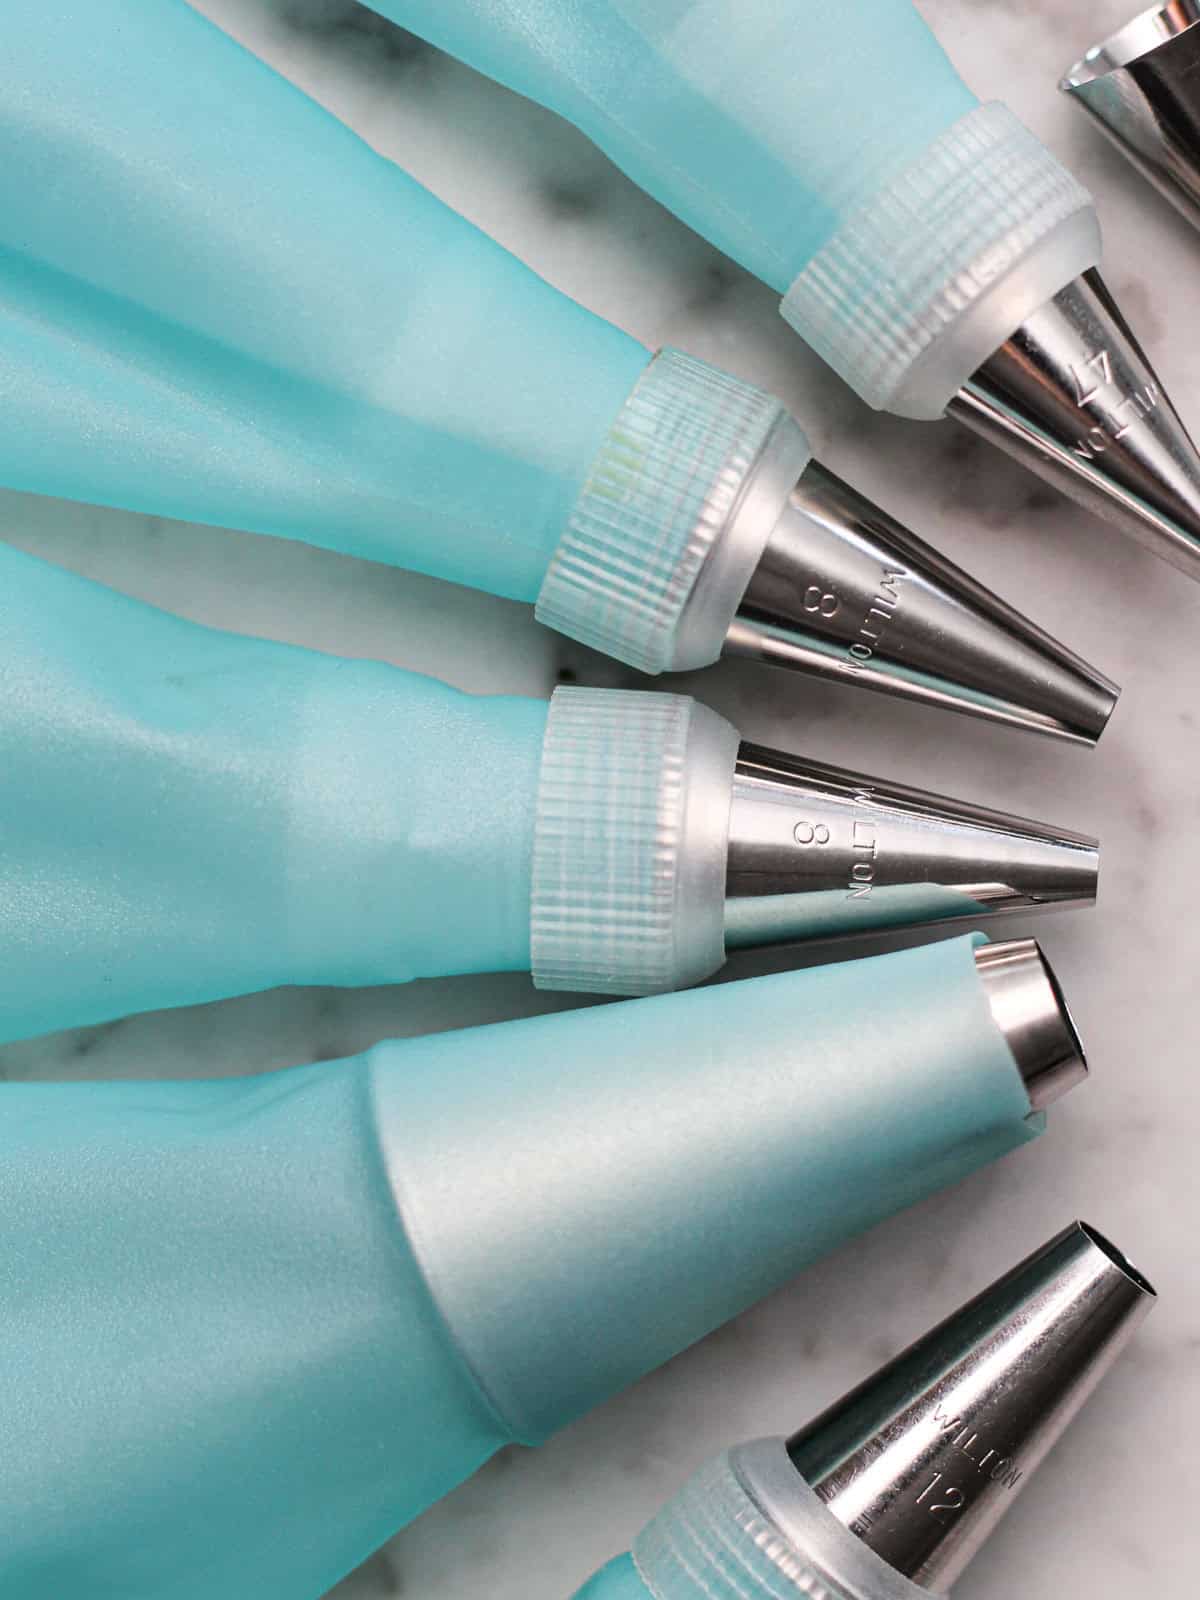
- Piping bags — You’ll want several for this project — one for each frosting color.
- A large round piping tip — This tip will help you pipe the large dollop of buttercream that will serve as the background or "sky" of these cupcakes.
- Small round piping tips — Small open tips (sizes #8 or smaller) help your buttercream flow smoothly for clean lines of your hot air balloons.
- Basket-weave piping tip — For the textured basket at the base of your hot air balloon.
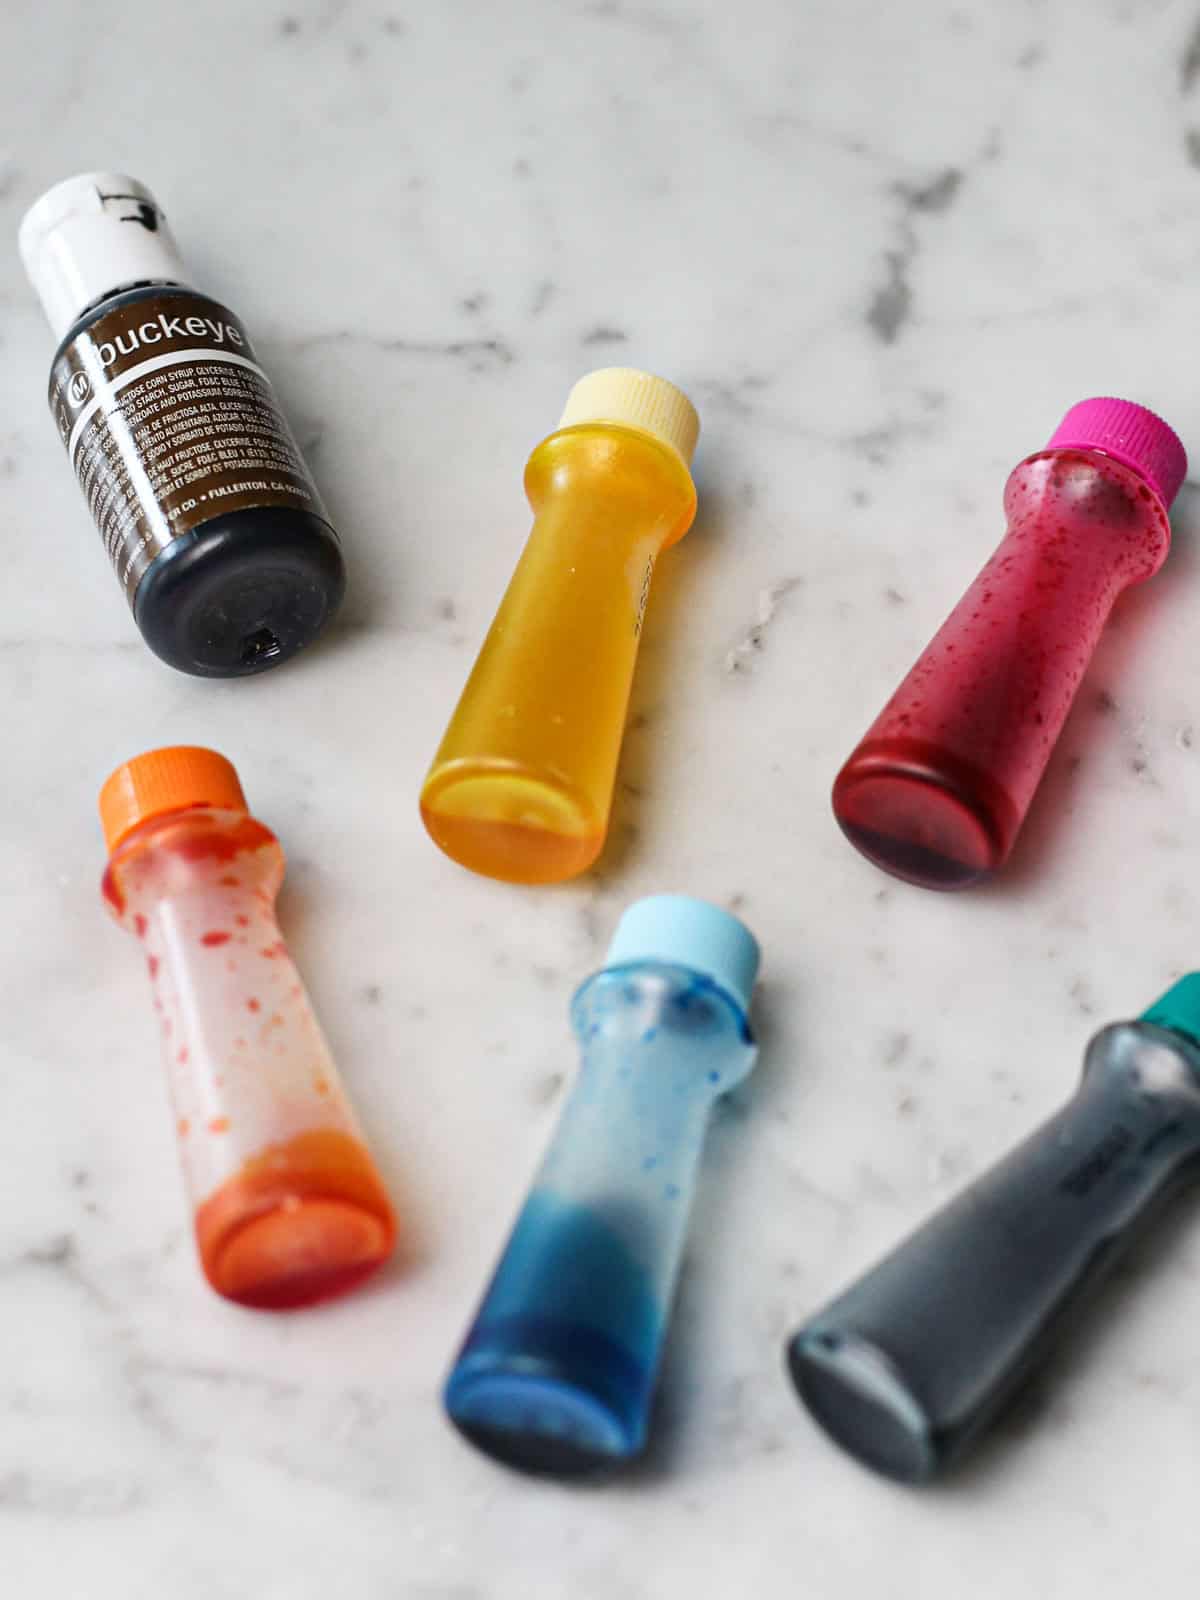
- Food gel colors - Food gels are an effective way to color your frosting; have fun with these to customize your design! Wilton, Americolor, and Chef Master are some of my favorite brands for vibrant shades.
- Cookie scribe or toothpick — To lightly trace your hot air balloon outline before piping. Using this as a guide really helps me keep a clean design
- Stand mixer or hand mixer — Ideal for whipping up the buttercream and cupcake batter.
If you’re new to decorating, you can usually find basic piping tip sets and many of the tools above at craft stores or online. Wilton or Ateco are great brands for this purpose, and their piping tip sets typically include a few round and basket-weave tips!
🎨 Frosting and Color Ideas for Hot Air Balloon Cupcakes
You’ll need at least three frosting colors for this design, but feel free to add more balloon colors if you’re making a larger batch or want extra variety.
- 🩵 Sky: I used light blue, but you could go darker or add a soft yellow blend for a sunrise effect.
- 🎈 1–2 balloon colors: Pick shades that look nice together — bright or pastel both work.
- 🧺 Brown or golden: For the basket at the bottom of each hot air balloon.
🧁 Recipes for Cupcakes and Frosting
For this tutorial, I used the batter of my raspberry almond cupcakes. However, if you want a shortcut so you can start decorating sooner, you could totally use a box mix here!
I do recommend homemade frosting, as its consistency is key for this tutorial. My almond buttercream frosting is a go-to. You could easily flavor it differently, though. Use lemon, coconut, raspberry, or another flavored extract you find at the grocery store!
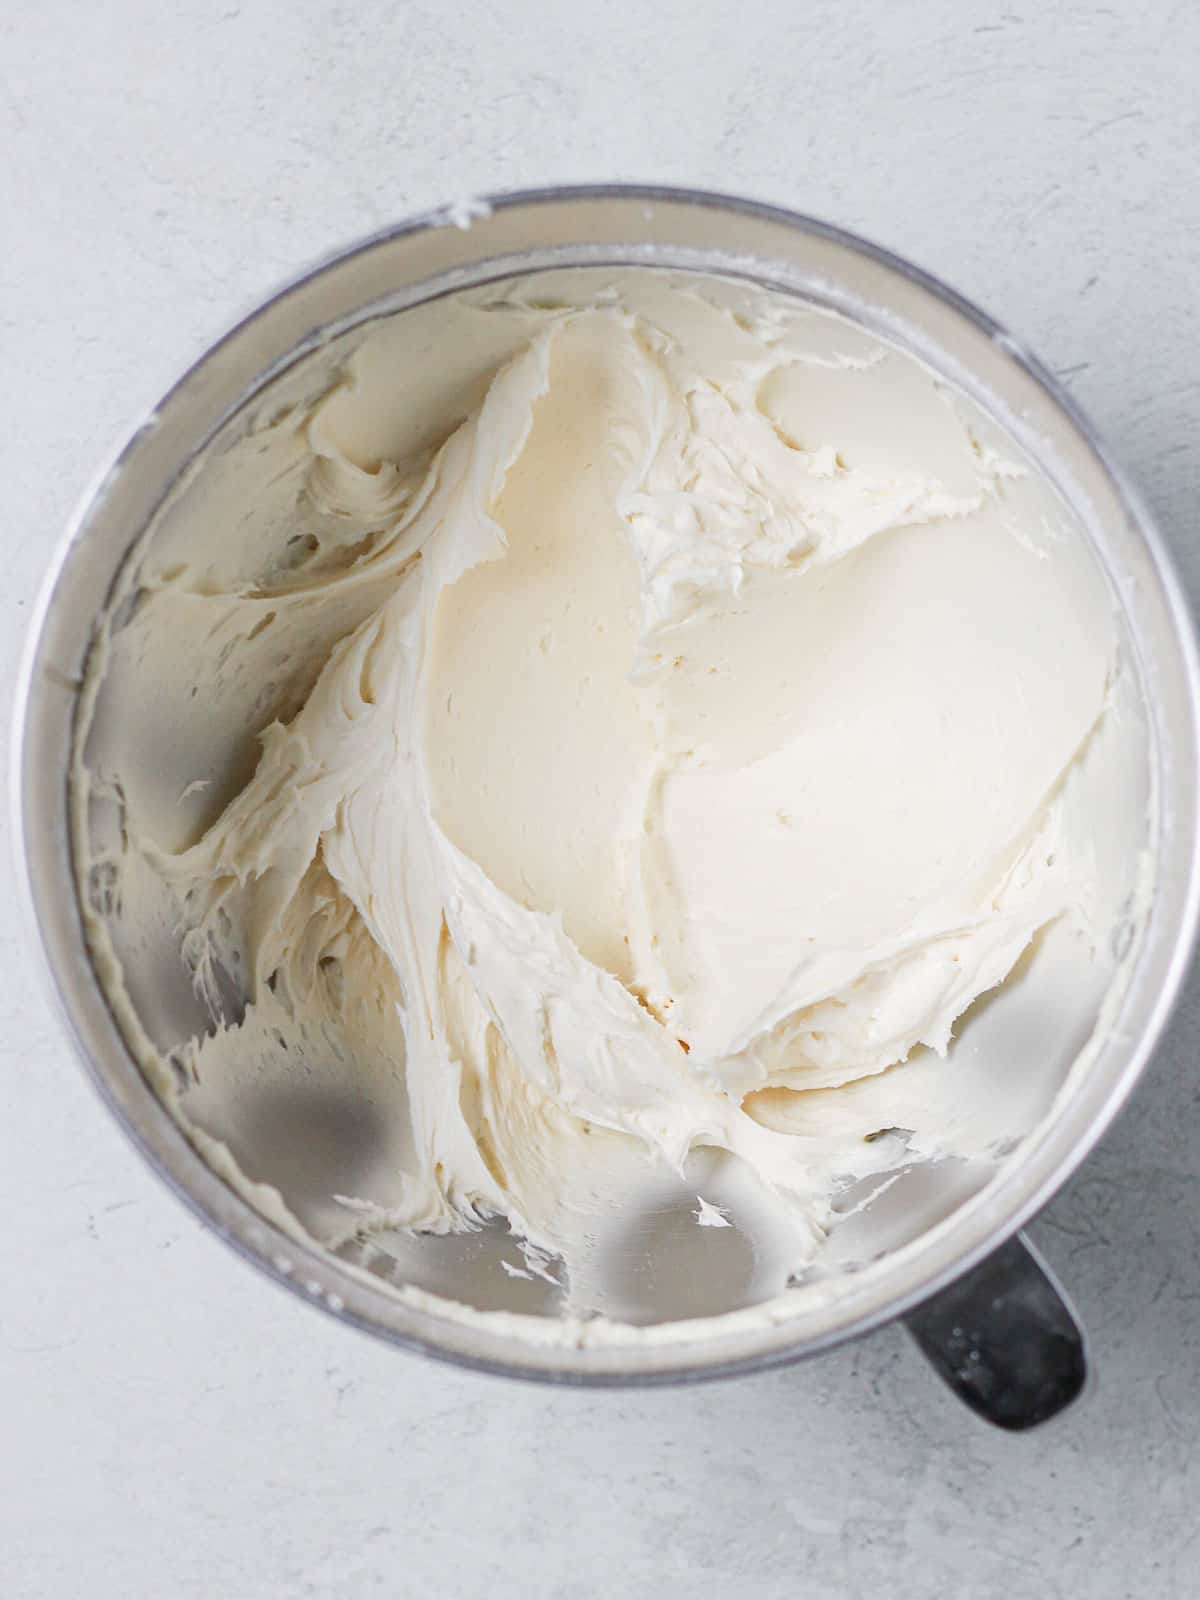
🤫 The Secret to Super Smooth Frosting
Once your stand mixer has fully combined all the ingredients, use a flexible rubber spatula to swipe the frosting around in your bowl.
As you do this, you’ll notice the tiny air bubbles disappear as you go. This simple step makes your buttercream silky and easy to spread.
Subscribe to receive more recipes like this one in your inbox!
🖌️ How to Decorate Hot Air Balloon Cupcakes Step by Step
Dive into the steps here once your cupcakes are baked and completely cool to the touch.
Prepare your frosting. Tint your buttercream's base colors. I chose sky blue and a pale yellow for the background. I also made orange and pink for the balloons and just a bit of brown for the basket
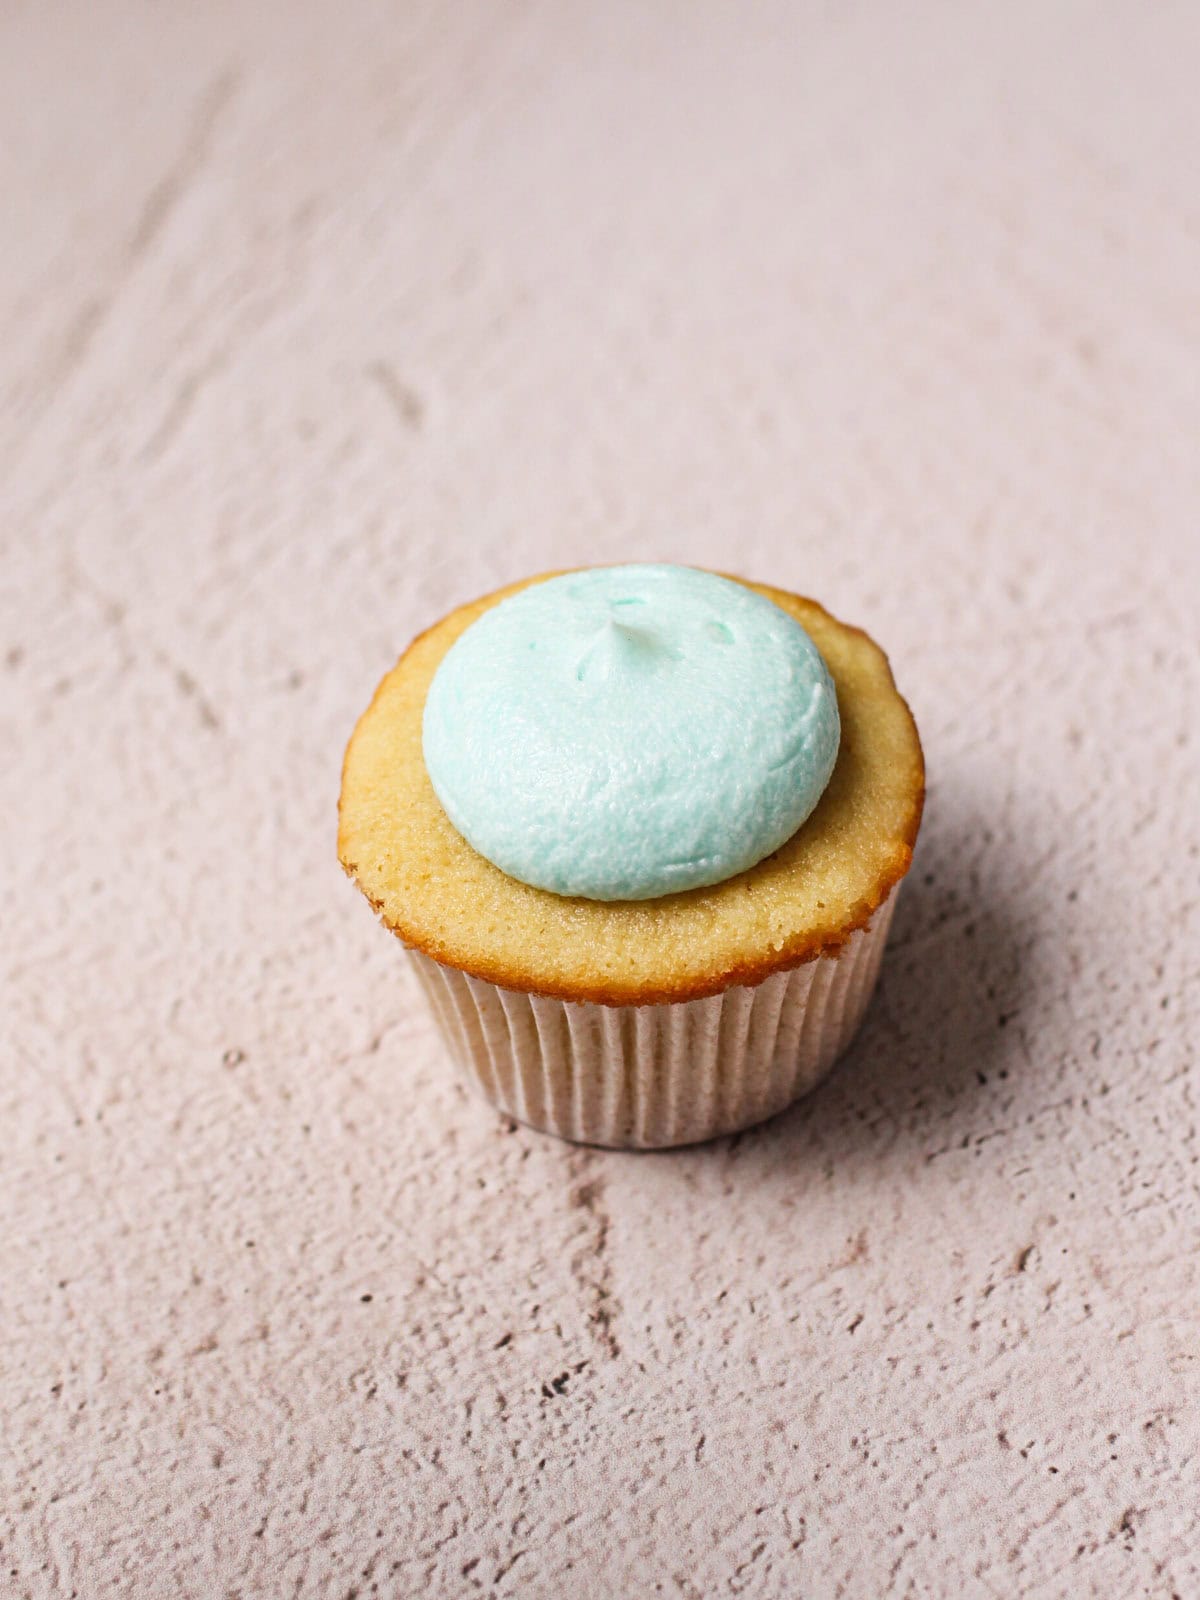
Pipe your frosting. Fit a piping bag with a large round open tip and fill with your sky-colored frosting(s). Pipe a dollop in the center of each cupcake so that the buttercream covers about 75% of the cupcake. You’ll press it down later, so don’t worry if it looks tall.
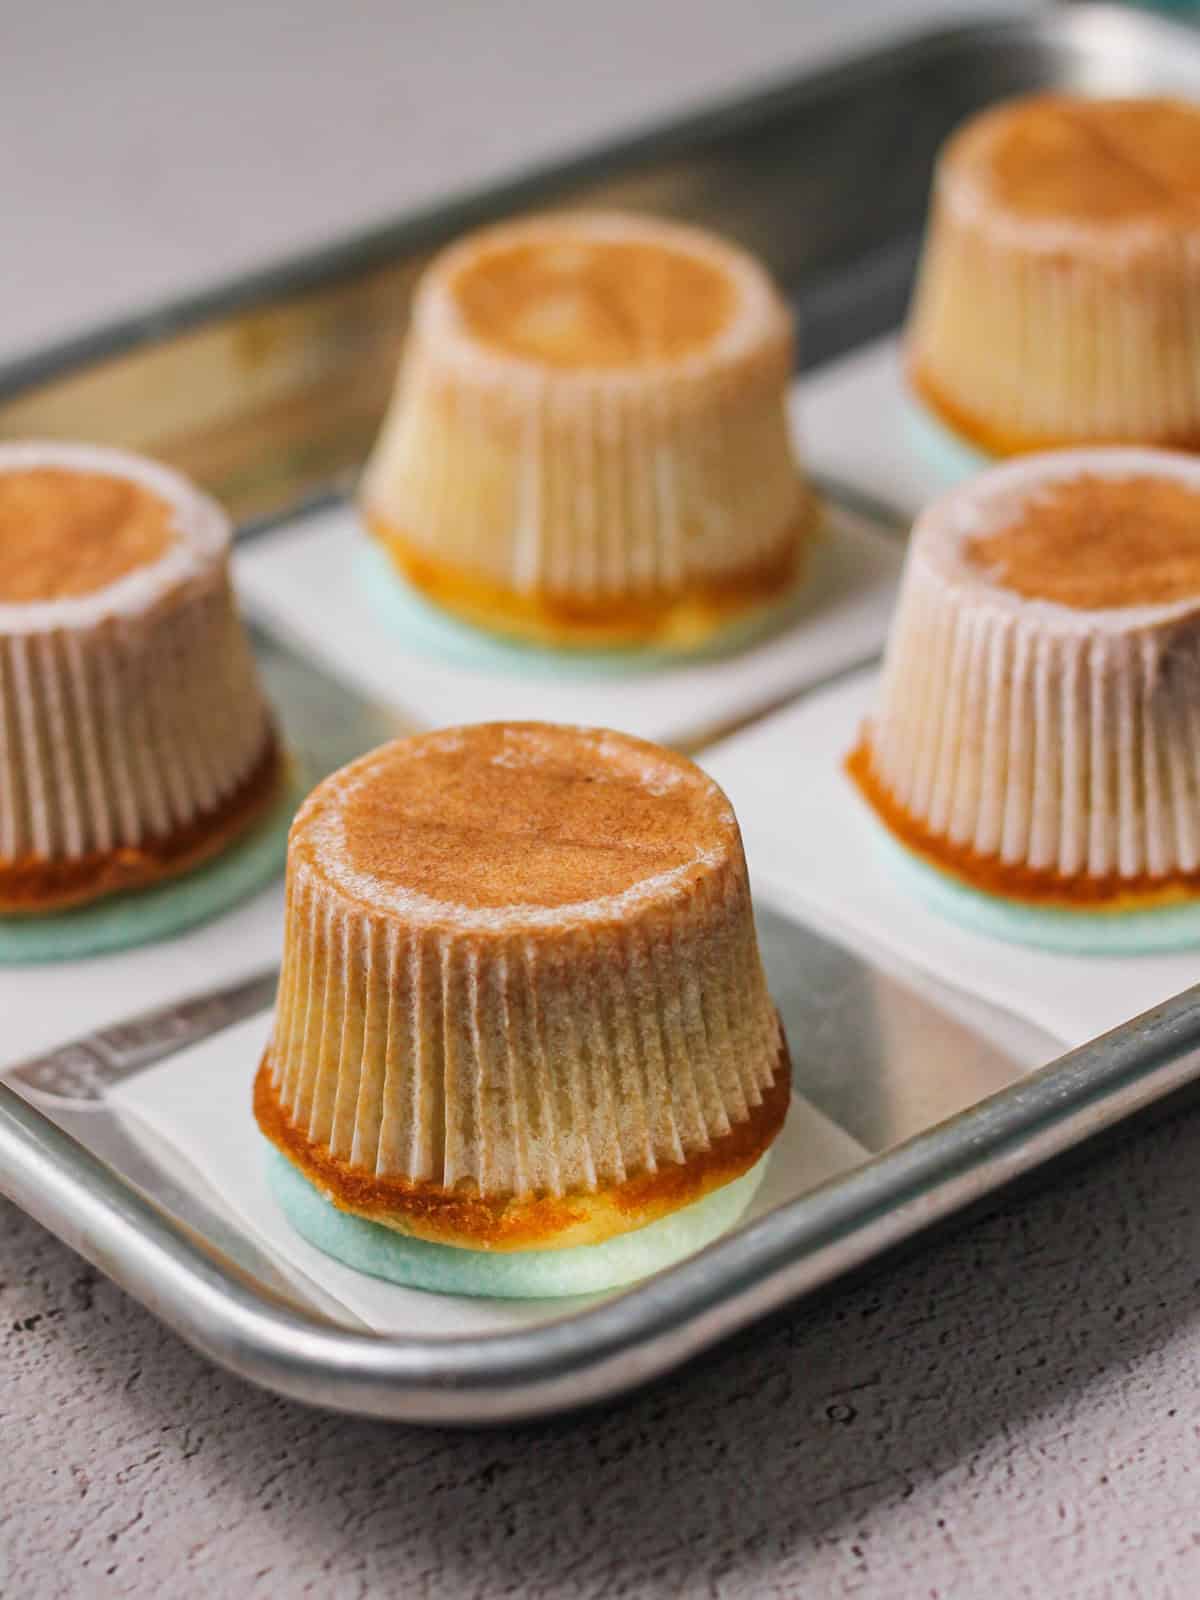
Create smooth, flat tops. Flip the cupcake upside down onto a sheet of wax paper. Press gently so the frosting spreads evenly, creating a perfectly flat decorating surface that covers the top of the cupcake.
Repeat for all cupcakes and place them on a tray in the freezer for 15–20 minutes.
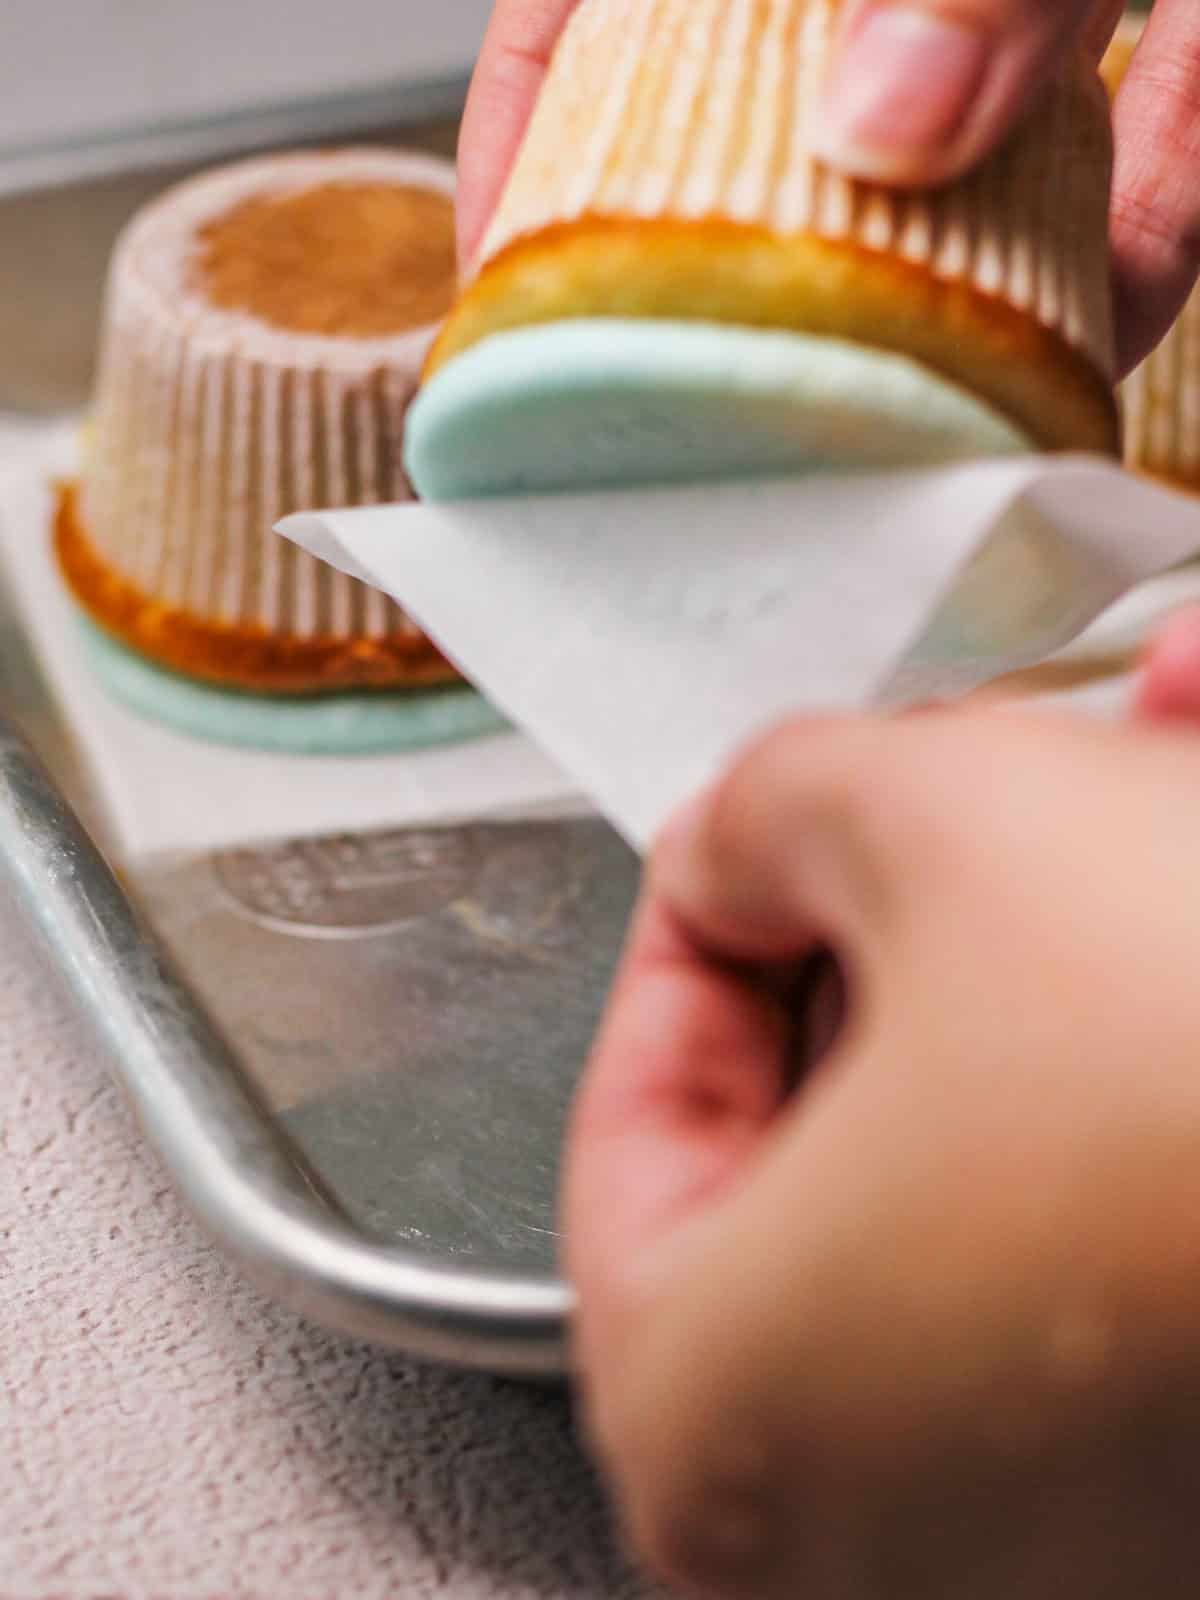
Smooth the surface. Remove cupcakes from the freezer and peel off the wax paper. If the frosting sticks slightly, return the cupcake to the freezer for a few more minutes before peeling away the paper.
💡 Pro tip: Warm a spoon under hot water, dry it, and gently glide it over any uneven spots for a perfectly smooth top.
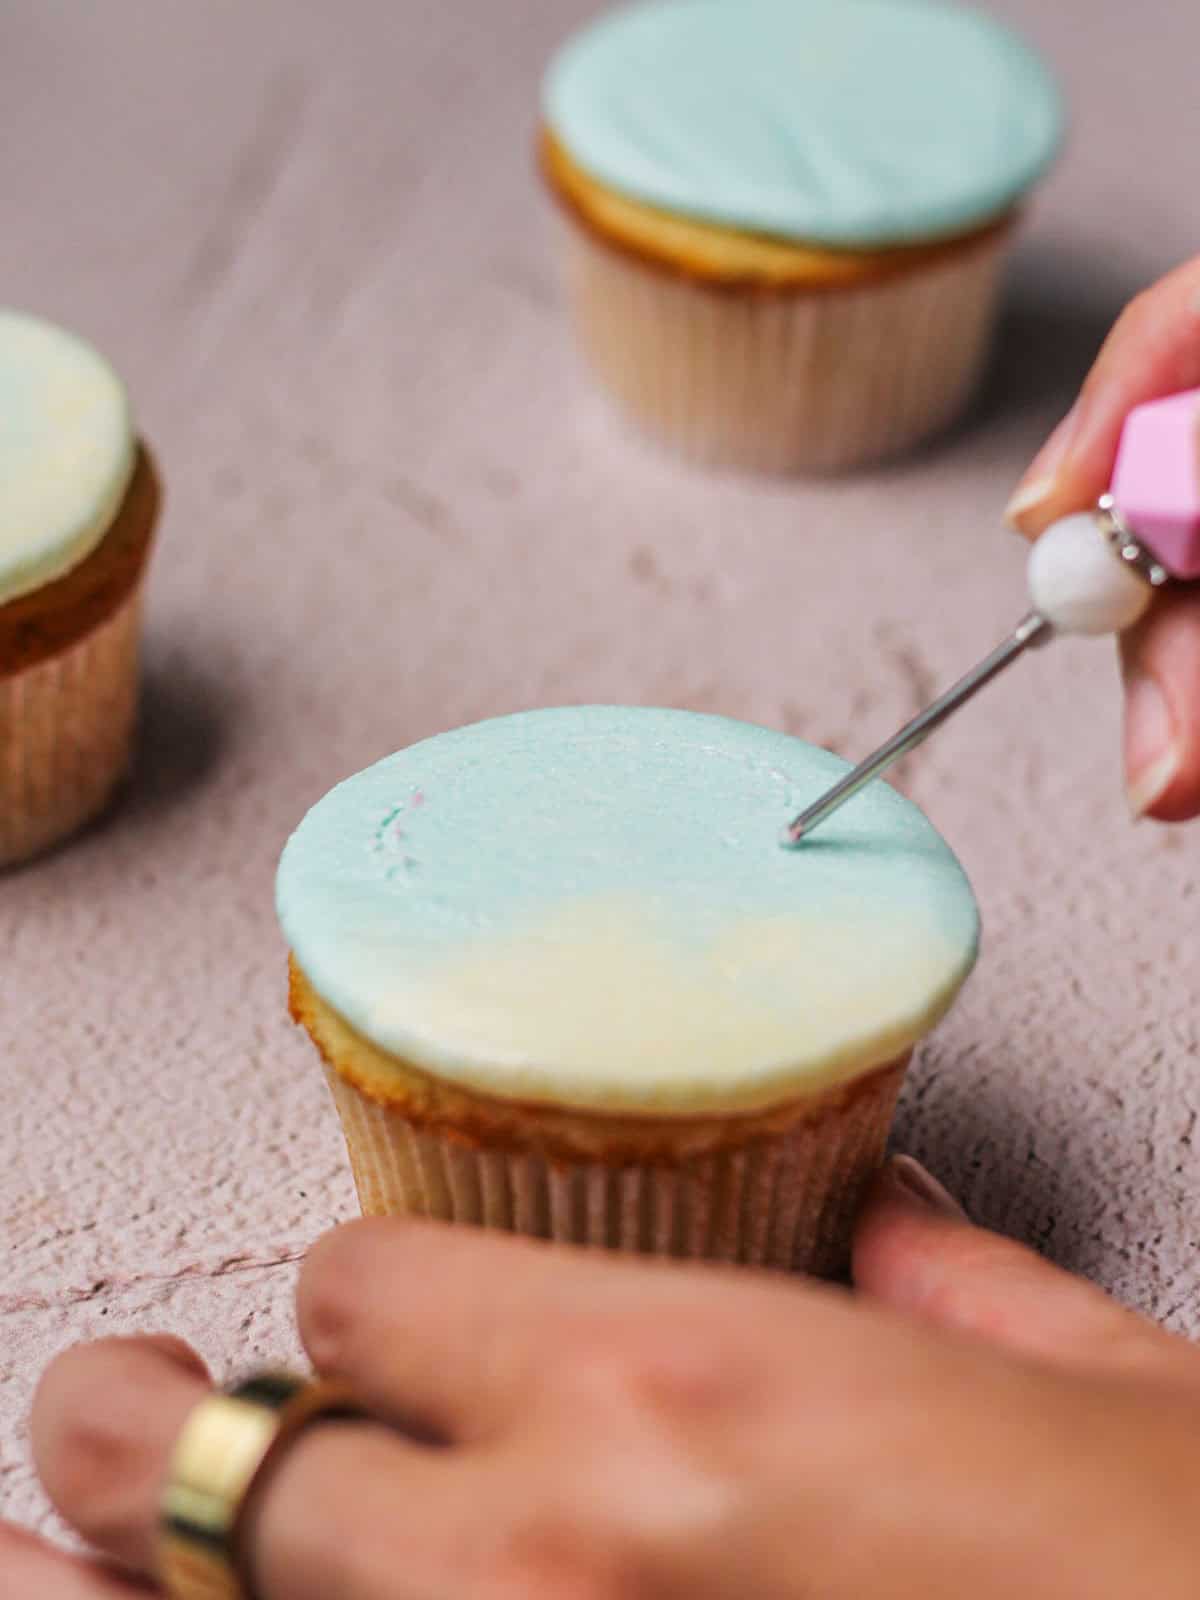
Outline the hot air balloon. Use a scribe or toothpick to lightly trace the shape of a hot air balloon on top of each cupcake. This gives you a guide for piping.
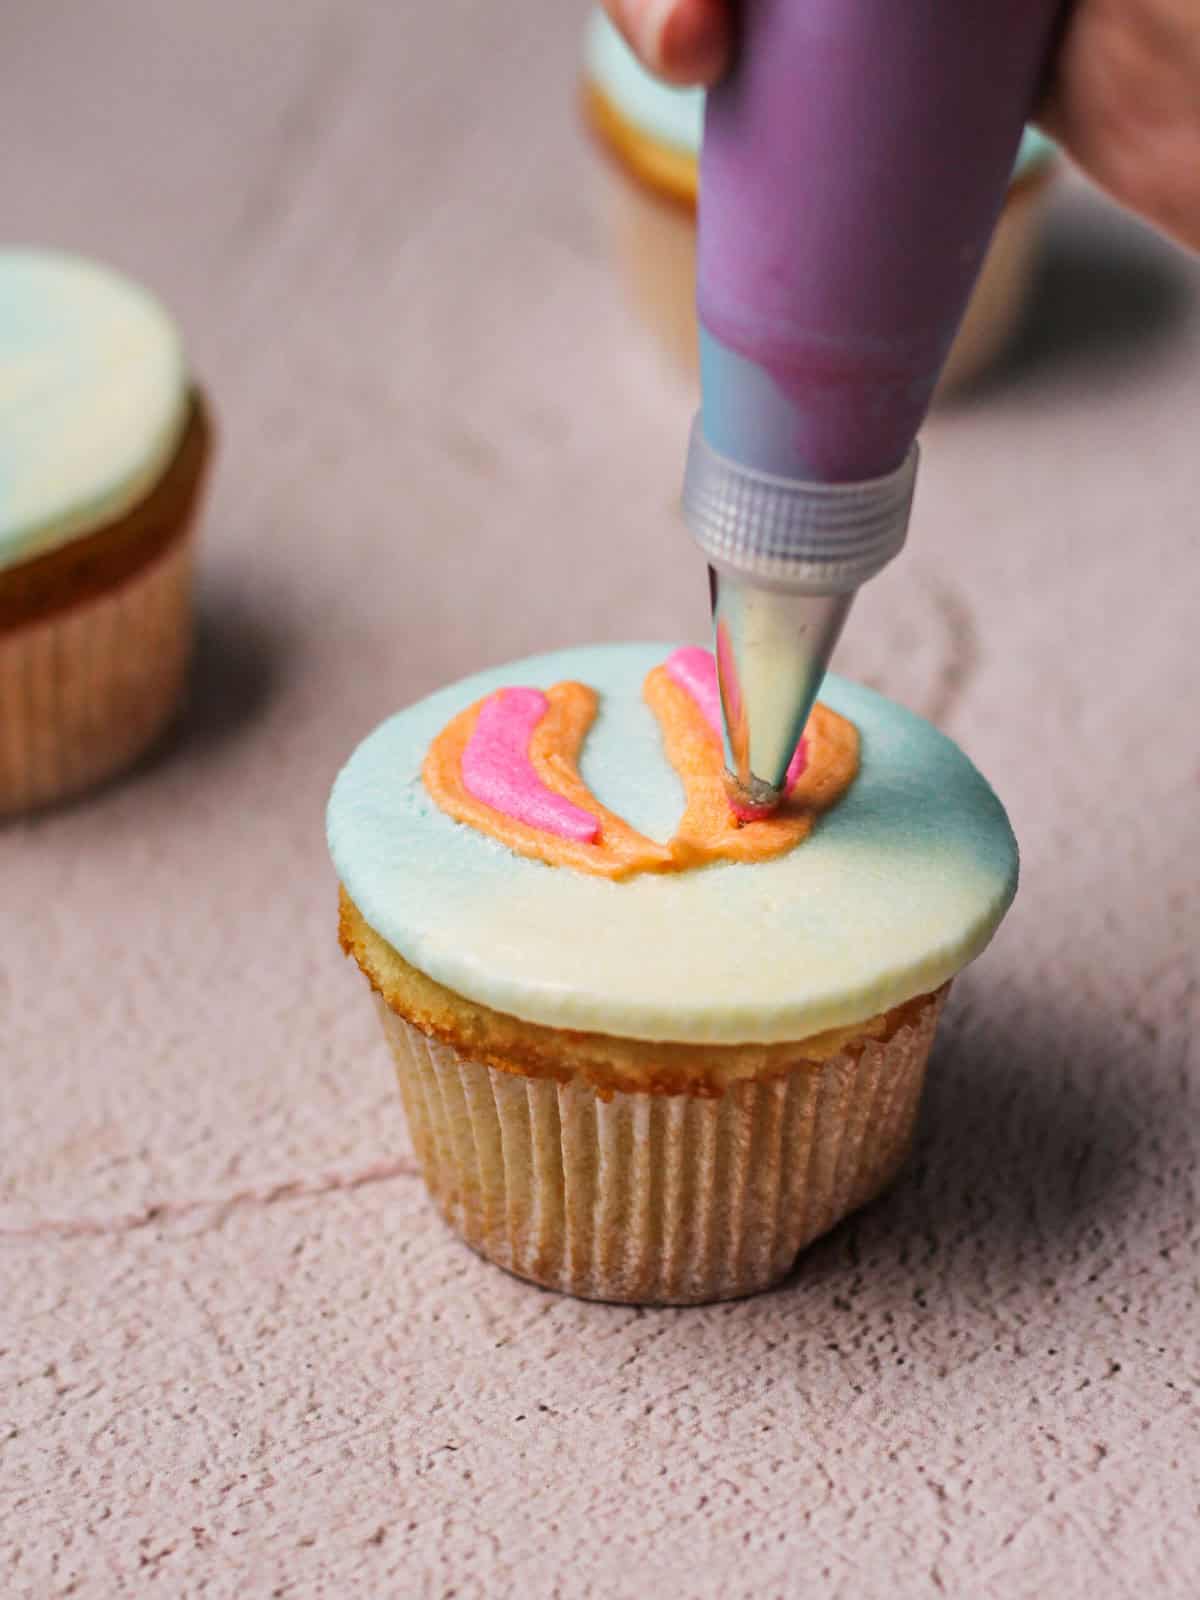
Pipe the balloon. Transfer each color to a piping bag fitted with a small round tip (#8 or smaller). Fill in the balloon area with stripes, patterns, or any color combo you like.

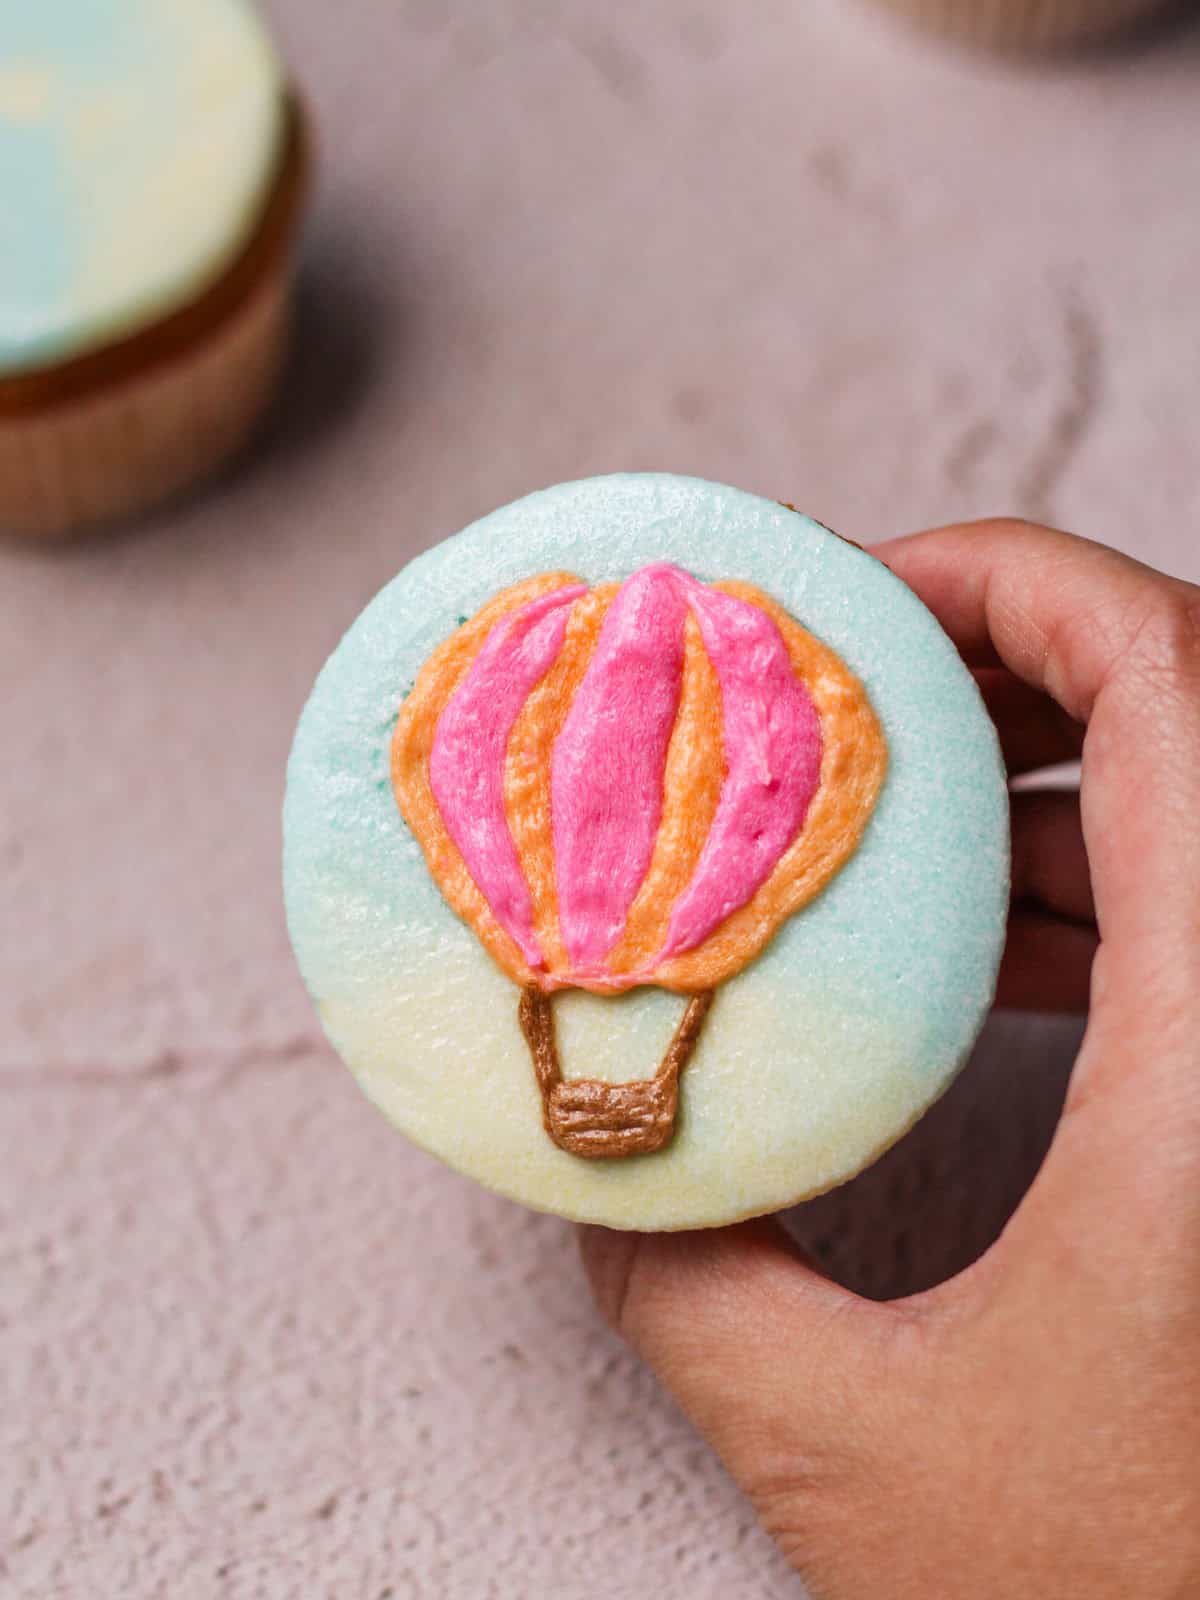
Add the basket and ropes. Use brown or golden frosting with a basket-weave tip to pipe a small rectangle for the basket. Connect it to the base of the balloon with thin brown lines of frosting, piped with a small open piping tip.
💡Pro Tip for Filling a Piping Bag
After attaching your piping tip of choice to your bag, take the wider open end of a piping bag. Fit it over the rim of a tall glass so it's stable. Use a spatula to add your buttercream to it.

❓Tutorial FAQ
Make sure your cupcakes are well chilled before peeling. If your kitchen is warm, freeze them a few extra minutes to firm up the buttercream.
Use a small round tip instead and pipe short, horizontal lines to mimic the look of a woven basket.
Yes to both!
For frosting, whip it for 1–2 minutes with a mixer to lighten it and make it easier to spread. You may also want to add a liquid (like heavy cream or milk) to make the consistency more spreadable, depending on the brand of store bought frosting you get.
You can also purchase pre-made cupcakes, remove the frosting from those, and follow the steps to decorate the cupcake tops.
🧊 Cupcake Storage
Want to prep these cupcakes ahead of time? You can freeze them frosted or unfrosted for up to 3 months.
- Freeze: Store in an airtight container (single layer if the frosting is soft).
- Thaw: For the best results, thaw overnight in the fridge and keep cupcakes covered to prevent condensation.
For step-by-step tips (buttercream, cream cheese frosting, sprinkles), see my how to freeze cupcakes with frosting guide.
🪄 More Tutorials


Hot Air Balloon Cupcake Tutorial
- Total Time: 105 minutes
- Yield: 12 cupcakes 1x
Description
Turn your favorite cupcakes into hot air balloons with this easy decorating tutorial! Learn how to smooth your frosting perfectly, pipe colorful balloons, and add a textured basket for a sky-high dessert inspired by a trip to Cappadocia in Turkey. This step-by-step photo tutorial includes frosting colors, piping tips, and pro tricks. These would be perfect for birthdays, travel lovers, or any celebration.
Ingredients
Cupcake Ingredients
- 1 ½ cups (190 grams) all-purpose flour
- ¾ tsp baking powder
- ½ tsp baking soda
- ½ tsp kosher salt
- 1 stick (113 grams) unsalted butter at room temperature
- ⅔ cup (150 grams) granulated sugar
- 2 tsp vanilla extract
- 2 ½ tsp almond extract
- 2 T canola oil (or other colorless, odorless oil like vegetable or grapeseed)
- 2 eggs, room temperature
- ⅔ cup (160 grams) buttermilk, room temperature
Frosting Ingredients
- 1 ½ sticks (170 grams) of unsalted butter, room temperature
- 5 cups (575 grams) of powdered sugar
- ⅓ cup (80 grams) heavy cream
- 1 ½ tsp vanilla extract
- 2 tsp almond extract
- Pinch of salt
- Optional: A few drops of lemon or lime juice (or white vinegar) to cut sweetness; add to your preference
Instructions
Cupcakes
- Preheat your oven to 350 F and line a standard muffin tin with 12 paper liners.
- To a large bowl, add and whisk together all-purpose flour, baking powder, baking soda, and kosher salt. Set aside.
- Using the paddle attachment in the bowl of a stand mixer, cream your unsalted room temperature butter, sugar, vanilla and almond extracts, and oil together on medium speed for 4 minutes. Stop mixer and scrape down the sides of the bowl. Add the eggs and beat again for 1 minute.
- Add half of your bowl of dry ingredients and half of your buttermilk to your mixing bowl. Mix on low for about 45 seconds before repeating step to incorporate all buttermilk and flour.
- Pour and evenly spread the batter into your prepared cupcake liners (about 50 grams in each cavity). Bake for 14-16 minutes or until cupcakes appear buttery and dense but bounce back at the touch of your finger.
- Let cupcakes cool in pan about 5 minutes before transferring to a wire rack to cool completely before frosting.
Almond Buttercream Frosting
- In the bowl of your stand mixer, combine your unsalted butter, powdered sugar, vanilla extract, heavy cream, and salt. Start mixing on a low setting in short spurts to incorporate and avoid powder flying everywhere. Then increase speed and beat for another 5 minutes.
- Taste test and add lemon juice if too sweet for your liking. Thin it out as needed with another tablespoon or two of heavy cream.
- Once happy with flavor, use a spatula to smooth the frosting. Drag the spatula from the middle of your bowl to its edges, watching as the tears and bubbles in your buttercream disappear. Spend 3-4 minutes doing these motions to achieve nice, smooth frosting.
- Transfer frosting to a piping bag fitted with a tip of your choice.
- Once your cupcakes are baked and fully cooled, follow the decorating steps to bring the hot air balloon design to life.
Cupcake Decorating
- In individual mixing bowls, tint your buttercream's base colors; you'll need colors for your background, hot air balloons, and the basket.
- Fit a piping bag with a large round open tip and fill with your sky-colored frosting(s). Pipe a dollop in the center of each cupcake so that the buttercream covers about 75% of the cupcake.
- Flip the cupcake upside down onto a sheet of wax paper. Press gently so the frosting spreads evenly, creating a perfectly flat decorating surface that covers the top of the cupcake.
- Repeat for all cupcakes and place them on a tray in the freezer for 15–20 minutes.
- Remove cupcakes from the freezer and peel off the wax paper.
- Use a scribe or toothpick to lightly trace the shape of a hot air balloon on top of each cupcake to give you a guide or outline for piping.
- Pipe the balloon. Transfer each color to a piping bag fitted with a small round tip (#8 or smaller). Fill in the balloon area with stripes, patterns, or any color combo you like.
- Use brown or golden frosting with a basket-weave tip to pipe a small rectangle at the base of the balloon. Be sure to connect it to the base of the balloon with thin brown lines of frosting, piped with a small open piping tip.
- Use your cookie scribe and piping bag to clean up any details on your hot air balloon cupcakes.
Notes
This frosting recipe provides enough buttercream to decorate 18-24 cupcakes. The cupcakes and buttercream freeze well for up to three months. Store any leftovers for your next baking project!
- Prep Time: 15 minutes
- Frosting & Decorating: 75 minutes
- Cook Time: 15 minutes
- Category: Dessert
- Cuisine: American
Nutrition
- Serving Size: 1 cupcake
- Calories: 356.25 kcal
- Sugar: 40.37 g
- Sodium: 210.53 mg
- Fat: 16.78 g
- Saturated Fat: 9.5 g
- Unsaturated Fat: 5.6 g
- Trans Fat: 0.59 g
- Carbohydrates: 49.09 g
- Fiber: 0.29 g
- Protein: 2.3 g
- Cholesterol: 60.57 mg

Leave a Reply