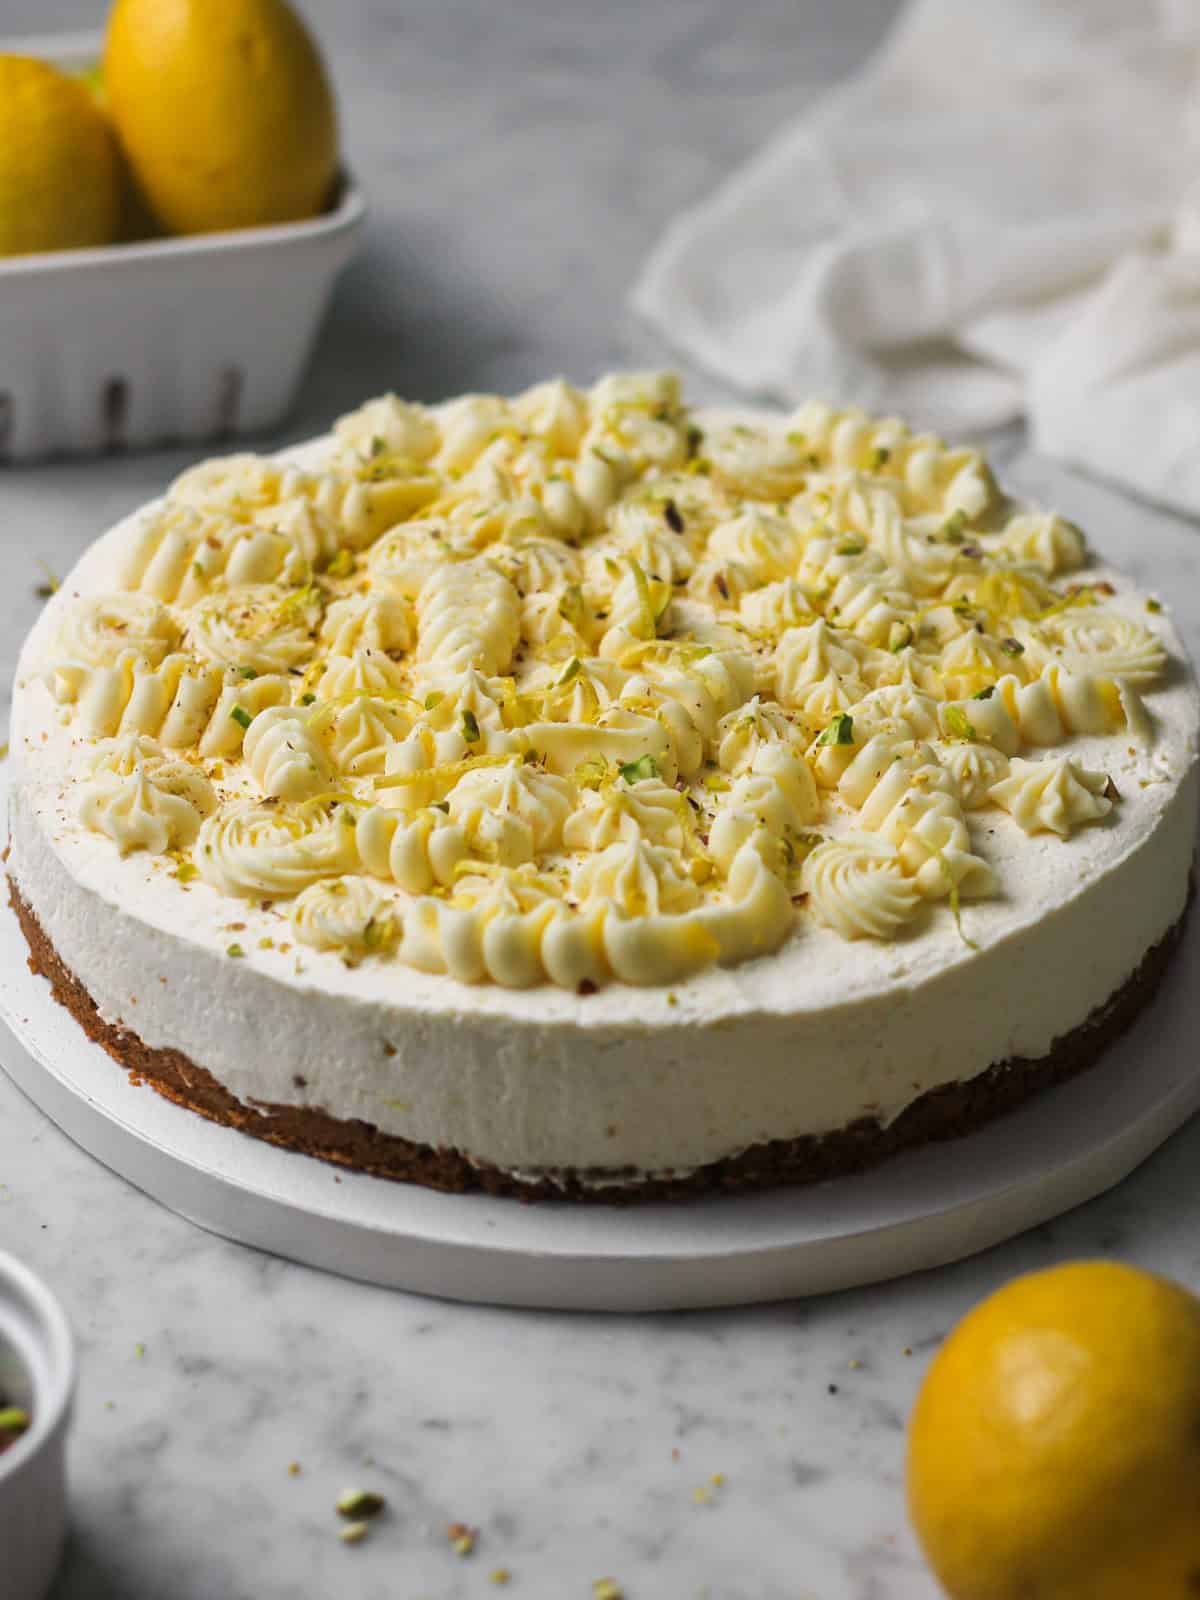
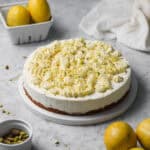
This no-bake lemon mascarpone cheesecake with whipped white chocolate ganache is creamy and smooth with zingy citrus flavors. The filling comes together in minutes with mascarpone, heavy cream, and fresh lemon; no gelatin needed. The whipped white chocolate ganache on top is silky with just the right amount of sweetness.
If you've tried my no-bake cheesecake with mascarpone, you already know how smooth and decadent that filling is. This recipe takes the same base and adds bright lemon flavor, finished off with a just-sweet-enough whipped white chocolate ganache.
The crust is my tried-and-true no-bake Biscoff pie crust, the same one I used as a contestant on Hallmark Channel's Baked with Love. It held up under pressure on TV and does its job again here! The spice of the Biscoff cookies pairs well with the tangy lemon filling and subtly sweet topping.
Jump to:
- 🍋 Why This Combination Works
- 📋 Ingredients You'll Need
- 💡 Tip for Working with Mascarpone
- 📖 Making the Crust
- 📝 Step-by-Step Instructions for the Lemon Mascarpone Cheesecake Filling
- 🍫 How to Make Whipped White Chocolate Ganache
- ⚠️ Don't Skip Chilling Ganache
- 💡 How to Fix Grainy Whipped Ganache
- 🎂 Assembling the Cheesecake
- ⭐️ Tips for Success
- 🔄 Flavor Variations
- 🗄️ Storage Instructions
- ❓ FAQ and Troubleshooting
- More Dessert Ideas
- No-Bake Lemon Mascarpone Cheesecake with Whipped White Chocolate Ganache
🍋 Why This Combination Works
Great desserts are often built on contrasts and pairings that are just different enough to come together and create a unique flavor profile.
That idea stuck with me after trying an incredible orange mascarpone cheesecake at a restaurant, and I could not stop thinking about it for weeks! Like this dessert, that one united bold flavors in a memorable way.
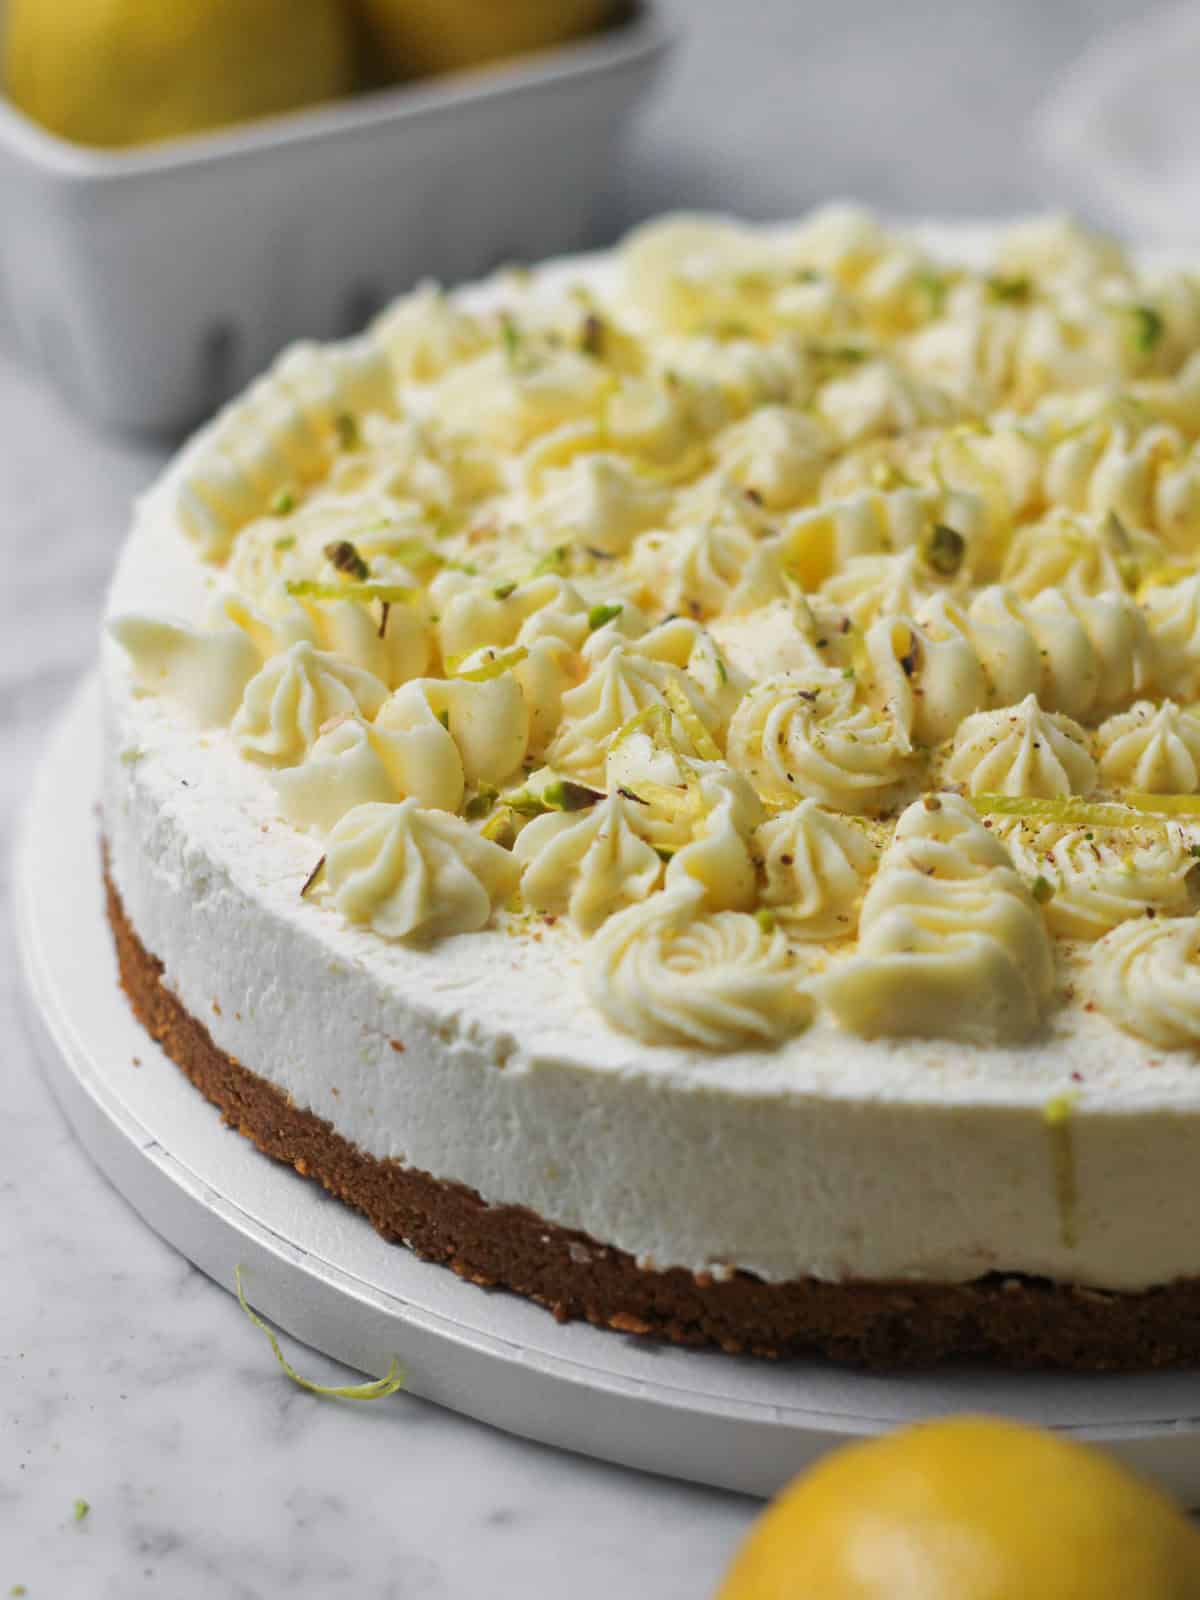
This cheesecake begins with a Biscoff crust that brings warmth and crunch. The lemon mascarpone filling has a bright flavor and creamy texture. And the whipped white chocolate ganache adds a layer of richness that rounds everything out without making it feel heavy.
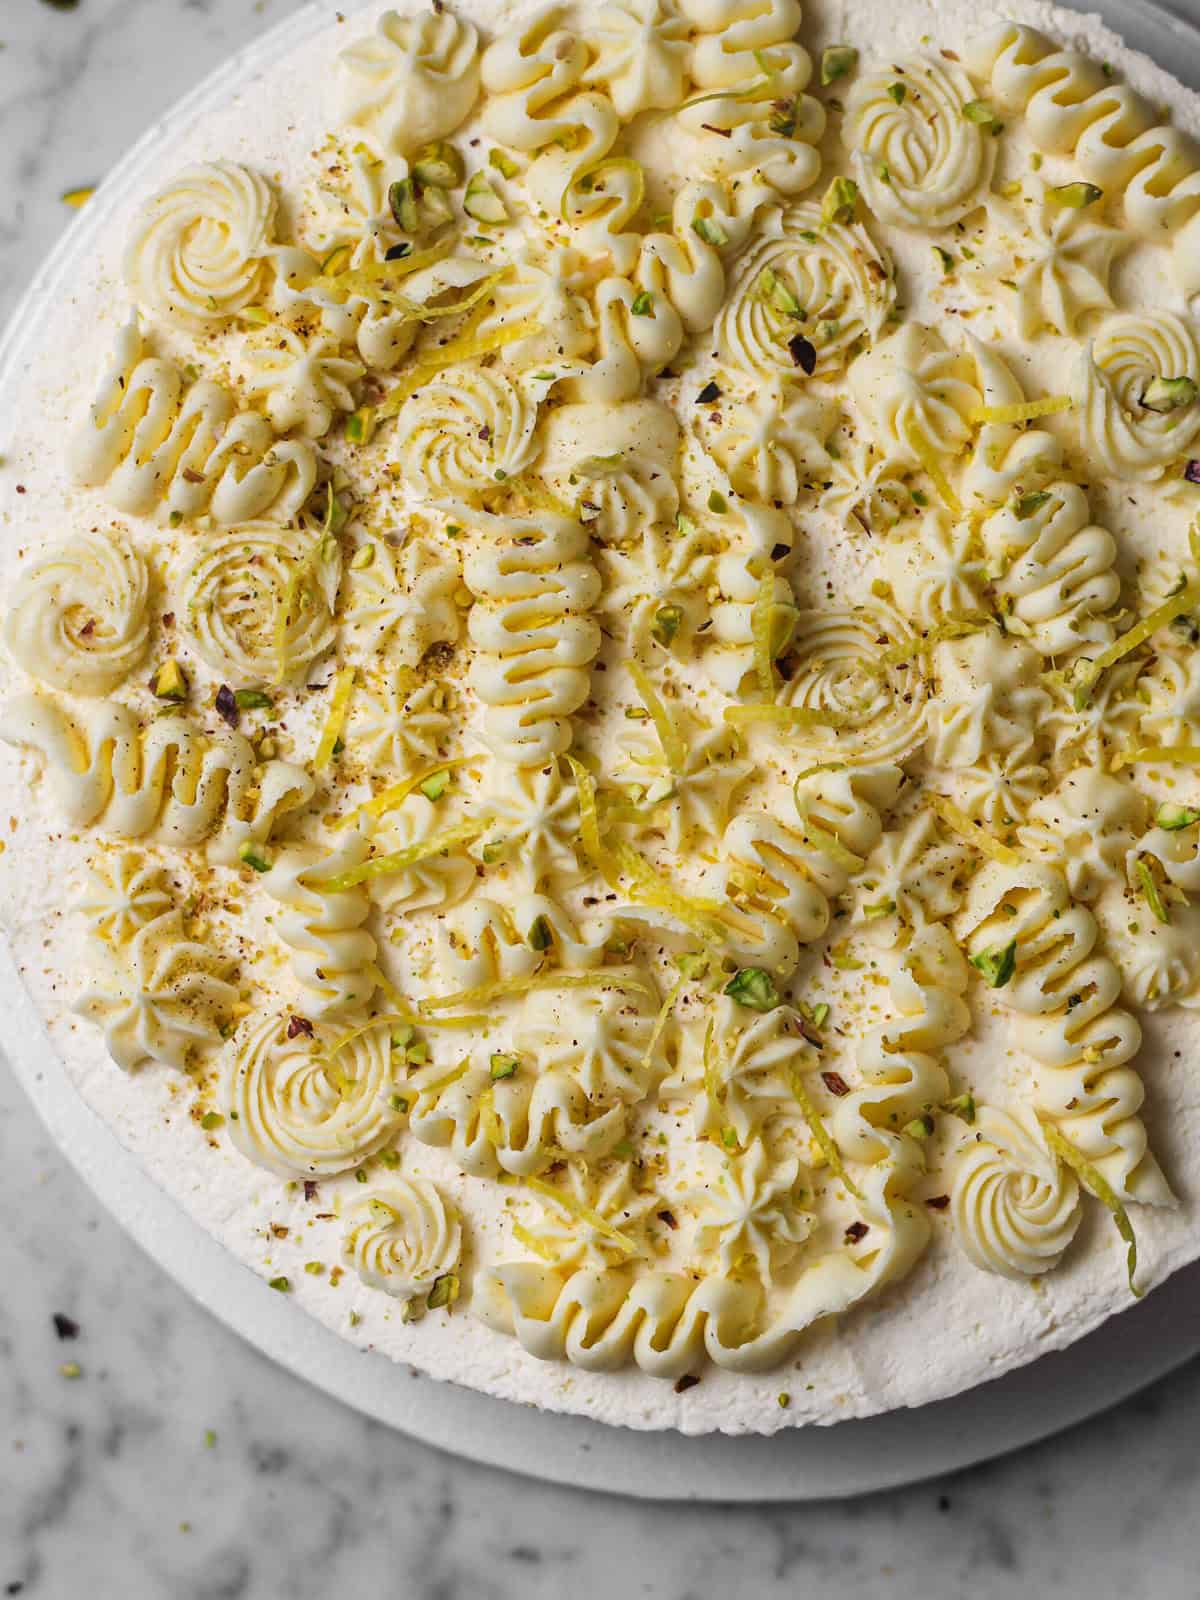
Plus, the optional dusting of pistachio introduces a lightly nutty flavor and pretty color to the dessert.
📋 Ingredients You'll Need
The full list of ingredients with exact measurements is in the recipe card below. Here's what's noteworthy:
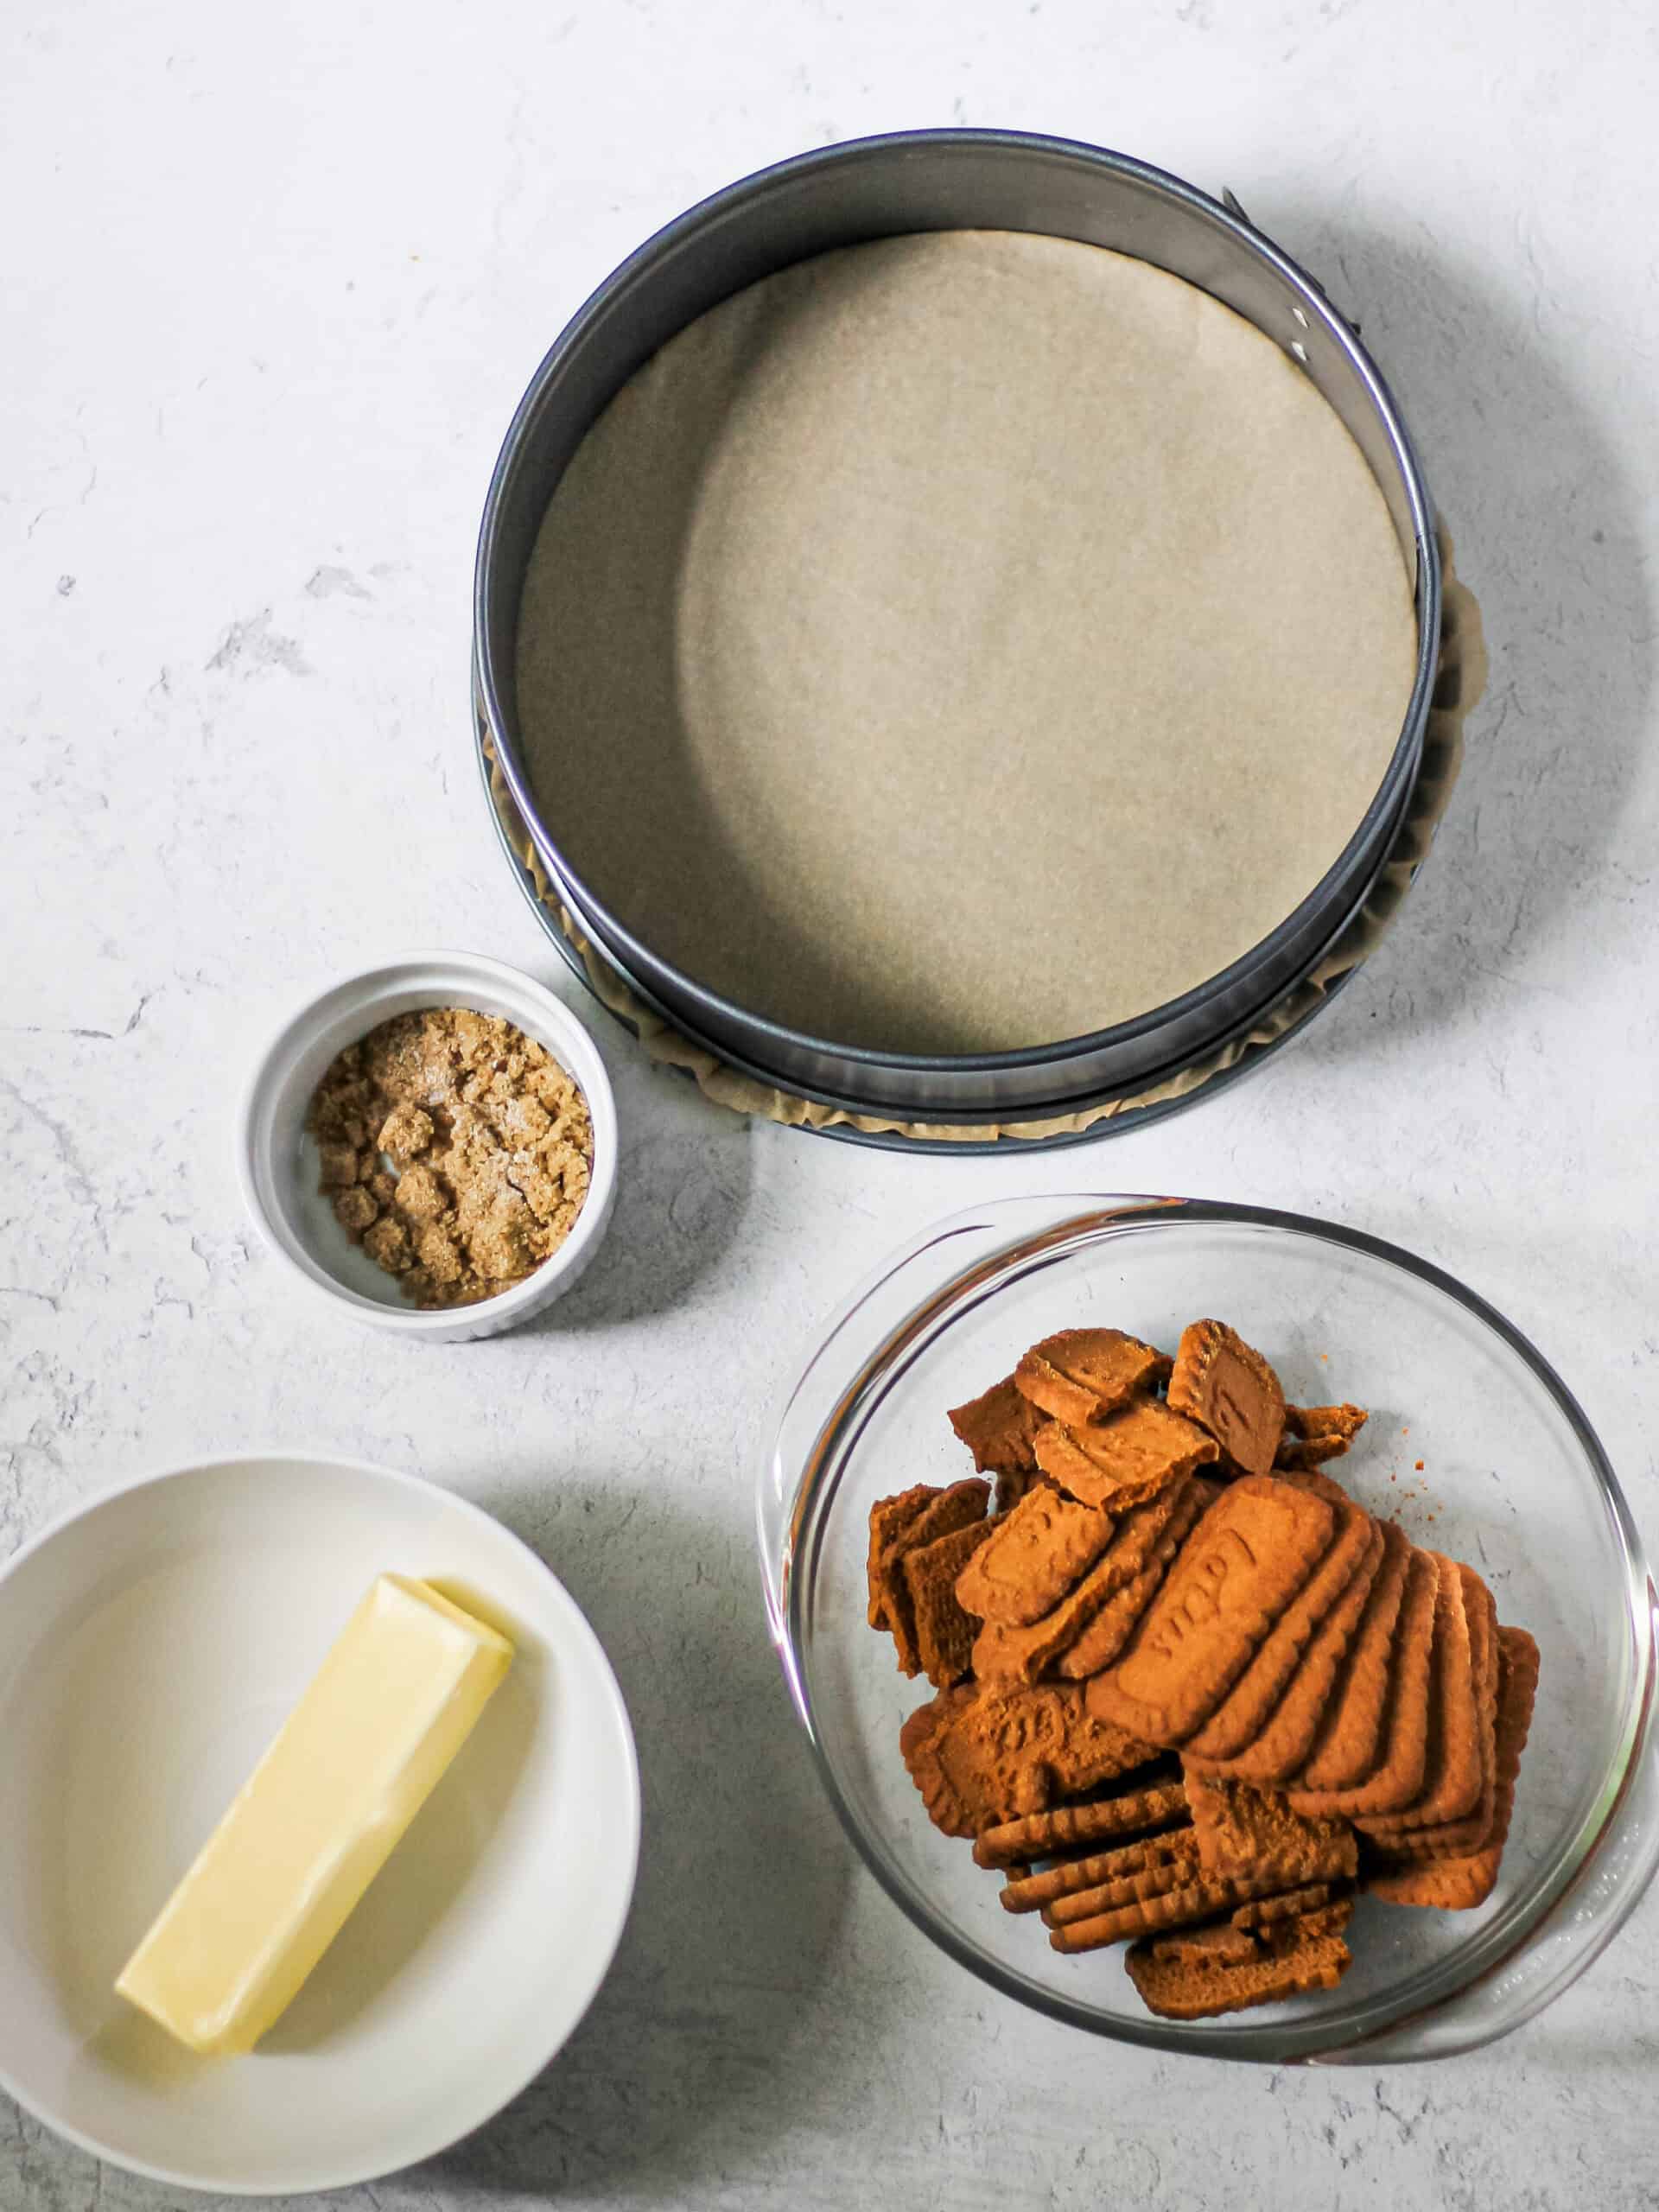
For the Biscoff Crust
- Biscoff cookies – Ground into fine crumbs, these create a sturdy, spiced base with a lightly caramelized flavor.
- Melted unsalted butter – A crucial element to hold this crust together without ever putting it in the oven, melted butter binds the crumbs together so the crust holds its shape when sliced.
- Brown sugar and a pinch of salt – Rounds out the sweetness and offers some moisture to further bind the crust together.
For the Lemon Mascarpone Filling
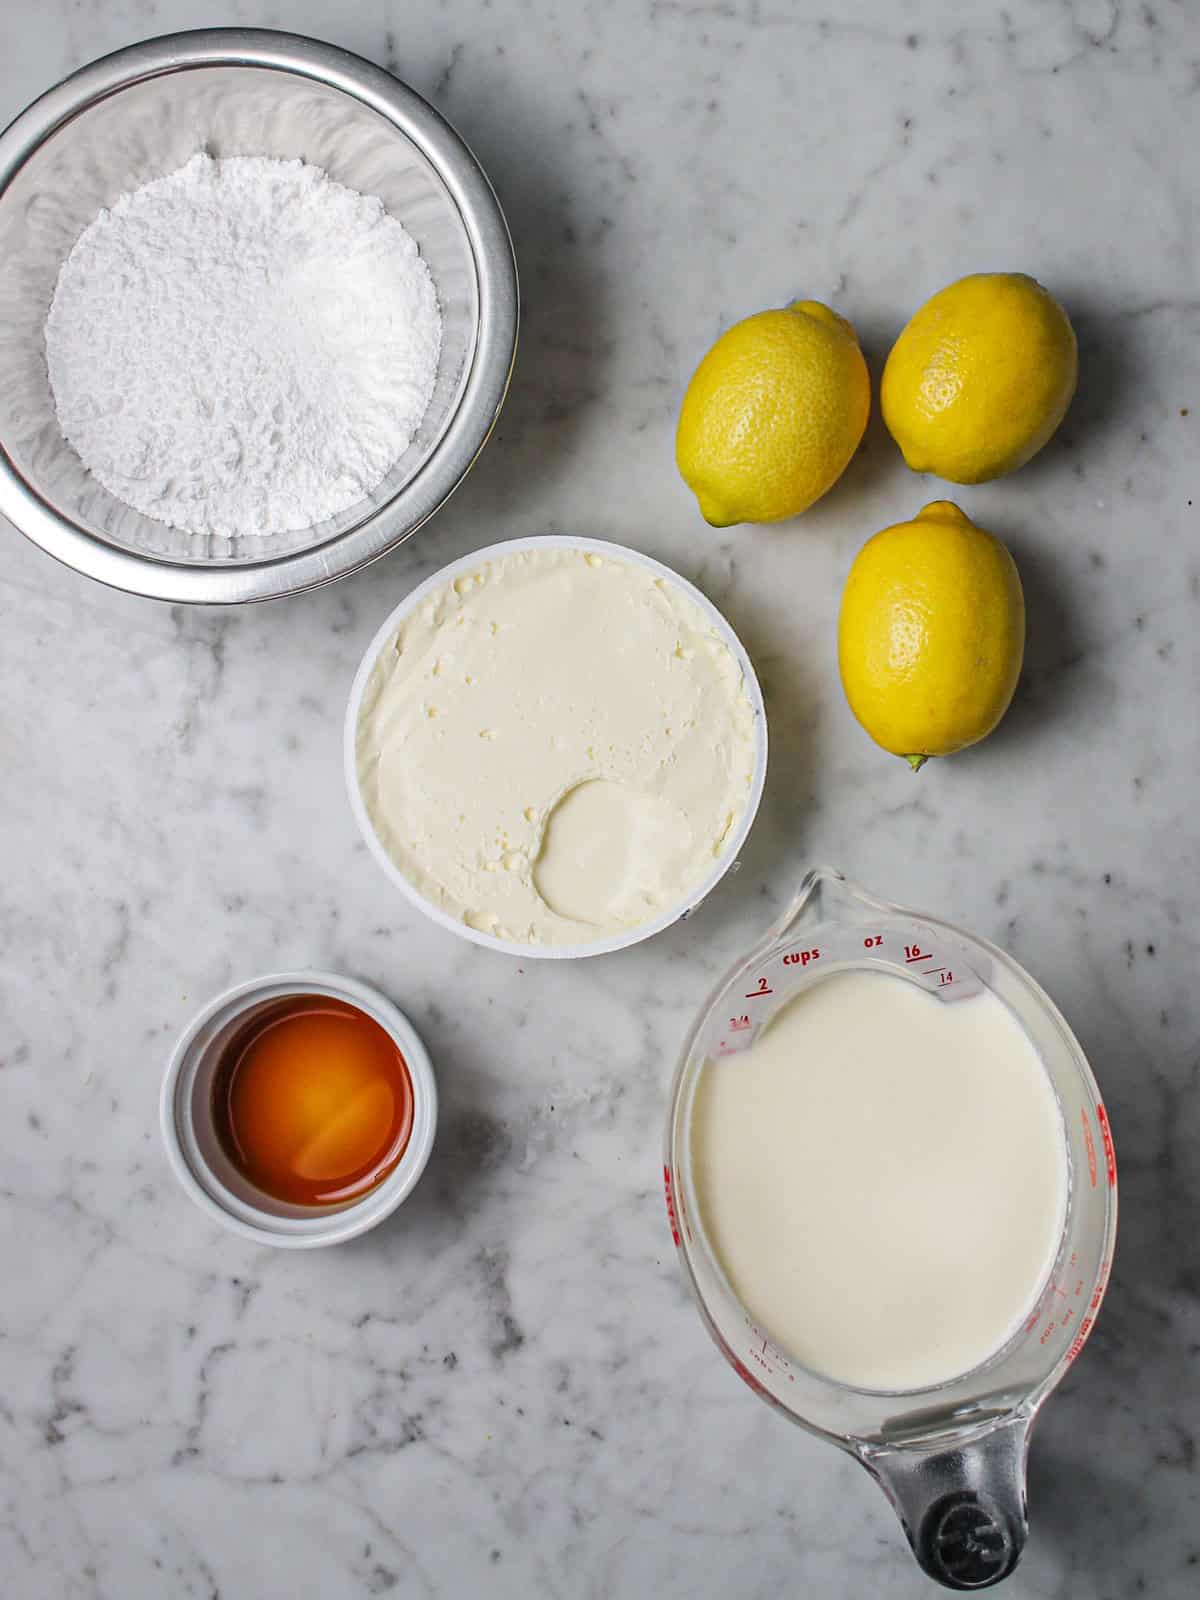
- Mascarpone cheese – This Italian cream cheese is the star of the filling. It's higher in fat content and texturally smoother than American cream cheese. This ingredient gives the cheesecake its melt-in-your-mouth feel without needing gelatin. I've used both the Trader Joe's and Belgioioso brands with great results.
- Cold heavy whipping cream – When beaten to stiff peaks along with the mascarpone, this ingredient adds volume and airiness to the filling. It also helps the cheesecake firm up as it chills in the refrigerator.
- Fresh lemon juice and lemon zest – You'll want about 3 tablespoons of juice and the zest of 2 lemons. The juice gives tanginess, and the zest amps ups that bright lemon flavor in a way that the juice cannot do on its own. While you can use bottled lemon juice in a pinch, the flavor will not be quite as strong. I really recommend squeezing fresh lemons.
- Powdered sugar – Sweetens the filling and gives it more volume. Be sure to sift your sugar first if you notice any clumps in it.
- Pure vanilla extract – Vanilla adds warmth that rounds out the lemon flavor.
For the Whipped White Chocolate Ganache
- Good-quality white chocolate – This is the most important ingredient in the ganache. You want real white chocolate that contains cocoa butter. Don't buy white candy melts or white baking chips made with palm oil. Brands like Guittard, Lindt, and Ghirardelli are my go-to. Chop bars into small, even pieces so they melt smoothly.
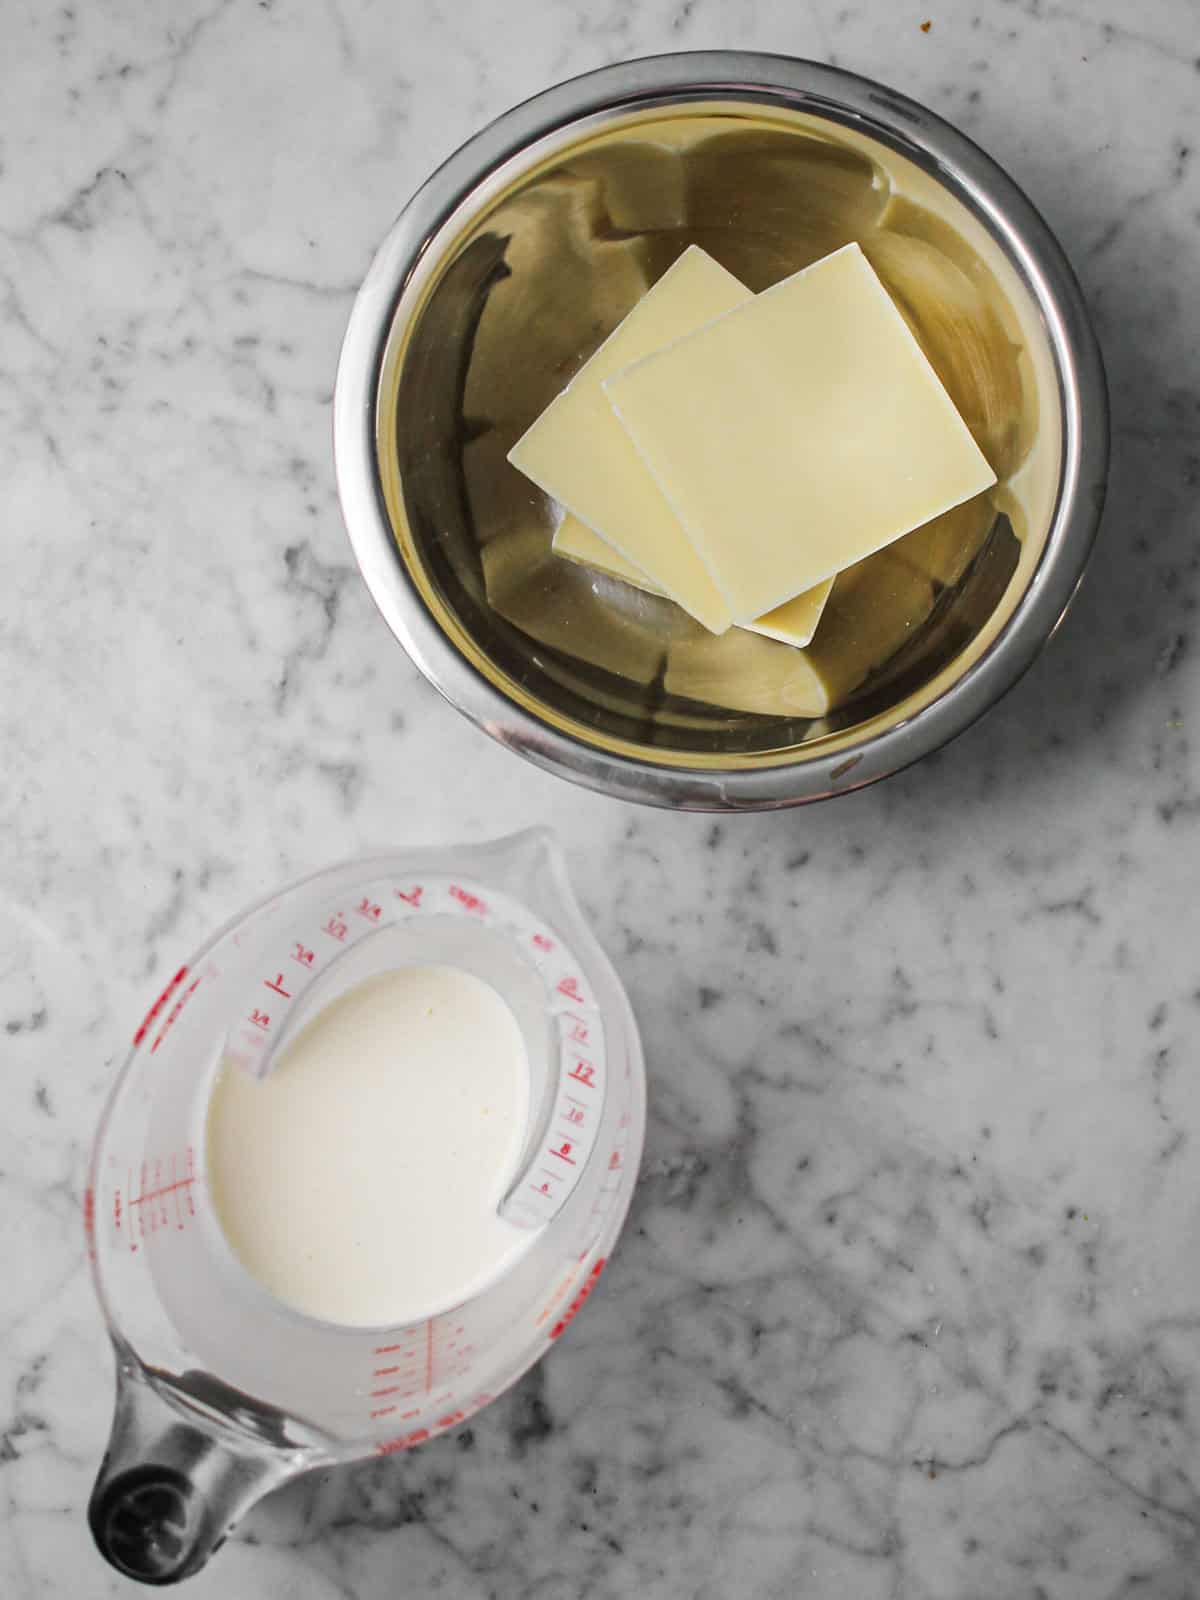
- Heavy whipping cream – You'll warm and use the cream to melt the chocolate.
💡 Tip for Working with Mascarpone
Mascarpone has a tendency to split when mixed with other ingredients that are a different temperature. If your mascarpone is very cold and your cream is at room temperature (or vice versa), the mixture could break. For this recipe, I work with cold mascarpone and cold heavy cream to ensure they combine smoothly. Chill your mixer bowl in the refrigerator for about 15 minutes before you start the filling.
📖 Making the Crust
This cheesecake uses my no-bake Biscoff pie crust: ground Biscoff cookies, melted butter, brown sugar, and a pinch of salt, pressed into a 9-inch springform pan lined with parchment paper. Head to that post for the full step-by-step instructions.
While the crust chills, place your stand mixer bowl in the refrigerator (or add ice to the bowl for a quick chill); you'll want it cold for the filling.
Tip: If your food processor is small, work in two to three batches to grind the cookies for your crust.
📝 Step-by-Step Instructions for the Lemon Mascarpone Cheesecake Filling
Prepare the bowl. Retrieve your chilled mixer bowl from the refrigerator, or empty out the ice and dry the bowl completely.
Beat the mascarpone mixture. Add the cold mascarpone cheese, cold heavy cream, powdered sugar, and vanilla extract to the bowl. Beat on low speed for 1 minute to incorporate, then increase to medium-high speed for 2 minutes.
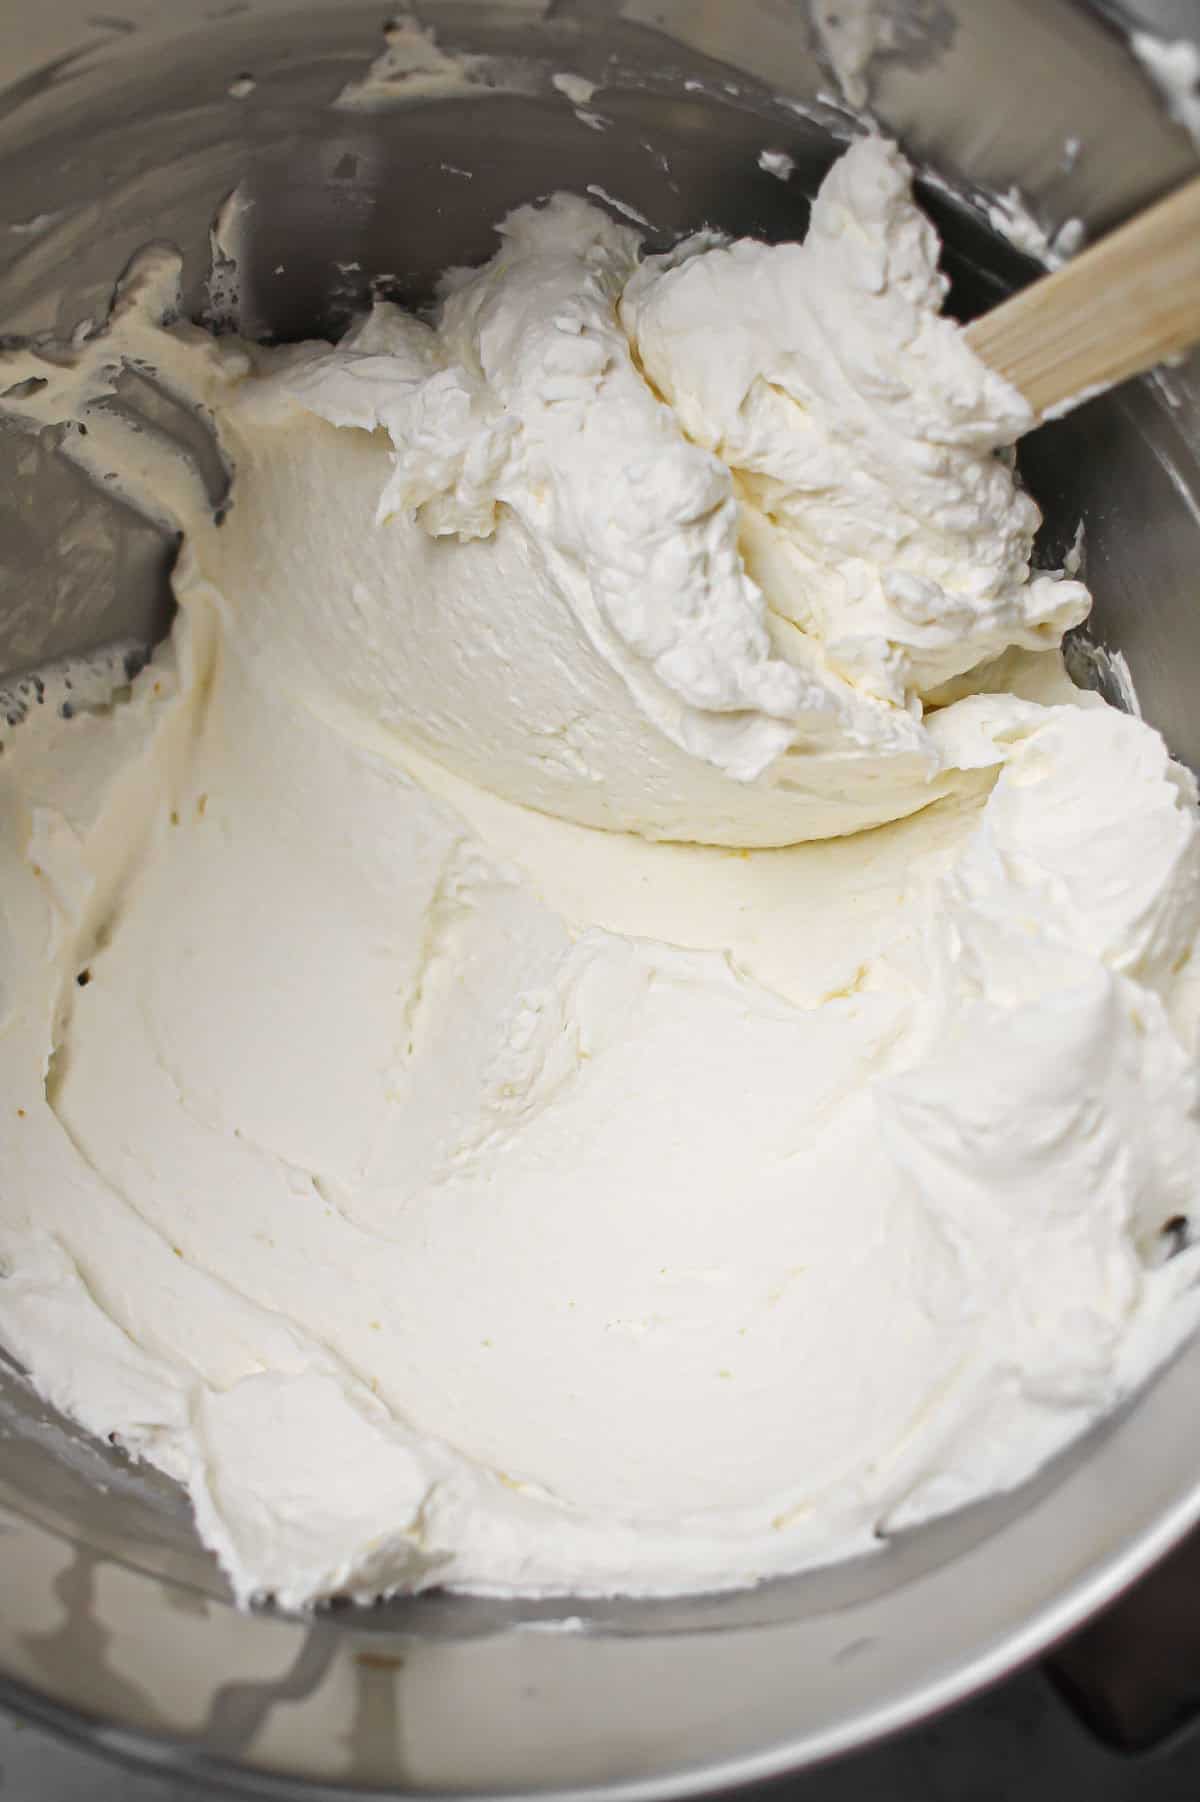
Add lemon juice and zest. Pour in the fresh lemon juice and lemon zest. Beat on medium-high speed for another 30 seconds to 1 minute, until the mixture is thick and holds its shape. It should look smooth and billowy, similar to a thick whipped cream.
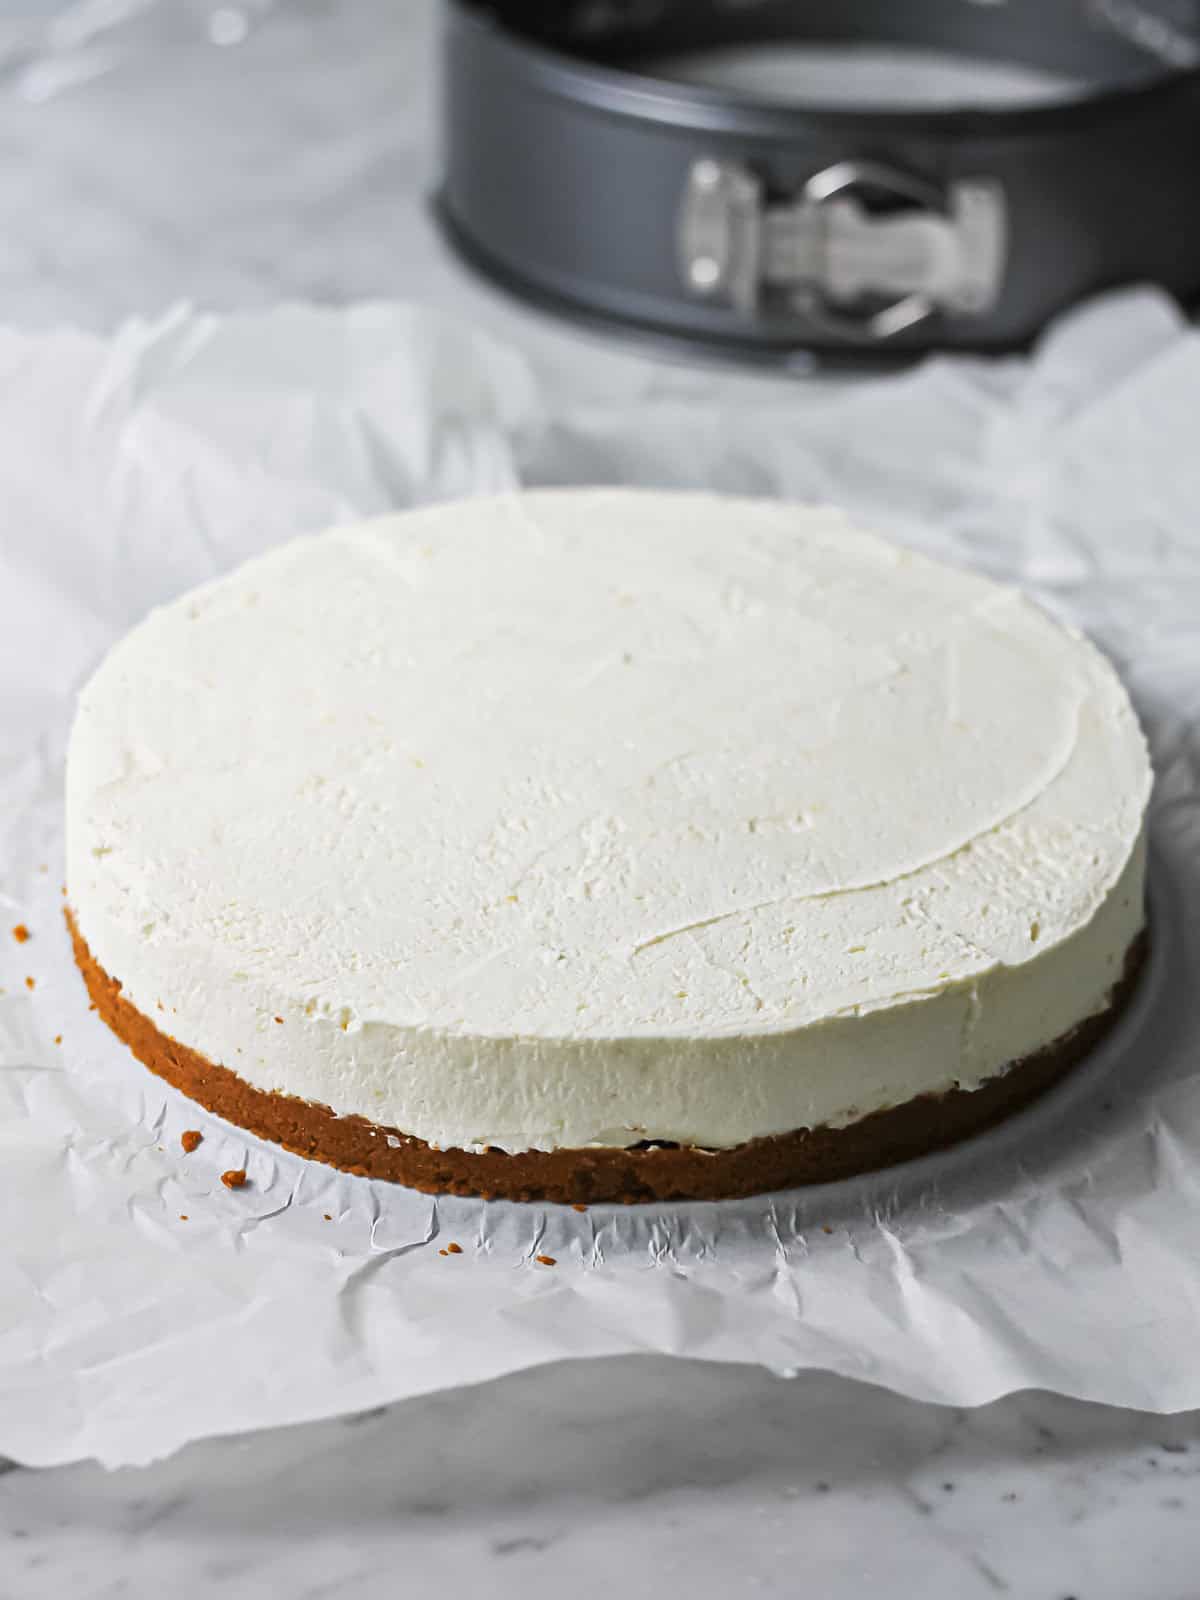
Fill the crust. Spread the lemon cheesecake filling evenly into the prepared Biscoff crust, smoothing the top with an offset spatula.
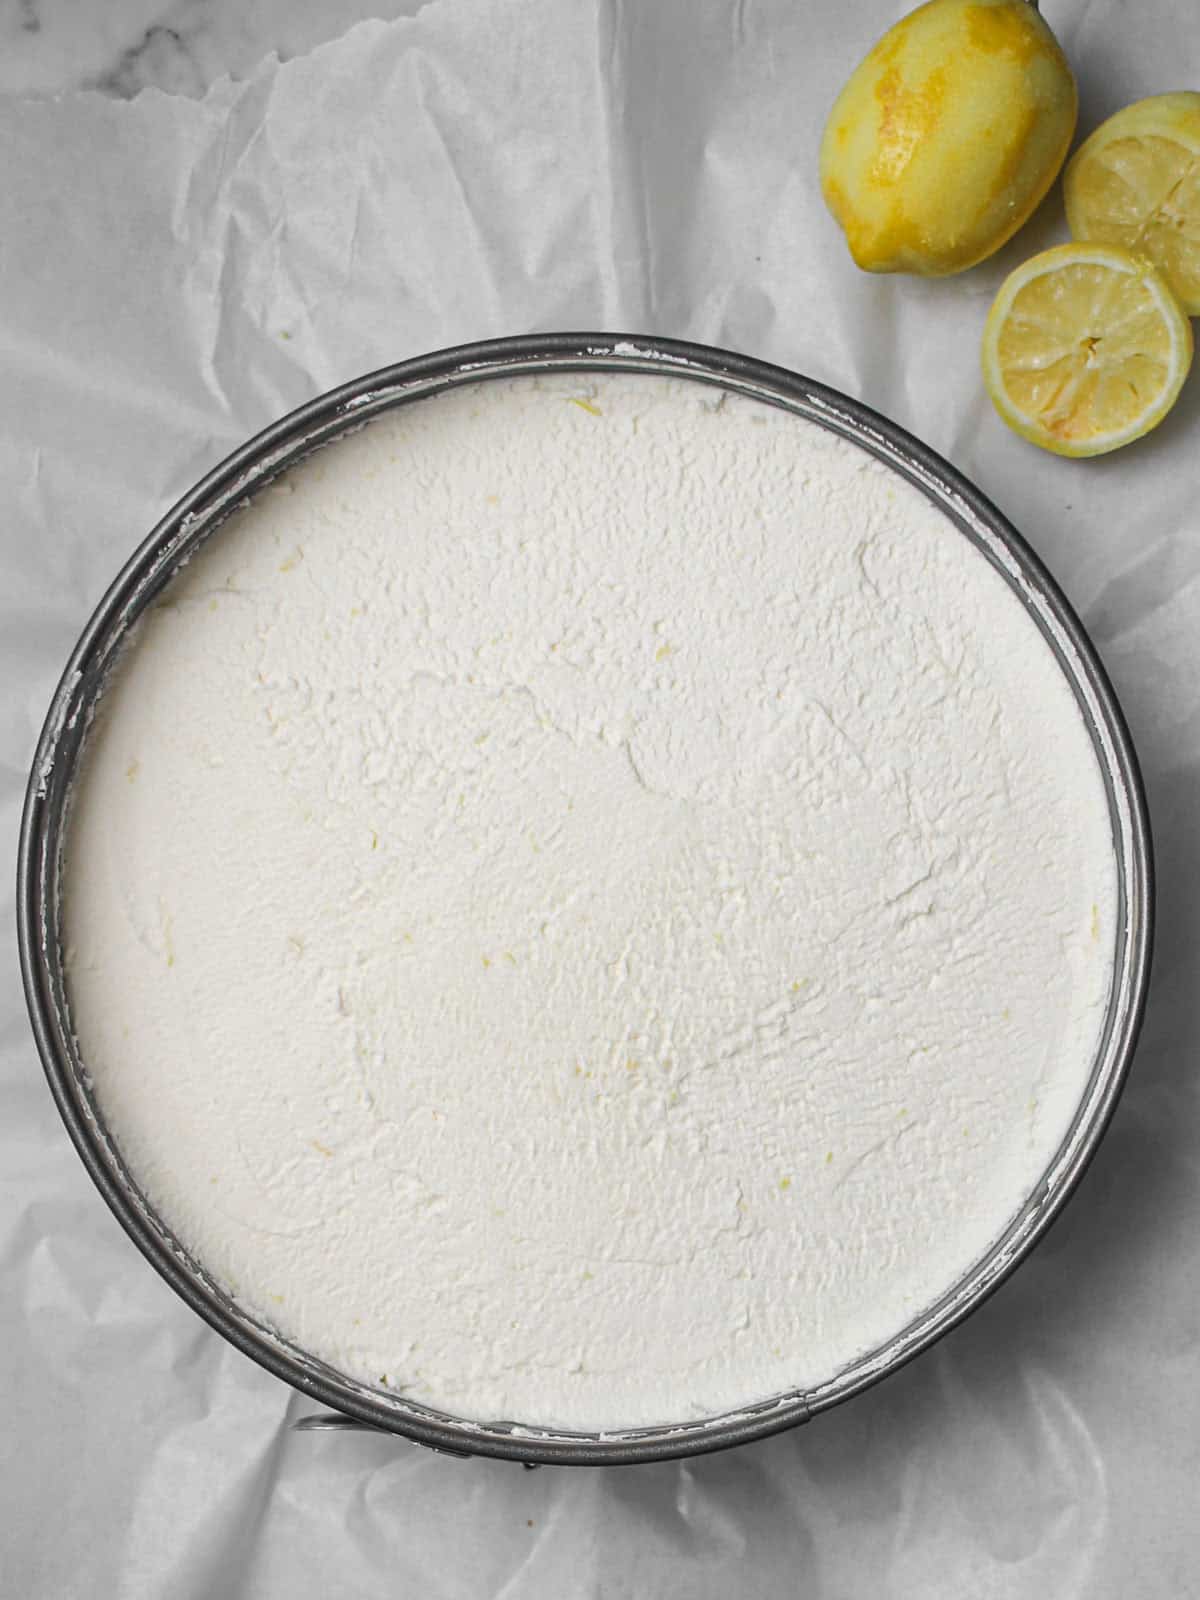
Chill to set. Cover the top with plastic wrap (this keeps your cheesecake from picking up other odors in your refrigerator) and refrigerate for at least 4 hours, or until firm. For best results, chill overnight. You'll add the whipped white chocolate ganache topping once the cheesecake is fully set.
🍫 How to Make Whipped White Chocolate Ganache
This ganache is great because it uses just two ingredients! But the flavor and end result create a silky, fluffy top layer of the cheesecake that complements the tangy filling below.
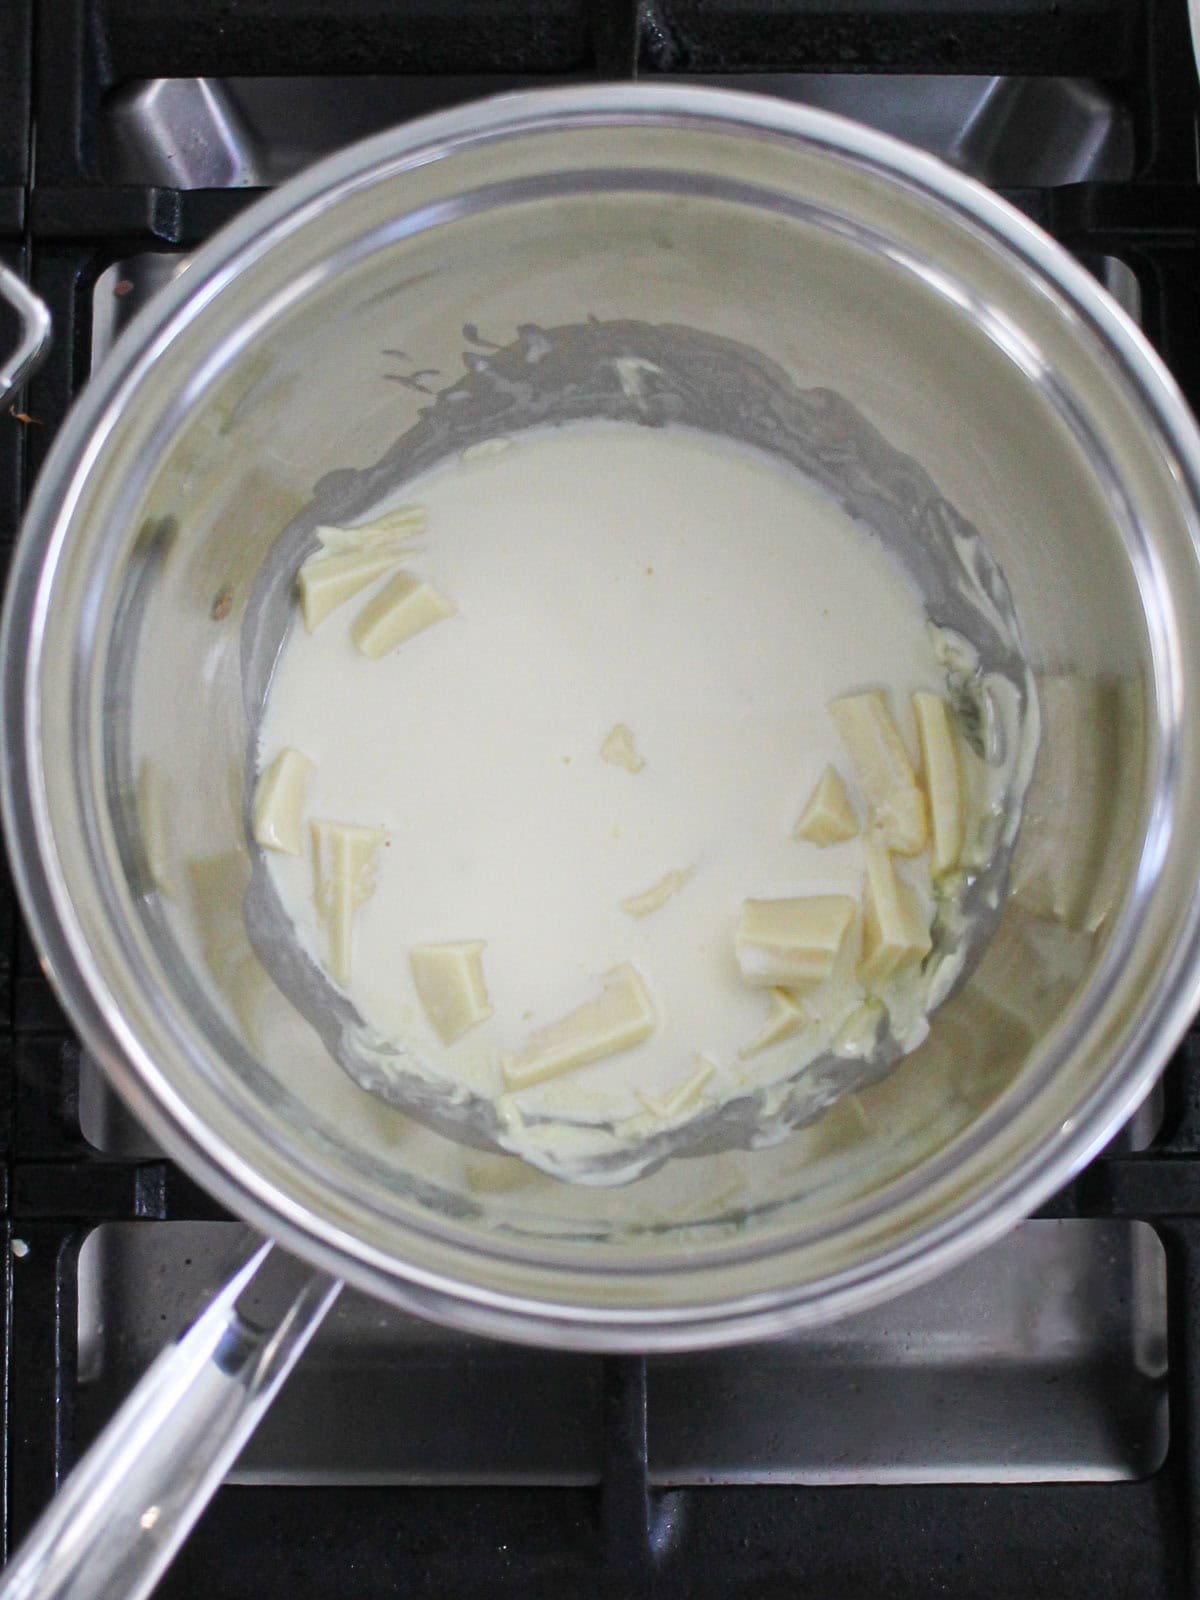
Chop the white chocolate. Finely chop your white chocolate into small, even pieces. This helps it melt smoothly and evenly when the warm cream hits it. If you're using white chocolate chips, you can skip this step. That said, bars tend to yield a smoother ganache.
Create a double boiler. Using a small saucepan, heat pot filled with two inches of water until it just reaches a simmer. Set a heat-safe bowl over the pot, adding all of your cream and chocolate to it. Gently whisk the mixture until completely smooth and no lumps remain.
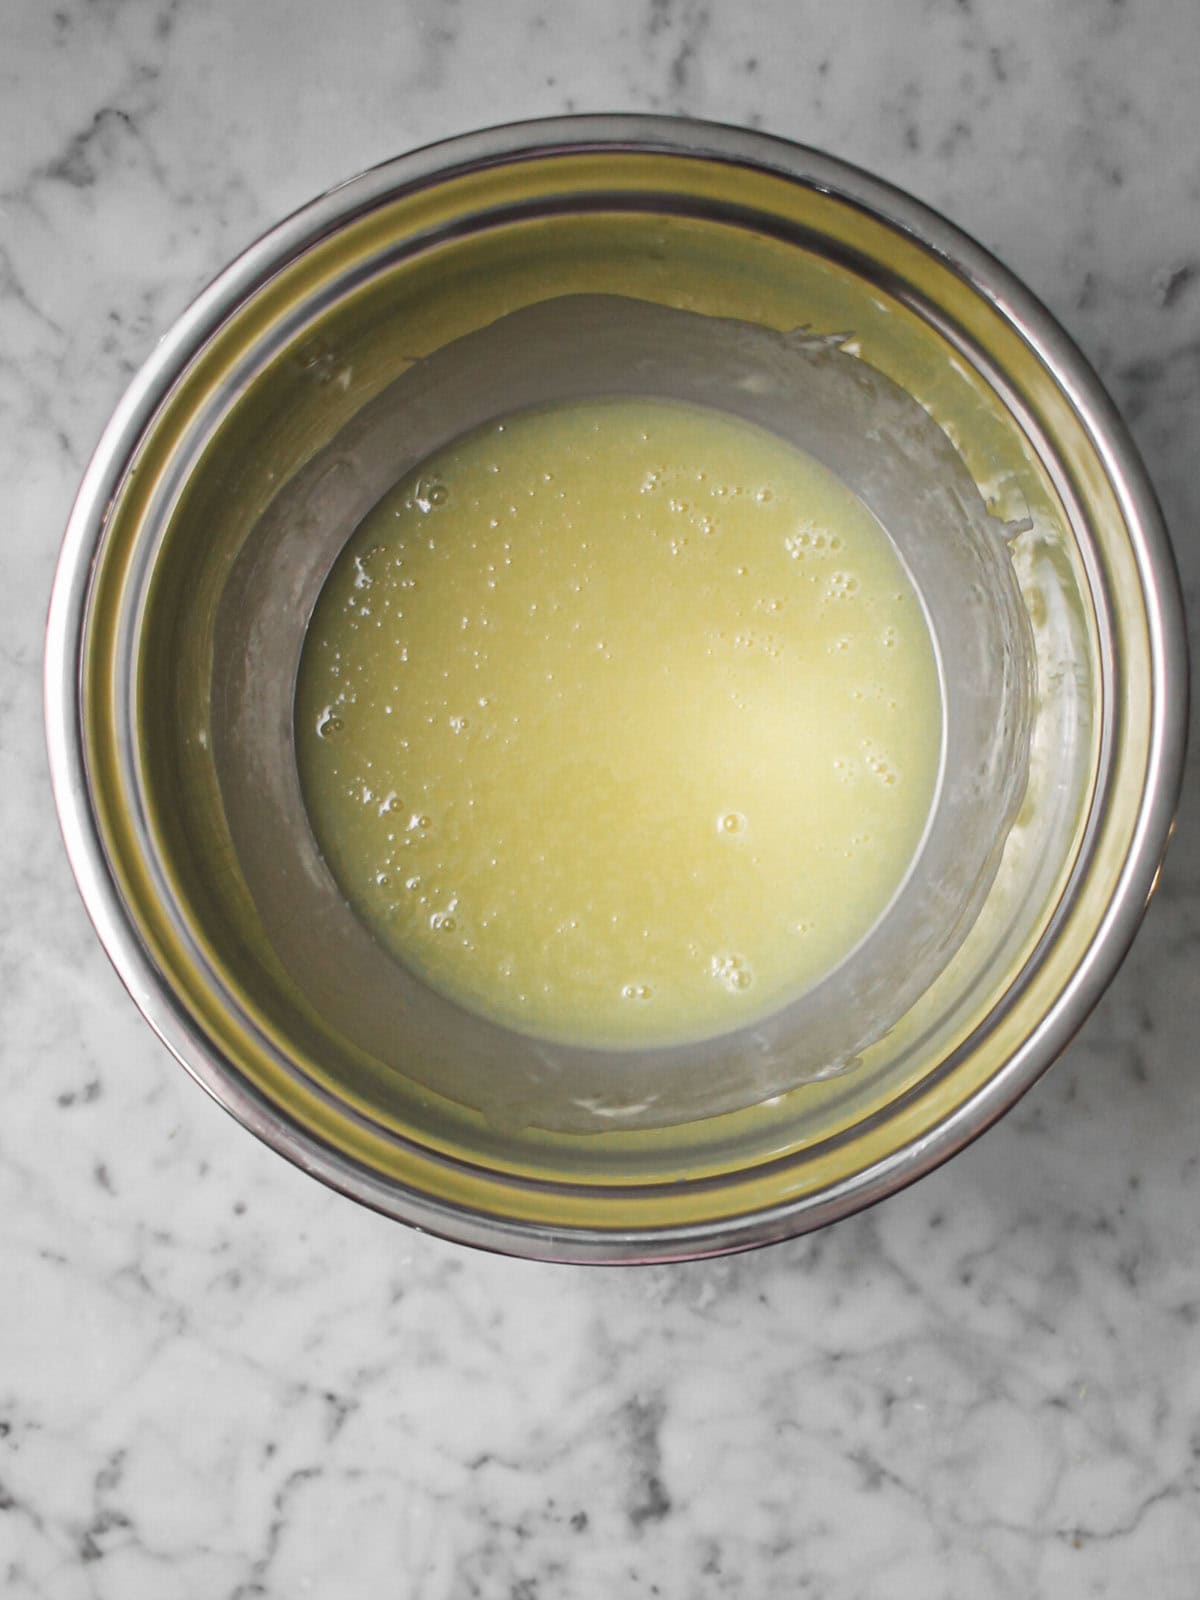
Chill ganache. Carefully remove bowl from pot (it will be hot!), and let it cool 10 or so minutes. Once cooled, press a piece of plastic wrap directly onto the surface of the ganache (this prevents a skin from forming). Refrigerate for at least 2 hours, or overnight. The ganache needs to be completely cold before you whip it.
⚠️ Don't Skip Chilling Ganache
Your ganache will not hold its shape if you whip it before it's fully chilled!
The mixture needs to be cold all the way through, not just cool to the touch. If it's still warm in the center, it won't whip up properly and may stay runny.
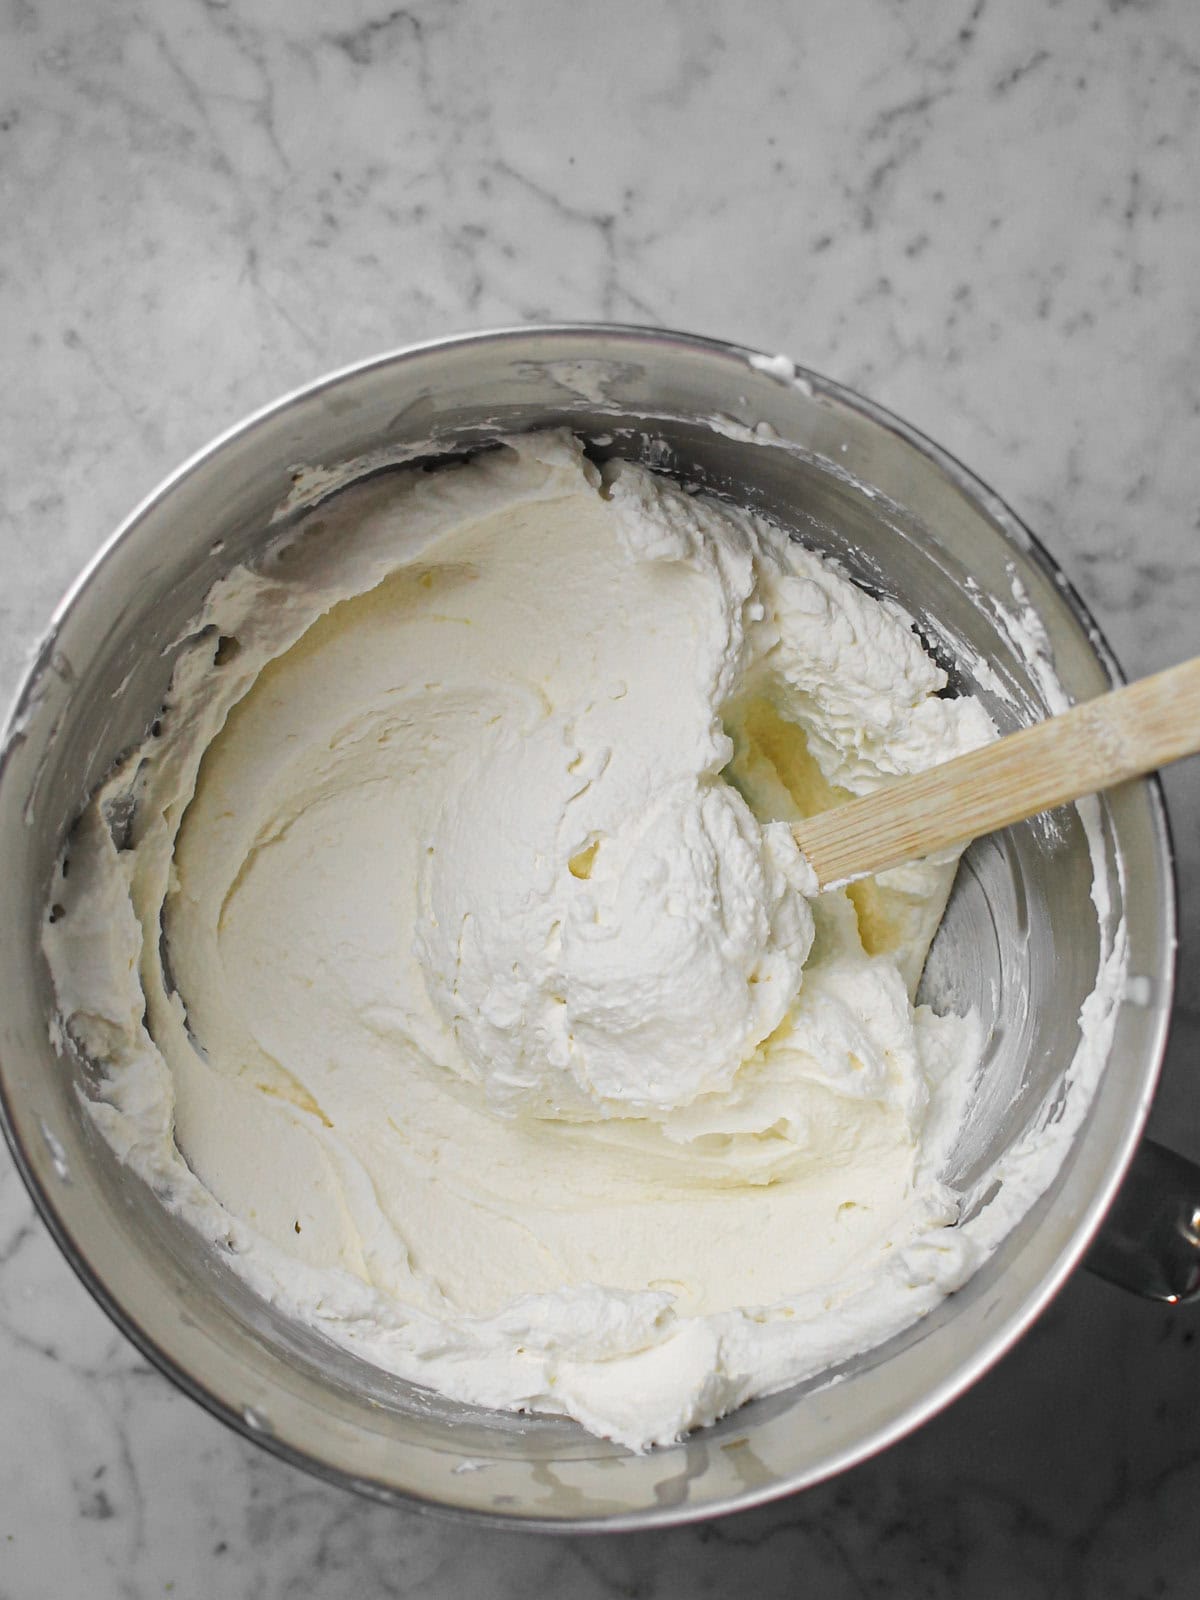
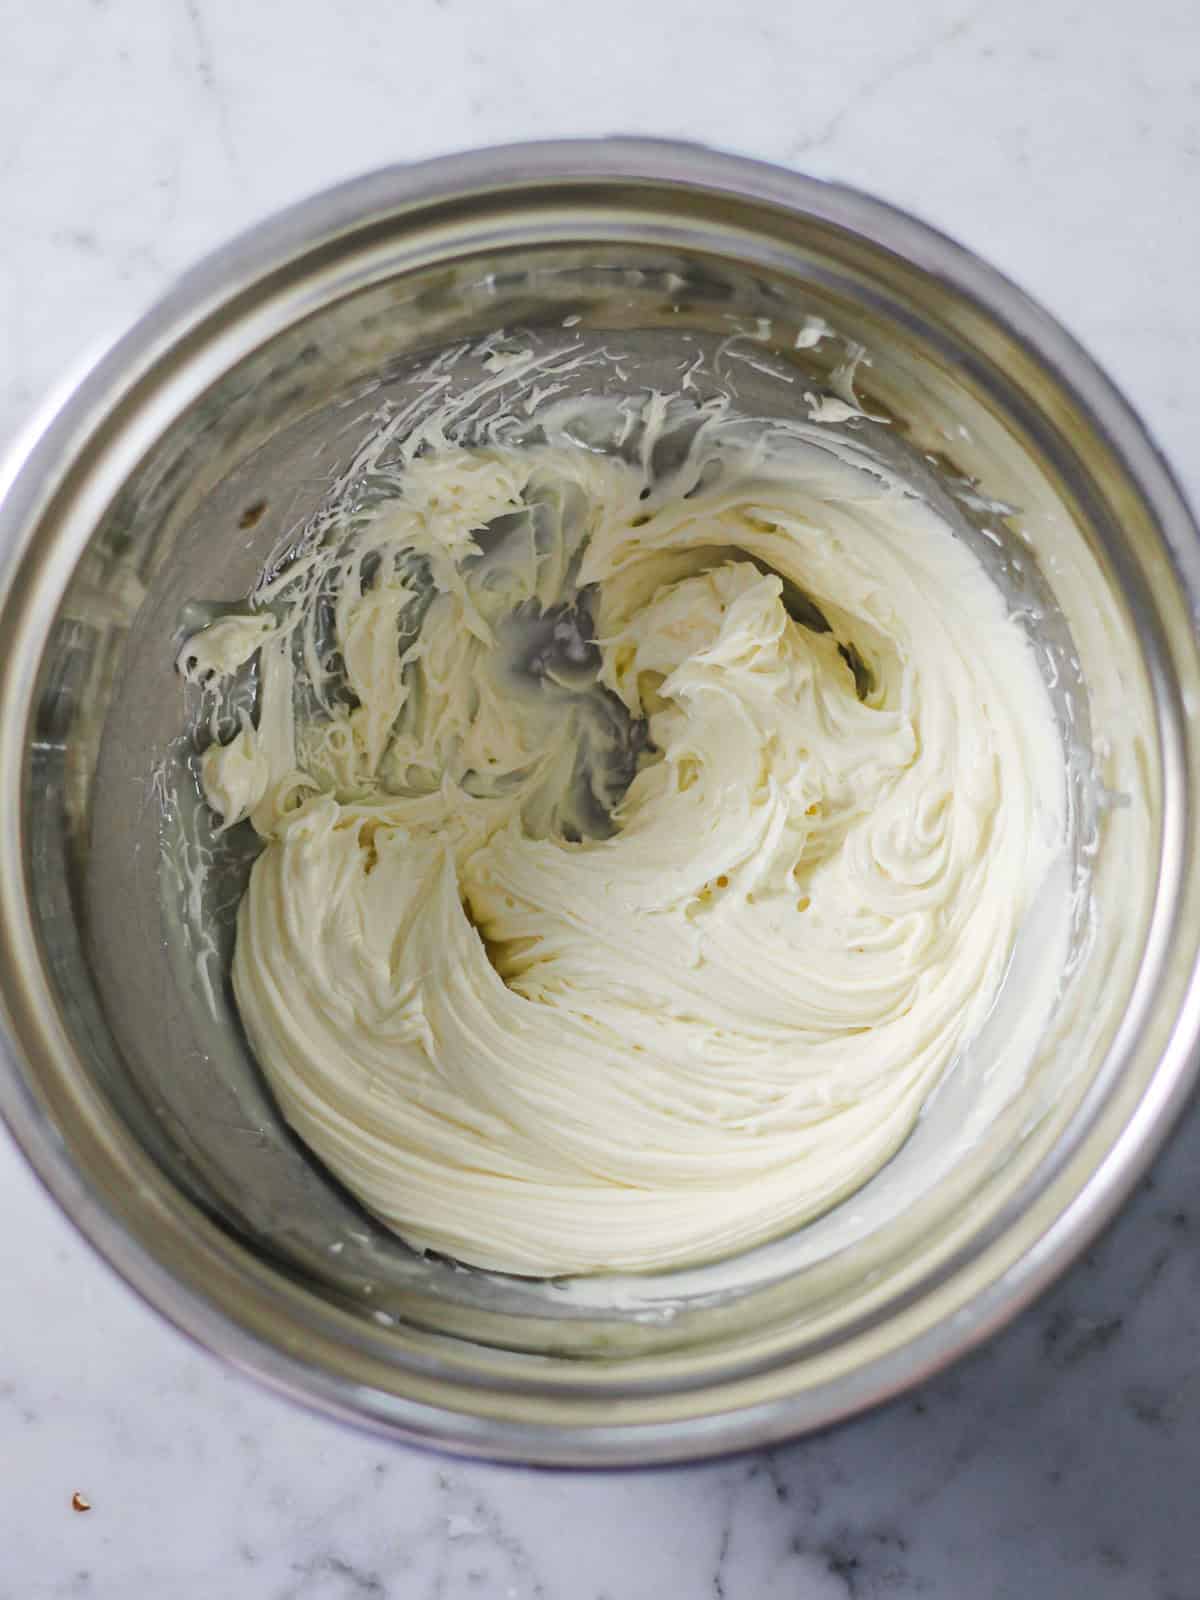
Whip the ganache. Using an electric mixer with the whisk attachment, beat the chilled ganache on medium-high speed for about 1 minute. You'll see it start to thicken. Stop when you see you have a consistency that's fluffy and spreadable, like a thickened whipped cream that holds its shape.
💡 How to Fix Grainy Whipped Ganache
If your whipped white chocolate ganache looks grainy or curdled, it's likely been over-whipped.
However, you may be able to salvage it; try warming a tablespoon or two of cream and whisk it into the mixture by hand. Sometimes this will revive a broken ganache. For next time, whip the ganache on a lower setting and switch to hand-whisking as soon as it starts to thicken.
🎂 Assembling the Cheesecake
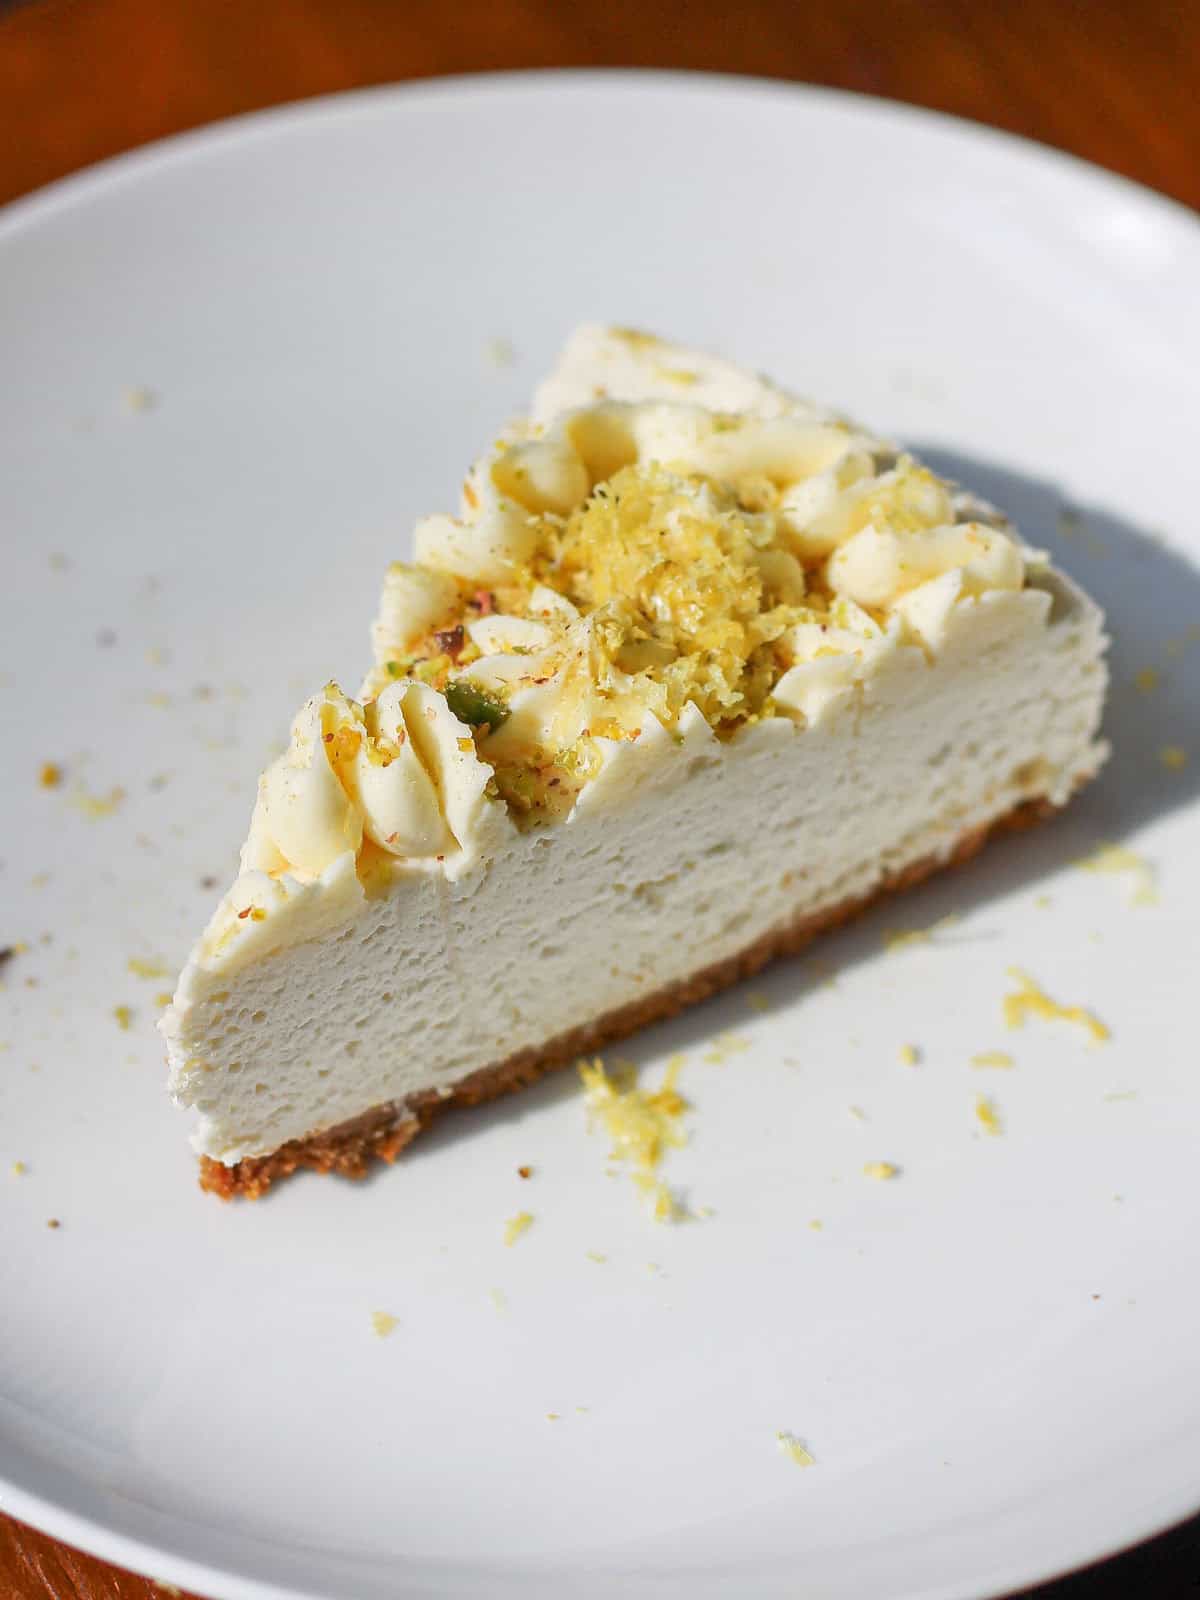
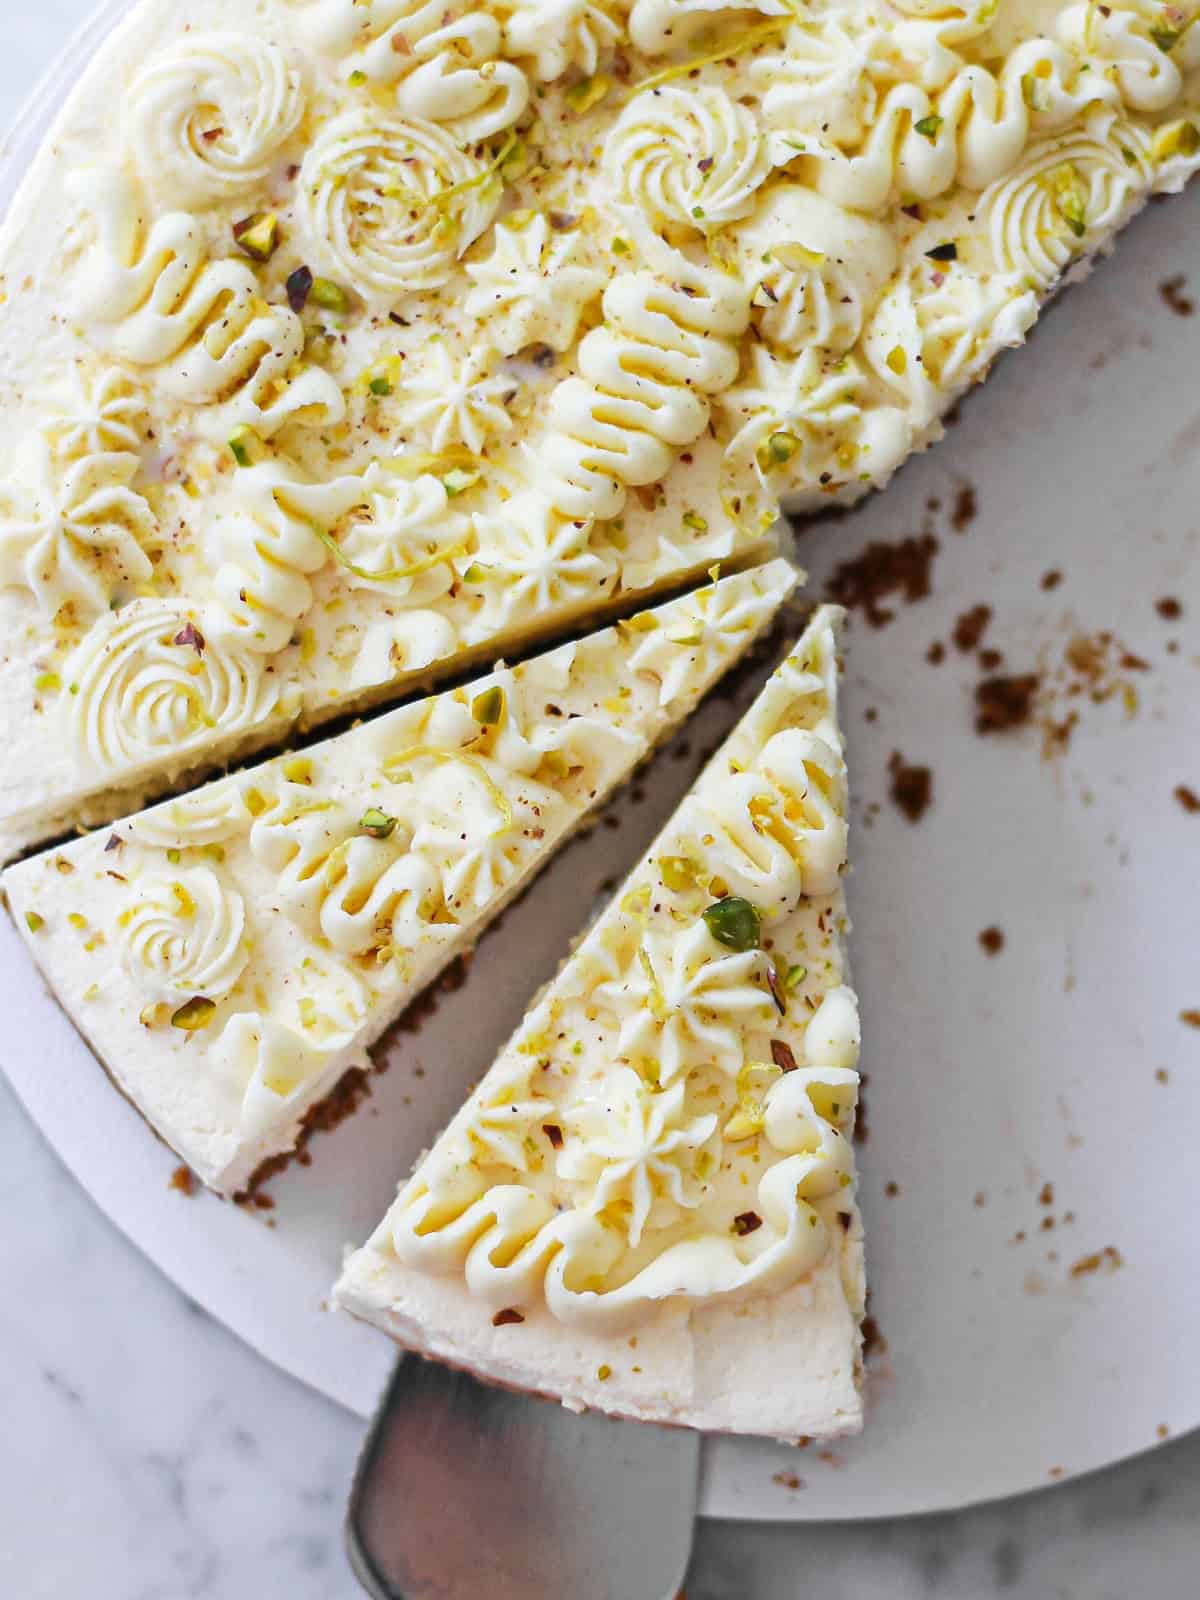
Release from the pan. Once your cheesecake has fully set (at least 4 hours, ideally overnight), remove it from the refrigerator. Gently run a thin knife (like a butter knife) or offset spatula around the edge of the springform pan before unclipping the sides. The parchment paper underneath will help you transfer it to a serving plate if needed.
Spread the ganache. Spread or pipe the whipped white chocolate ganache evenly over the top of the lemon filling.
Garnish. I like simple garnishes that hint at the flavor inside a dessert or add something unique and different. I used some lemon zest, as well as finely ground pistachio for some texture on top and a nutty flavor to accompany the lemon. You could use thin lemon slices, a few fresh berries, or a different nut of your choice, to name a few options.
⭐️ Tips for Success
- Use a springform pan: A 9-inch springform pan lets you cleanly release the cheesecake without destroying the crust or filling. Line the bottom with parchment paper for even easier removal.
- Fresh lemons are best: Bottled lemon juice is convenient, but it won't give you the same bright, punchy lemon flavor. Fresh juice and zest make a real difference here.
- This is a great make-ahead dessert: You can make the crust one day, add the filling the next, and top with ganache the day you plan to serve. It actually tastes better after sitting overnight because the flavors have time to meld.
🔄 Flavor Variations
The possibilities are endless if you're looking for ways to personalize this cheesecake to your liking, but below are a few options:
- Lemon-raspberry (or another berry): Gently swirl a few spoonfuls of raspberry jam (or your favorite fruit to enjoy alongside lemon) into the filling before chilling for a marble effect and berry flavor.
- Swap the crust: Graham crackers or vanilla wafers work well if you want a less spiced crust.
- Orange or lime: Swap the lemon juice and zest for orange or lime for a different citrus profile. The white chocolate ganache would still work.
🗄️ Storage Instructions
This cheesecake should be stored in the refrigerator, covered, for up to 5 days. Keep it in an airtight container or cover the top with plastic wrap so it doesn't absorb odors from your fridge.
I don't recommend freezing this cheesecake. The mascarpone filling and whipped white chocolate ganache can both develop unusual textures once frozen and thawed. That said, I have tucked away slices of this cheesecake in the freezer and brought them out and enjoyed them. The texture is not quite as silky, but it is still tasty.
For clean slices, dip a sharp knife in hot water and wipe it dry between each cut. This gives your dessert a more polished look.
❓ FAQ and Troubleshooting
Grainy ganache is often the result of over-whipping. Beating white chocolate for too long or too fast causes the fat to separate.
To avoid this, whip on medium-high speed (not high) for about 1 minute, then switch to whisking by hand until it's fluffy. If it does turn grainy, try warming a tablespoon of cream and gently whisking it in by hand.
The most common culprit is not whipping the mascarpone and cream long enough. The mixture should be thick enough that it holds medium-stiff peaks. Give the cheesecake a full overnight chill before adding the ganache topping.
And in a pinch, you can freeze it to salvage its shape, though the texture will be different.
You can, but bars tend to produce a smoother ganache because they melt more evenly. If using chips, make sure they're real white chocolate (check for cocoa butter in the ingredients, not palm oil).
You can make the crust, filling, and ganache base (before whipping) up to 2 days ahead. Store the unwhipped ganache in the fridge with plastic wrap pressed against the surface. On the day you want to serve, whip the ganache and add it to the set cheesecake. The fully assembled cheesecake will keep in the fridge for around 5 days.
This recipe does not use gelatin.
The whipped heavy cream folded into the mascarpone provides the structure, and the mascarpone itself naturally thickens as it chills. Just make sure you beat the filling long enough and give it at least 4 hours (ideally overnight) in the fridge.
More Dessert Ideas
If you love this recipe, you might also enjoy some of my other no-bake desserts and mascarpone-based treats:
- No-Bake Cheesecake with Mascarpone – The original recipe that inspired this lemon version.
- Chocolate Mascarpone Mousse – Another easy, no-bake mascarpone dessert.
- Mascarpone Cookies – Soft pumpkin cookies made with mascarpone.

No-Bake Lemon Mascarpone Cheesecake with Whipped White Chocolate Ganache
- Total Time: 4 hours 30 minutes
- Yield: 12 slices 1x
Description
This creamy no-bake lemon mascarpone cheesecake is layered on a spiced Biscoff crust and topped with a silky white chocolate ganache. No gelatin or oven needed!
Ingredients
Biscoff Crust
- 2 cups (240 grams) Biscoff cookies (about 30 cookies, finely ground into crumbs)
- 6 tablespoons (85 grams) unsalted butter, melted
- 1 tablespoon brown sugar
- ¾ teaspoon kosher salt
No-Bake Lemon Mascarpone Filling
- 16 oz (2 cups/450 grams) mascarpone cheese, cold
- 1 ½ cups (350 grams) heavy whipping cream, cold
- ¾ cup (95 grams) powdered sugar
- 3 tablespoons fresh lemon juice (from about 1½ large lemons)
- 5 teaspoons lemon zest (from approximately 2 lemons)
- 1 teaspoon pure vanilla extract
Whipped White Chocolate Ganache
- 6 oz (170 grams) good-quality white chocolate, finely chopped (Lindt, Ghirardelli, or Guittard recommended)
- ½ cup (100 grams) heavy whipping cream
- ½ teaspoon vanilla extract or vanilla bean paste
Instructions
Crust
- Place the bowl of your stand mixer in the refrigerator to chill while you prepare the crust.
- In a food processor, combine the Biscoff cookies, brown sugar, salt, and melted butter. Pulse until finely ground and the mixture resembles wet sand. If your processor is small, work in two batches.
- Line the bottom of a 9-inch springform pan with parchment paper. Pour the crumb mixture into the pan and press it evenly across the bottom and slightly up the sides using the bottom of a rounded glass.
- Chill the crust in the refrigerator or freezer while you make the filling.
Lemon Mascarpone Filling
- Retrieve the chilled mixer bowl. Add the cold mascarpone, cold heavy cream, powdered sugar, and vanilla extract. Beat on low speed for 1 minute, then increase to medium-high and beat for 2 minutes.
- Add the fresh lemon juice and lemon zest. Beat on medium-high speed for 30 seconds to 1 minute, until the mixture is thick, smooth, and holds its shape.
- Spread the filling evenly into the prepared Biscoff crust, smoothing the top with an offset spatula.
- Cover top of springform pan with plastic wrap and refrigerate for at least 4 hours, or overnight, until firm.
Whipped White Chocolate Ganache
- Place finely chopped white chocolate and heavy cream in a heat-safe bowl. Using a small saucepan, heat pot filled with two inches of water until it just reaches a simmer. Set your heat-safe bowl over the pot, gently whisking the ganache and cream until completely smooth and no lumps remain.
- Carefully remove bowl from pot (it will be hot!), and let it cool. Once cooled, press plastic wrap directly onto the surface of the ganache and refrigerate for at least 2 hours, or overnight, until completely cold.
- Using an electric mixer with a whisk attachment, beat the chilled ganache on medium-high speed for about 1 minute, until it begins to thicken into a lighter, fluffier texture. Stop mixing once it can hold its shape, and do not over-whip.
Assembly
- Once the cheesecake filling has fully set, spread or pipe the whipped white chocolate ganache evenly over the top. Garnish with thin lemon slices, lemon zest, fresh berries, or a dusting of powdered sugar. Run a thin butter knife around the edge of the pan before releasing the springform sides.
Notes
- Mascarpone temperature tip: Work with cold mascarpone and cold heavy cream to prevent the mixture from splitting. Chill your mixer bowl for 15 minutes before starting the filling.
- White chocolate quality matters: Use real white chocolate containing cocoa butter — not candy melts or chips made with palm oil. This makes a significant difference in the ganache texture.
- Allow enough time to chill the cheesecake: The cheesecake filling needs at least 4 hours (overnight is better) to set before topping. The ganache needs at least 2 hours in the fridge before whipping.
- If ganache turns grainy: It's likely over-whipped. Try gently warming 1–2 tablespoons of cream and whisking it in by hand to bring it back together.
- Storage: Keep covered in the refrigerator for up to 5 days. Not recommended for freezing — mascarpone and whipped ganache can develop unusual textures once frozen and thawed.
- Make-ahead friendly: Prepare the crust and filling up to 2 days ahead. Make the ganache base (before whipping) up to 2 days ahead. Whip the ganache and assemble on the day you plan to serve.
- For clean slices: Dip a sharp knife in hot water and wipe dry between each cut.
- Prep Time: 30 minutes
- Chill time: 4 hours minimum (overnight recommended)
- Category: Dessert
- Method: No-Bake
- Cuisine: American
Nutrition
- Serving Size: 1 slice
- Calories: 553 kcal
- Sugar: 27 g
- Sodium: 239 mg
- Fat: 45 g
- Saturated Fat: 28 g
- Carbohydrates: 34 g
- Fiber: 0 g
- Protein: 4 g
- Cholesterol: 107 mg
Leave a Reply