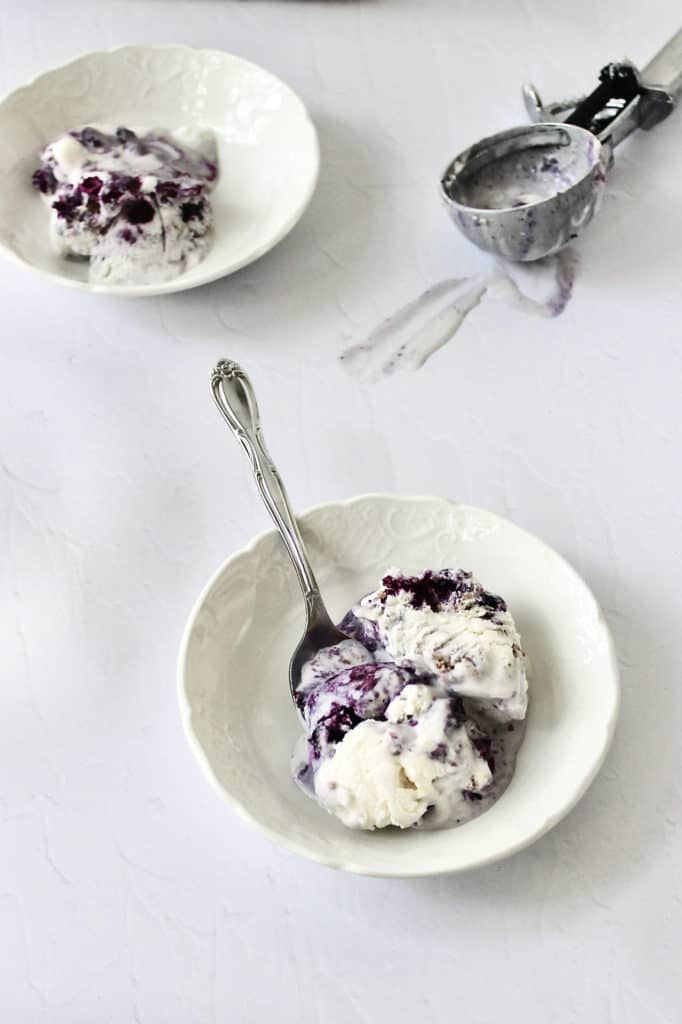
I've been really enjoying dreaming up new ice cream flavors lately. Summer is in full swing, and I'm ready to combat the heat with an ever-satisfying bowl of ice cream. This easy blueberry crisp ice cream hits on the perfect flavors of summer. Plus the ease of a no churn ice cream makes it even more irresistible!
The main ingredients in the no churn ice creams I make are cream (either heavy cream or heavy whipping cream) and sweetened condensed milk. From there, the possibilities are truly endless!
The Story Behind this Blueberry Crisp Ice Cream
I created this blueberry ice cream on a visit home to my parents. When I asked my dad for a flavor he'd like me to try, he didn't hesitate before selecting blueberry. I was a little surprised; my dad is a chocolate lover! But he started fondly recalling the taste of blueberry ice cream from his childhood. I could tell we had a winning flavor.
For me, ice cream is about flavor almost as much as it is texture. While a perfectly smooth ice cream is yummy, I couldn't resist pairing this blueberry ice cream with an oat crisp for a little extra something.
I also love adding oats to my desserts. Whether they're in chocolate chip cookies or added to the top of a plum crumble, I'll try and sneak them in wherever I can! They add something between a crunch and a chewiness to this ice cream that it otherwise wouldn't have.
If you're a smooth ice cream person, though, you can absolute omit the crisp/crumble. But I recommend giving it a shot before you pass it up!
Whether you include the crumble topping or not, this homemade blueberry ice cream and crumble is incredibly easy to make! With only 10 ingredients, it's a breeze to make and will have your kitchen smelling like blueberries. While you do cook down your blueberries over the stove, I promise that your time in front of the oven will be brief. If you're anything like me, the less time I spend in a hot kitchen in the summer, the better.
How to Make This Easy Blueberry Crumble Ice Cream
With ingredients that you can count on just two hands, this recipe comes together in about half an hour. The toughest part is the long wait once your ice cream goes into the freezer and is firm enough to eat!
Start by placing blueberries (I added frozen ones straight from the freezer, but fresh would work, too), sugar, and lemon juice to a small pot without a lid. Bring to a boil and continue cooking for about 6-8 more minutes.
Once the berries have thickened into more of a sauce-like consistency, set them in the freezer or refrigerator in a small heat-proof bowl to cool.

Next, pulse oats in a food processor or blender until powdery. Pour them into a small mixing bowl, OR in the food processor directly, add your sugar, cinnamon, and melted butter. I poured my oat flour into a measuring cup to combine everything with a spoon. Set aside.


Next, beat your cream on medium high until peaks form (about 2 minutes). Do not over-mix, or your cream will taste like butter!

In a separate bowl, whisk by hand your vanilla extract and sweetened condensed milk. Combine until completely smooth, 30-60 seconds.

In the container you're using to store your ice cream, fold whipped cream into sweetened condensed milk with a spatula.

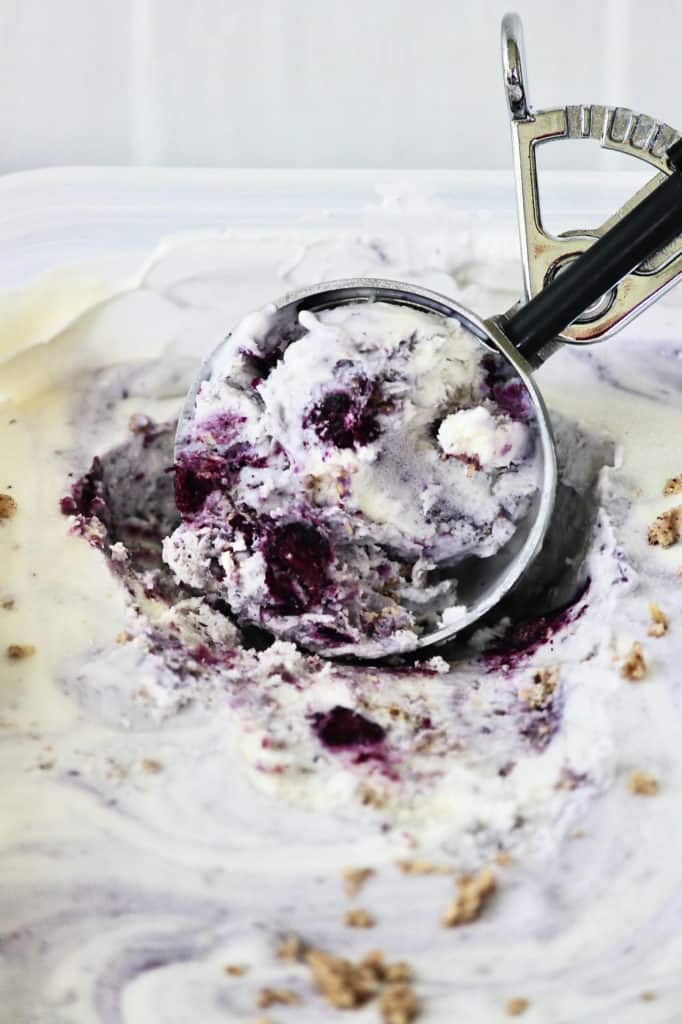
Lastly, carefully fold blueberries and oat crumble into your batter. Your blueberries should be cool to the touch by this point. Fold only 4-5 times so that you still get distinct, deep purple swirls throughout your ice cream. Over-mixing results in a blue ice cream mixture.


Freeze for at least 5-7 hours in the back of your freezer, then serve. I usually make my ice cream the day before I plan to eat it so it has plenty of time to set up.

Tips for Homemade Ice Cream Success
Homemade ice cream is easy, but to ensure your success, I've highlighted a few pointers below that have helped me create smooth, creamy, dreamy ice cream every time.
Make Room for Your Blueberry Crisp Ice Cream in the Back of Your Freezer
Before you start this ice cream recipe, make sure you'll have the freezer space for storage when you're done. You'll want to put it there as soon as soon as you're done so it can firm up and get ready for you to eat it!
And within the freezer, your ice cream will fare best toward the back of your freezer. This ensures that it'll remain as cold as possible. Warm air that enters the freezer when you open and close it won't bother your ice cream as much if it's further from the door.

Don't Over-whip your Heavy Cream or Heavy Whipping Cream!
One of the only ways you can mess up this recipe is to over-whip your heavy cream or heavy whipping cream. Mixing it just a bit too long in your stand or hand mixer can actually turn it to butter! That's great for butter and all, but unless that's a flavor you're trying to recreate in your ice cream, you'll want to be sure that this doesn't happen.
Chill Your Bowl
Heavy cream will come together best if your bowl is cold. Placing it in the freezer for even 15 minutes before you make your ice cream will save you time. It also lessens your chance of over-whipping. I just put my mixing bowl in the freezer when I started this recipe. By the time I was ready to whip the cream, it was chilled.
Alternatively, if you don't have enough space in your freezer, you can leave the bowl in your refrigerator for half an hour or so.
Chill Your Beaters or Whisk Attachment
While you're placing your bowl in the freezer or refrigerator, go ahead and put your beaters or whisk attachment with it. This is one more step you can take to help your whipped cream come together more quickly.
Store Your Ice Cream in a Long, Flat Container
I like freezing my ice cream in long containers with a lid. This kind of container slides into my freezer easily. This also spreads the ice cream out, making it firm up a bit more readily than it would in a tall, cylindrical sort of container. I have also used these adorable mini ice cream containers from Tovolo, and they work well. The best option for you may come down to what fits best in the freezer with the space you have available.
Shut Your Lid
Okay, I just wanted your attention and didn't want that to seem rude. BUT you should absolutely use a container with a lid and shut it tight! If that's not available to you, firmly wrap your container in plastic wrap to prevent ice crystals from forming.
Now go make that blueberry crisp ice cream!

Easy Blueberry Crisp Ice Cream (No Churn)
- Total Time: 7 hours
- Yield: 12 servings (6 cups total) 1x
Description
What's not to love about an easy recipe for homemade ice cream? This one features rich swirls thanks to blueberries and a comforting texture from an oat crumble spread throughout.
Ingredients
Blueberries:
- 1.5 cups (280 grams) cups frozen blueberries
- 2 tablespoons granulated sugar
- 1 tablespoon lemon juice
Crumble
- ⅔ cup oat flour (grind approximately ¾ cup of oats)
- 2 Tablespoons granulated sugar
- ½ teaspoon ground cinnamon
- 3 Tablespoons unsalted butter, melted
- Pinch of salt
Ice Cream
- 2 cups (480ml) heavy cream
- 14 ounce (396g) can full-fat sweetened condensed milk
- 1 teaspoon pure vanilla extract
Instructions
- Prepare your blueberries: Add blueberries, sugar, and lemon juice to a medium sized pot and bring to boil over medium high heat. Continue to boil for 6-10 additional minutes. By the end, your berries will have slightly more of a sauce-like consistency.
- Pour hot berry mixture into a heat proof bowl, and place in the freezer to cool down as you proceed with the rest of the recipe.
- Make your crumble: In a food processor or blender, combine and pulse your oats into a powder-like consistency. You can next add your sugar, cinnamon, melted butter, and pinch of salt to your processor and pulse until the contents look like dark, wet sand. Alternatively, you can mix it all together in a small bowl. Either way, once mixed, set aside.
- Create the Ice Cream: In a chilled bowl with cold beaters or whisk attachment, beat your heavy cream on medium high until peaks form (approximately 2-3 minutes). Do not over-mix, or your cream will taste like butter!
- In a separate bowl, whisk by hand your vanilla extract and sweetened condensed milk. Combine until completely smooth, 30-60 seconds before pouring into container you're using to freeze your ice cream.
- Fold your whipped cream into the sweetened condensed milk with a spatula.
- Carefully fold blueberries and oat crumble into your batter. Fold 4-5 times so that you still get distinct, deep purple swirls throughout your ice cream.
- Prep Time: 30
- Time to Chill Mixing Bowl and Whisk: 30


Melinda
I have always been a fan of no-churn ice cream recipes and this one just topped my list! The blueberry crisp added a delightful crunch and the flavor was out of this world. I love how easy the recipe is, yet the result is so indulgent. It’s the perfect treat for a sunny afternoon. Thank you for sharing this, Susan
Susan
I'm so glad you liked it! Appreciate the nice comment!