Description
Looking for an easy Christmas cake-decorating idea? The design for this Christmas tree farm cake comes together in under 30 minutes!
Ingredients
Scale
Equipment:
- Food-safe brushes for cake decorating
- 3 small mixing bowls
- Toothpick for tracing design
- Optional but helpful: A cake turntable as well as disposable or reusable cake circles
Ingredients for painted design:
- 1 cake, covered in white frosting
- 1-2 drops of green food gel
- 1-2 drops of red food gel
- 1-2 drops of black food gel
- 1 1/2 tsp of clear extract (like almond extract, imitation vanilla, or another clear extract of your choosing), divided into thirds
- 3 tsp of powdered sugar, divided into thirds
Trees on top of cake:
- Piping bag fitted with an open star piping tip
- 4 tbsp of white frosting (or more for larger trees)
- A few drops of green food gel
- Edible glitter for dusting on top
Instructions
- To create the painted design, pour your red, green, and black food gels into three separate mixing bowls or small containers like mugs.
- Add 1 tsp of powdered sugar and 1/2 tsp of clear extract to each of these bowls. Combine all ingredients together in your three respective bowls with the food safe paintbrush you plan to use for each of the colors. Add more powdered sugar or extract to each bowl as needed to achieve a paste-like consistency.
- Set your frosted cake on a cake stand or turntable, ideally with a cardboard or reusable cake circle underneath it.
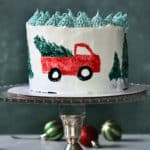
- Using a toothpick, draw the outline of a truck on your cake. The lines will not be visible once you paint in all the details.
- Fill in the truck’s design with your red “paint,” and draw the tires with your black food gel mixture.
- Use your green food gel mixture to create a few trees surrounding your truck and peeking out of the bed of it. To make the trees like mine, gently make repeated small strokes of paint on the cake in triangular shapes of the Christmas trees. Think of it as sponge painting with a paintbrush.
- To decorate the top of the cake with a ring of trees, dye your white frosting green (you could mix it in the small container you used with the remnants of green food gel), and put it inside your piping bag fitted with an open star tip.
- Press your piping tip to the rim of the top of your cake, and make a tree by pressing your piping bag down, releasing as you pull it up, and repeating this motion three times to make each tier of the tree.
- Repeat that same motion around the edge of the top until it’s covered with small trees.
- Add edible glitter for snowy vibes. Enjoy!
Notes
The cake I decorated here was a 6" cake with two thick layers. You will likely need to increase your frosting as you increase the size of your cake. Here's one guide for frosting ratios, but know that you will need minimal, if any, increases to your food gel mixtures if you're only increasing your cake by a few inches. A little goes a long way with mixing food gels, powdered sugar (or a sugar-free frosting alternative), and extracts! You can stretch those far for making a painted cake design.
- Prep Time: 5 minutes
- Category: Dessert